- REVIEWS
Camera Reviews 
More Reviews Mobile Reviews Photography Reviews - GALLERIES
- VIDEOS
- BUYER'S GUIDES
Digital Gear; Lens Filters; Do They Have A Place In Digital Photography?
One of the easiest ways to improve your images is to use lens filters, but like so much in the photo world, life is rarely that simple. That’s because photographers seem to be of two minds about using filters: Some purists don’t like them because they abhor anything coming between reality and the captured image. True filter fans worry less about resolution charts and just like to have fun with their photography. If that’s you, read on…
Filters For Digital Photography
When working under difficult environmental conditions, such as blowing dust or sand, a Skylight or UV filter can protect the front element of your expensive lens from possible damage. Even the most expensive filter is less expensive than a new lens! If your camera lacks Shady or Cloudy White Balance settings, a Skylight filter also absorbs UV light and provides a slight warming when shooting outdoors in the shade or on overcast days.
 |
|
|
 |
|
|
Haze (UV) filters are designed to reduce the blue haze caused by ultraviolet light. A good quality Skylight filter will absorb 45.5 percent of the UV light present, but a Haze filters provides 71 percent absorption. Photographers who live at high altitudes or shoot marine scenes might prefer to use a Haze 2 filter that will absorb virtually all UV light. If UV filtering is not desired, you might try a Protection filter to do exactly what its name implies, or a Digital filter, which cuts all UV and IR. The other “must have” filters for your camera bag are the graduated neutral density, neutral density, and polarizing filters. If you’re experimentally inclined, you might consider an opaque Infrared filter for capturing images in the invisible near-IR spectrum.
A Polarizer can deepen the intensity of blue skies, as well as reduce or eliminate glare from non-metallic objects. Many manufacturers offer Warm Polarizers, including Hoya’s (www.thkphoto.com) Moose filter, named for nature photographer Moose Peterson, which combines a polarizing filter and a warming filter. Polarizers are available in either traditional linear or circular versions. Take the time to read your camera’s manual to find out what kind you need for your SLR and purchase the proper one.
 |
|
|
 |
|
|
If you want to get the ethereal effect of blurring while photographing moving water and can’t select a slow enough ISO speed, Neutral Density (ND) filters placed in front of your lens allow you to use slow enough shutter speeds to photograph waterfalls or river water flowing over rocks. Neutral density filters absorb light evenly throughout the entire visible spectrum, effectively altering exposure without causing a color shift. ND filters are available in different densities of gray and are rated by how many f/stops they decrease your aperture settings.
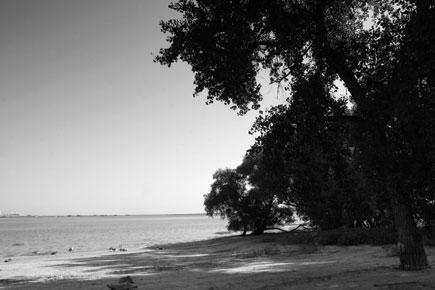
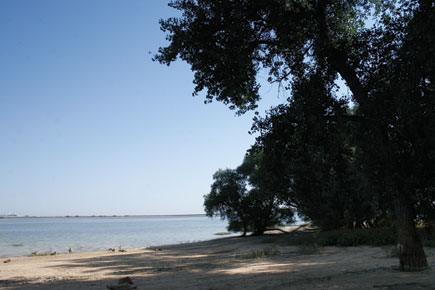
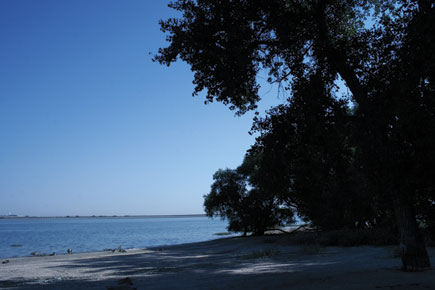
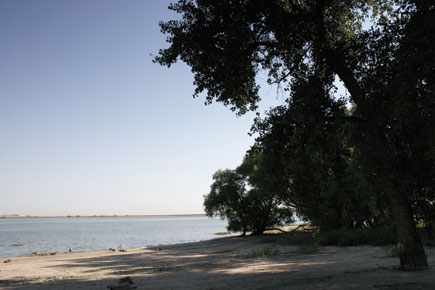
The most useful tools in my filter toolkit are graduated density filters, sometimes called gradient filters or “grads.” These filters have a clear area at the bottom and, somewhere around the middle, start blending into an area of increasing color or neutral density. Graduated density filters allow you to control areas of excessive brightness such as a sky and bring them into balance with the rest of a scene by darkening and possibly adding color. The colored area of these filters covers less than half of the filter, but the effect can be adjusted by moving the filter up and down vertically or by rotating the filter folder, so there is no pressing requirement to split the image in equal and perhaps boring parts.
Color graduated neutral density filters can take what you see and “kick it up a notch.” The final effect of using graduated density filters will vary based on the distance of the filter from the front of lens and the density of filter used. The effect is more pronounced when a wide angle lens is used at small apertures, while just the opposite effect is produced at wider apertures with longer lenses. Other graduated filters add colors ranging from mauve to brown and are in pairs of the same color, with one having a mild effect with the other, darker one, being used to create more dramatic effects.
 |
|
|
|
| |||||||||


![]()
Get the Latest Photo Tips, News & Reviews from Shutterbug!
| Camera Reviews Other Reviews | Mobile Reviews Photography Reviews Columns | News | Features | How-To | Resources |
 © 2025 Shutterbug
AVTech Media Americas Inc., USA
All rights reserved