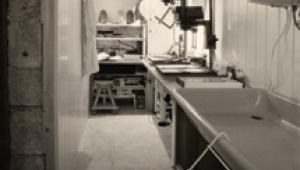
The Darkroom: Strip, Clean, And Overhaul

What's in the bottle? Don't know? Throw it out! And label it next time!

"A house is a machine for living."--Le Corbusier

Any machine needs maintenance. Here's how I maintain my darkroom: a "strip, clean, and overhaul" in engineering terms, or a tune-up in automobile terms. Every 600 prints, or six months... Well, it's not that regular, but you know what I mean. Do it now, before the winter darkroom season starts.

First, get rid of all the clutter. As you do this, try to work out how to stop it from cluttering the darkroom up again. This doesn't necessarily mean throwing it away. How could you make it easier to store? How can you get it out of the way? Is there another way of doing it? This may ultimately result in your redesigning the darkroom completely--which isn't necessarily bad--but it may equally amount to no more than buying some new folders or archival boxes, or putting in a few shelves. It might even be as simple as screwing in half a dozen cup hooks.

Chemical Control
Check all chemicals, discarding as necessary. Half-used bottles of muddy-looking developer; unlabeled bottles that you think are toner, but aren't sure; stuff you haven't used for months, and are unlikely ever to be used again--throw them out. Follow all local and federal directions for the disposal of hazardous chemicals when doing so. Make a list at the same time of things that you need: more silver nitrate, Farmer's reducer, or whatever.

It is a good idea to wear thin ("surgical") latex gloves while you are handling these chemicals and many others. I buy these in packets of 100 from specialist darkroom suppliers or companies who cater to minilabs. Check your local yellow pages or call the suppliers listed at the end of this article. Throw your darkroom towels and lab coats or aprons into the washing machine. This is also the time to disconnect all darkroom electrical equipment, if you have not done so already.

Once you have the clutter out of the way, wipe everything down with a damp, lint-free cloth. Do not forget such things as the top of the enlarger, any wall-mounted clocks or timers, and the top of the paper towel dispenser (these are not expensive and make it much easier to keep the darkroom clean). Wipe the electrical cables: it is suprising how dirty they can get. Wipe down the walls if feasible. Do the floor last!

A J-Cloth or similar non-woven fabric square is ideal, but any lint-free cloth will do. Change it as soon as it begins to show dirt. Don't leave things too wet: a "wet" darkroom should always be as dry as possible, paradoxical though this may seem.

Dust Control
Get rid of as much dust as you can before you start taking anything apart: you can always do another wipe down later. Vacuum cleaners can be useful, but you need one with a long hose so that you can leave the cleaner itself outside the darkroom. The cleaner should have dust filters on the vent side: the amount of dust that a vacuum cleaner can kick up is alarming.

Failing the right sort of vacuum cleaner, use a damp sponge-mop: low tech, but reliable. Squeeze it out frequently, and (once again) keep it as dry as possible. Muck out all cupboards: this is also a part of the great Used Chemical Hunt, as described earlier. Clean shelves with a damp cloth.

And Now, The Gear...
Once you are reasonably certain that you have eliminated as much dust as possible, and that the room is clean, you can start on the specific pieces of equipment. The enlarger is the obvious place to start. How far you can strip it down will depend on the design of the enlarger and your own confidence, but this is what I do:
Clean all lenses, using the same care you would with camera lenses. Enlarger lenses lead a hard life in a hostile environment and should be stored somewhere dry and clean if possible. This may be a counsel of perfection but your lenses will last longer if you do. At the very least, store them in their "bubbles," preferably with a silica gel sachet. Make sure the "bubbles" are clean first. Reactivate old silica gel sachets by heating them for half an hour or more in an electric oven on an iron plate. Let them cool before using them! Clean the lens panels, too (with a damp cloth, Swiffer, or similar cleaning cloth).

The negative carrier comes next. Use a brush--ideally a StaticWisk antistatic brush, as made by Kinetronics--and a microfiber cleaning cloth. Store unused negative carriers in Zip Loc or similar self-sealing bags.

With diffuser enlargers, remove the mixing chamber. Brush it off. Inspect for yellowing or other discoloration: most are replaceable. A new mixing chamber can halve your exposure times and remove unexpected unevenness in coverage.

With condenser enlargers, remove and clean the condensers. Windex or a similar product, applied with a well-washed soft cloth such as an old T-shirt, is as good as anything.

If at all possible, remove the bellows. Blow out any dust (outside the darkroom!). If you cannot remove the bellows, extend them fully and wipe lightly and carefully with a damp cloth, Swiffer, or similar.

Check all shiny metal surfaces, including the column, bellows rails, etc. Wipe with a very lightly oiled rag, then wipe again with a clean rag to remove any surplus oil. Check all bearing surfaces, racks and pinions, etc., and (if appropriate) lubricate very lightly with Vaseline or other petroleum jelly. Check ll electrical connections, especially earth connections.

If anything is badly worn, consider replacing it. This is one of the great advantages of having an enlarger by someone like Beseler or De Vere, who can supply parts even for very old enlargers.

Wipe down all enlarging easels/masking frames, taking particular care on the one hand to remove all dust from crevices and on the other not to bend anything. Wipe the baseboard again before you re-assemble the enlarger, to pick up any dust that has gotten away.

And The Wet Side, Too
Wash all graduates and trays. I always use a very weak detergent solution, with a mild, pure detergent. In the US I use Joy, which is (or was--I have not tested it lately, but have no reason to believe that it has changed) so mild that I used to use it for cleaning contact lenses, well diluted of course. Use a sponge or "shark-skin" scouring pad, according to your estimate of the durability of the surfaces you are cleaning. Steel wool and wire scouring pads are not recommended! Rinse very well afterward: I generally hose things off in the back yard, using generous quantities of water. If possible, let them dry outside the darkroom (to keep humidity down).

Drain all processors--Nova, Jobo, etc.--and clean in a similar way, using a bottle brush if necessary. Nova's "Tar Buster" is invaluable for removing stains from Lucite and other acrylics. Another cleaning product I use a good deal in the darkroom is CHEM-KWIK by Seneca Tec in (unsurprisingly) Seneca, New York: it is particularly good for removing chemical stains, not only on darkroom surfaces, but also on your lab coat or whatever else you wear in the darkroom.

For dried-on, crusty deposits (which of course should never happen) use PHOTOFINISH (by Photographic Solutions, Inc.) which is also very good for stainless steel sinks. These and other lab cleaning products are available from the companies that supply minilab users. All of those listed at the end of this article have told me that they are willing to deal direct with Shutterbug readers and take credit card orders. With all cleaning materials, follow the manufacturers' instructions.

If you have an RC print dryer, wipe out the interior carefully with a damp cloth. Use a dab of silicone putty--the sort of thing that students use to secure posters to walls--to pull dust and navel lint out of the corners. Wipe screen-type dryers for FB prints with a (clean) damp cloth--gently!

If you have an analytical balance--which really should not live in your darkroom--then clean this, too, paying particular attention to the weights, which can grow scabby and nasty.

Clean the sink out thoroughly; give another wipe down, including another once-over for the floor; and put
everything back together. This is also a good time to check safelights, to make sure that they are actually safe: use the time-honored coin test, preferably with pre-flashed paper.

All of this can easily take half a day, or at least a whole evening, but once you have done it, you will soon recoup the time expended because you will be working in a much better organized darkroom. You should also see the benefit in cleaner prints (less time spent spotting) and a generally more relaxed attitude to working in the darkroom. Everything will be so much easier that you vow to keep it this way. Which you will--until the time comes for the next overhaul...

Manufacturers/Distributors
Base-Line Inc. (Minilab supplies)
(800) 872-0075; (253) 852-6681
fax: (253) 852-6796
www.base-line.com

Crown Photo Systems (Minilab supplies)
(800) 228-1518; (360) 653-0300
fax: (360) 659-0671
www.crownphoto.com

Jobo Fototechnic Inc. (Nova)
(734) 677-6989
fax: (734) 677-6963
www.jobo-usa.com

Kinetronics Corporation (Darkroom accessories)
(800) 624-3204; (941) 951-2432
fax: (941) 955-5992
www.kinetronics.com

Liberty Photo Products (Minilab supplies)
(800) 572-3600; (949) 361-1100
fax: (949) 498-4441
www.libertyphotoproducts.com

Loon Photographic Inc. (Minilab supplies)
(800) 367-9298 (Midwest); (800)
662-7448 (West); (800) 860-5666
(South)
fax: (800) 566-6123 (Midwest);
(209) 832-5094 (West); (770) 447-
6748 (South)
www.loonphotographic.com

Minilab Supply Store (Minilab supplies)
(800) 866-6694
fax: (763) 404-0048
www.minilab.net

Photographic Solutions, Inc.
(PHOTOFINISH)
(800) 637-3212; (508) 759-2322
fax: (508) 759-9699
www.photosol.com

Seneca Tec (CHEM-KWIK)
(800) 666-2645; (716) 381-2645
www.senecatec.com

COMMENTS
ilky's picture

I would be pleased if all WebPages provided such articles.
Reverse Phone Lookup

X