- REVIEWS
Camera Reviews 
More Reviews Mobile Reviews Photography Reviews - GALLERIES
- VIDEOS
- BUYER'S GUIDES
CPAC Imaging PRO Version 3.0; Quick, Easy, Good—And More!
 CPAC
Imaging PRO, Version 3.0, is sold mainly as a retouching software for professionals
with a sell line that says, "Outstanding results in just minutes."
But it's much more than that. While Adobe's Photoshop is the de
facto software for professional image-makers, that doesn't mean that there
are not other applications that can perform some of the same tasks, and sometimes
in an easier fashion.
CPAC
Imaging PRO, Version 3.0, is sold mainly as a retouching software for professionals
with a sell line that says, "Outstanding results in just minutes."
But it's much more than that. While Adobe's Photoshop is the de
facto software for professional image-makers, that doesn't mean that there
are not other applications that can perform some of the same tasks, and sometimes
in an easier fashion.
CPAC Imaging PRO is really a combination of many programs. It's like a
combo of Photoshop Lite, KnockOut, skin softening software, a colorizer, print
layout software, plus a couple of unique twists like built-in suits, backgrounds,
and even eyelashes! It's quite robust, and since it's priced at
$500, not inexpensive. So for the first question--can this replace Photoshop?
Sorry, the answer is no. But for professionals looking to do retouching fast
and easy this program is unique and even a little astounding.
Installing The Software
Installing the software is a little more convoluted than most. To prevent piracy,
CPAC has come up with a clever tool. When you install the software, you must
first locate the "dongle" that you must put in one of your USB ports,
or things just don't work. You have to fill in the blanks and then go
to a website for the registration number. It's a little dangerous for
me, trying to get three 16-digit numbers and letters straight, but once you're
done, fire up the program, remove the dongle, and...whoa! The program will
not work without the dongle protruding from your machine. The software can be
installed in up to five computers, so I loaded it in one at work and one at
home. I had to again register and get a unique registration number for each
computer. And I also have to cart the dongle back and forth to the office so
I'll have it where I need it. I guess it's a sign of the times in
which we live.
 |
|
|
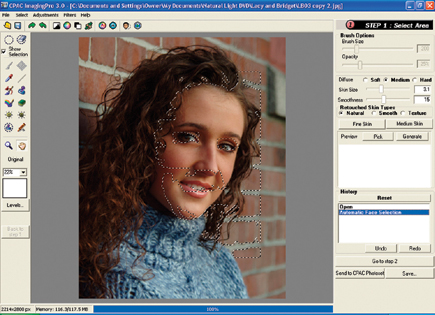
Software Functions
The software comes with a very complete and easy to understand help menu as
well as tutorials on two CDs that can be loaded onto your hard drive. I'd
suggest watching the movies first, they're short and very informative.
I did, then went right to work by loading up a portrait file. (Dupe it first,
as you can't do that in the software.) Then I clicked the "Auto
Face Selection" tool and it somehow circled the face and outlined the
eyes and lips so they wouldn't be affected. (Note: If you have a group
image, it will also find all the faces and circle them all.) Then I clicked
the "Auto Retouch" tool and watched my computer hum away.
 |
 |
|
|
||
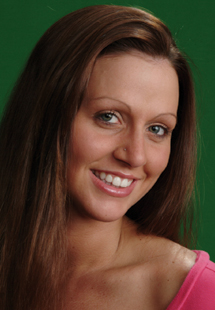
When it finished its work about 15 seconds later I was honestly stunned. I was looking at a beautifully retouched and softened portrait, and I hadn't done anything! I had assumed I'd have to go clean up eye lines, small blemishes, etc., but all my work was done for me. Amazing! If that's too much work, you can just hit the "Auto Face Retouch" button and be done in one click! It should be noted here that you may set up your own tastes in the "Preferences" section. You have several options to control the softening such as Fine or Course skin texture or Opacity. It can be as automatic or as manual as you wish. You can also manually select the faces and erase out eyes and lips. There are many tools that can also be applied for this task, but if you follow the recommended "steps" it's more logical to apply them later, as we'll see.
 |
 |
|
|
||
Step 1 is called "MakeUp." Here you can fine-tune
the skin sharpness once again and also add a little "MakeUp" (their
spelling). Use the Brush tool, hold down the "Alt" key to change
to the Eyedropper (sound familiar?), pick out a skin tone or color from a palette,
and brush on. Then use the Retouch tool to brush over a large area and watch
blemishes and lines disappear. You can also adjust how strong you'd like
the effect, something like the "Fade" command in Photoshop.
A unique control is the Nose Line tool. Here's how it works: Select it,
then hold the Alt key down to pick the highlight on the tip of the nose, draw
a line up the nose bridge to the top of the nose, and "Bango," you've
got a nice highlight on the nose bridge. I actually like it and think it's
a useful tool. You can fine-tune the effect with the Opacity tool. Now you're
ready to click the "Go to Step 2" button.
 |
|
|
|
| |||||||||


![]()
Get the Latest Photo Tips, News & Reviews from Shutterbug!
| Camera Reviews Other Reviews | Mobile Reviews Photography Reviews Columns | News | Features | How-To | Resources |
 © 2026 Shutterbug
AVTech Media Americas Inc., USA
All rights reserved