- REVIEWS
Camera Reviews 
More Reviews Mobile Reviews Photography Reviews - GALLERIES
- VIDEOS
- BUYER'S GUIDES
Beyond Layer Basics; They’re Not Just For Composites
Despite what many photographers think, there is more to Photoshop's layer
technology than its ability to bring together several images. Some of the most
sophisticated layer techniques are not based on composing different image parts
but rather use the characteristics of the layer technology to provide nondestructive
editing alternatives for many of our standard enhancement techniques.
For instance, instead of applying Levels or Curves alterations directly to the
pixels in a photo you can make use of a Levels or Curves adjustment layer to
perform the same changes nondestructively. Or, why not make tonal changes via
the Luminosity Layer Blend mode rather than going to the trouble of changing
your photo from RGB to LAB color? If you add noise to photos to simulate texture
then the same approach can be used to blend a textured layer with the original
image layer.
Nondestructive Editing Using Adjustment Layers
To apply basic color and tonal changes to your pictures nondestructively try
using one of the adjustment layers available via the Create Adjustment Layer
button in the Layers palette. Once selected, the dialog for the control will
be displayed and an adjustment layer will be created above the active layer.
Manipulate the settings in the dialog and then click OK. The changes will be
visually applied to contents of all layers below the adjustment layer. To fine-tune
the settings simply double-click on the Layer Thumbnail on the left side of
the adjustment layer. This will show the control dialog again with the existing
settings displayed. Click OK to apply the new settings. Remember making changes
with an adjustment layer doesn't alter the original pixels.
 |
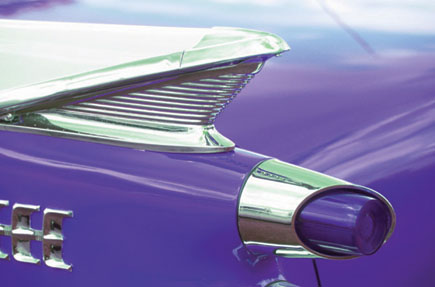 |
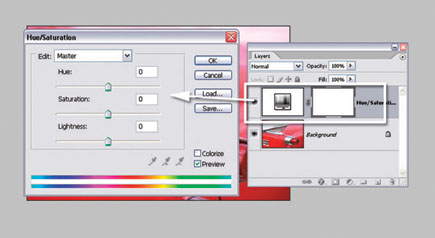
1) With the photo open, select a new adjustment layer from those listed in the Layer>New Adjustment Layer menu. After selecting an option, a new adjustment layer is created above the background and the feature's dialog opens. In the example, the Hue/Saturation adjustment layer was added.
 |
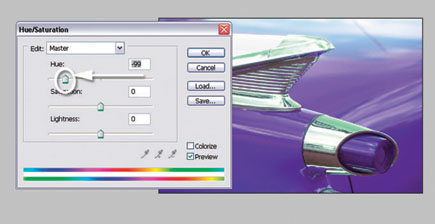
2) Using the dialog's Hue slider it is possible to change the dominant colors in the photo. This is a handy way to quickly alter the tints in graphic images, for example. Here I moved the slider to the left, switching the original red/orange with a striking purple. Clicking OK applies the change.
 |
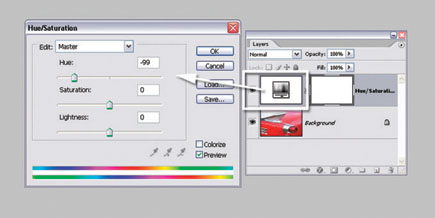
3) Remember, using adjustment layers for enhancement means that the original pixels are never altered. Another advantage of this approach is the ability to fine-tune the enhancement settings at a later time. Just double-click on the Layer Thumbnail (left) in the Layers palette to display the feature's dialog complete with current settings.
 |
4) By default, adjustment layers apply their changes to all layers that are below them in the layer stack. If you want to restrict the enhancement changes to a single layer, create the adjustment layer directly above the layer to enhance and then hold down the Alt/Option key and click at the junction point between the adjustment layer and image layer in the layer stack (the cursor will change to two overlapping circles when you are over the correct spot). This will apply the adjustment layer changes to just the single layer.
 |
Adding Texture Using Layer Blend Modes
Do you crave the look of old high ISO film stock and want to reproduce the appearance
of grain in your digital work? Well, you are not alone. Many digital photographers
regularly add a little texture to their pictures to echo the look of historic
images. But filtering the image layer will change the original pixels forever.
Layer technology provides the nondestructive solution. It uses Layer Blend modes
to mix a specially created texture layer with the image layer. By employing
a Blend mode to mix the texture with the picture parts it is always possible
to remove the effect later by simply hiding the texture layer. You can also
modify the strength of the effect by adjusting the texture layer's opacity.
 |
 |
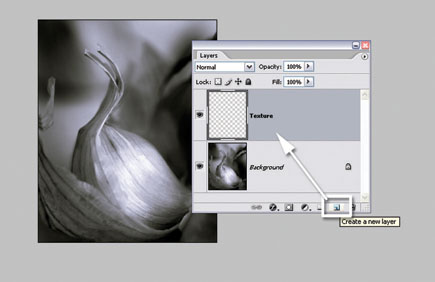
1) Start by making a new layer (Layer>New>Layer) above the original image layer. Label this layer "texture" as it will eventually contain the texture that will be mixed with the image.
 |
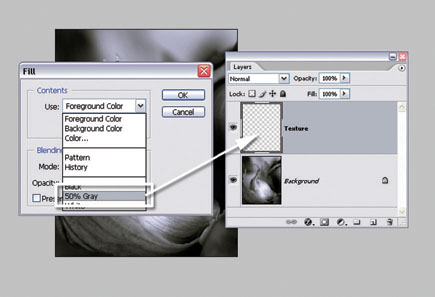
2) Next, fill the texture layer (Edit>Fill) with 50 percent Gray. Rather than having to create the gray as a color swatch just select the 50 percent Gray option from the drop-down menu in the Fill dialog. The gray provides an image tone for the texture filter.
 |
3) Now add texture to the gray layer by selecting the Filter>Noise>Add Noise filter. In the example the filter was set to Monochromatic and Gaussian, but these options can be varied to suit. The Amount value that you choose will depend on the pixel dimensions of the image you are working with and how strongly you want the texture to appear in the final result.
 |
4) To blend the texture with the image layer beneath, just change the texture layer's Blend mode to Overlay. Do this by making sure the layer is selected in the Layers palette and then choosing the Overlay option from the Blend mode drop-down menu at the top left of the palette. Select other Blend mode options to provide a different style of texture blending.
 |
Layer-Based Retouching
On many occasions, creating a nondestructive version of a standard technique
just requires a slight shift in thinking or approach. For example, layers can
also help with activities such as retouching. Rather than using tools like the
Spot Healing Brush directly on the original pixels try creating a new layer
first and then apply the retouching changes to the new layer.
|
| |||||||||


![]()
Get the Latest Photo Tips, News & Reviews from Shutterbug!
| Camera Reviews Other Reviews | Mobile Reviews Photography Reviews Columns | News | Features | How-To | Resources |
 © 2026 Shutterbug
AVTech Media Americas Inc., USA
All rights reserved