- REVIEWS
Camera Reviews 
More Reviews Mobile Reviews Photography Reviews - GALLERIES
- VIDEOS
- BUYER'S GUIDES
BEGINNER’S Guide to LIGHTROOM: Get Started Here! (VIDEO)
Last week we featured what turned out to be a very popular tutorial for those new to Photoshop, explaining the first tools to learn. We don’t want Lightroom users to feel ignored, so today we’re doing something similar for you.
Just like Photoshop, Lightroom is full of powerful features, and it’s easy to become intimidated. While this beginner’s guide is from a different image-editing expert, the approach is the same: start with the basics and gradually expand your skills and the tools you employ once you become more proficient.
German pro Christian Mohrle is very adept as simplifying complicated processing techniques—especially when it comes to editing travel and nature photos. But in the video below he dials things way back—with a basic Lightroom workflow for those just getting started.
We have a couple suggestions for making the most of this 14-minute beginners guide. First, have paper and pen handy so you can jot down some notes for future reference. You’ll also find it helpful to download the demonstration image in the description beneath the video so you can follow along in real time (which is the best way to learn).
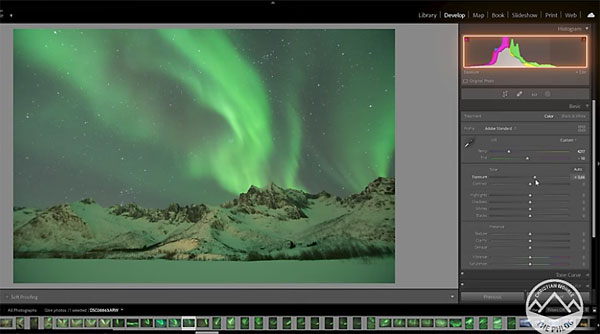
According to Mohrle it’s usually important to make adjustments in a specific order, and for the purpose of this initial method he focuses exclusively on Lightroom’s Develop tab where most of the easy magic occurs. The image you’ll be enhancing in this episode is a photo Mohrle made in Norway of the Northern Lights.
The first thing you’ll do is to select Lens Corrections and enable the Remove Chromatic Aberrations option. You’ll also see how to choose the lens you used to make the shot. One you’ve done that the image already looks better.
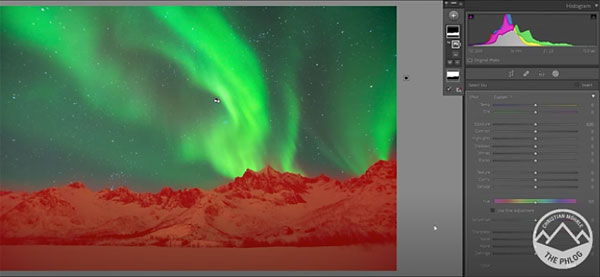
The next step involves a few simple basic adjustments to the overall scene; to get it ready for more targeted enhancements. Then Mohrle demonstrates a simple approach for selectively adjusting specific portions of the image, without affecting adjacent areas.
Along the way you’ll learn how to use Lightroom’s Tone Curve and HSL slider, and do basic split toning and sharpening.
Once you get these techniques under your belt, head over to Mohrle’s YouTube channel for the next steps in your progression.
And if you own both Lightroom and Photoshop, be sure to check out last week’s beginner’s guide to the latter, explaining the first tools to learn.


![]()
Get the Latest Photo Tips, News & Reviews from Shutterbug!
| Camera Reviews Other Reviews | Mobile Reviews Photography Reviews Columns | News | Features | How-To | Resources |
 © 2026 Shutterbug
AVTech Media Americas Inc., USA
All rights reserved