- REVIEWS
Camera Reviews 
More Reviews Mobile Reviews Photography Reviews - GALLERIES
- VIDEOS
- BUYER'S GUIDES
Beautiful Light: We Go On a Shoot with Acclaimed Fashion Photographer Lou Freeman to Learn Her Lighting Tricks

All Photos © Lou Freeman
You enter a room bustling with activity. You see models posing in front of photographers on two different sets, other models patiently sitting getting their makeup and hair done, lights and modifiers everywhere, while one petite woman seems to be in charge of this organized chaos. Welcome to a workshop with one of the premier glamour and fashion shooters of our day, Lou Freeman.
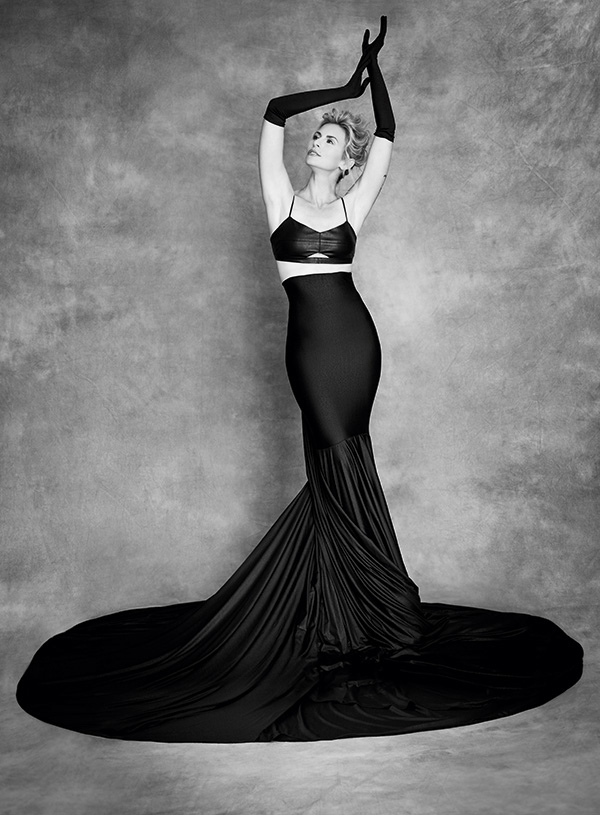
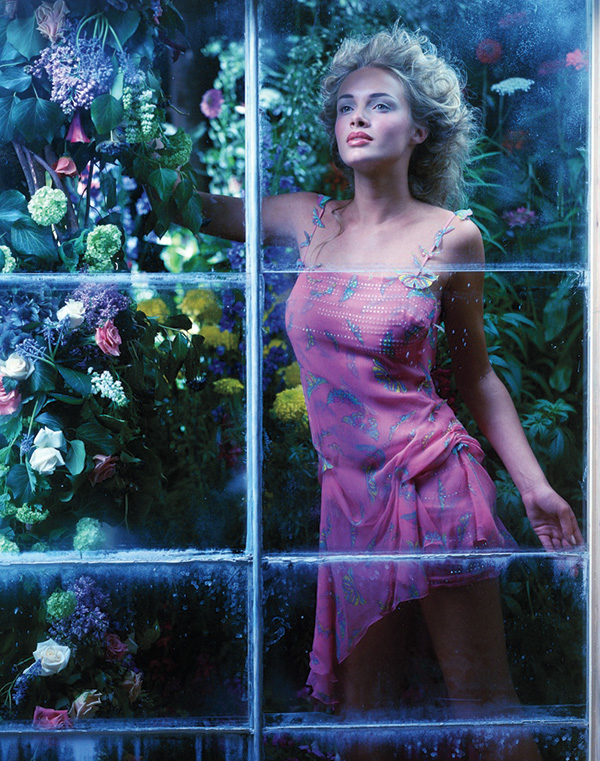
For over three decades, Lou Freeman has practiced and shaped the art of fashion, glamour, fine interior, and lifestyle photography. Her clients are among the most respected and recognized names in America and Europe. Her work has been featured in Glamour, Elle, Harper’s Bazaar, Seventeen, Vanity Fair, Elle Decor, Metropolitan Home, Architectural Digest, People, Modern Bride, and more. In 1988, her work captured the interest of executives at Playboy Enterprises, Inc., one of America’s most widely circulated brands and magazines. She became the second woman ever to shoot for Playboy magazine. For 12 straight years, she delivered nearly 600 spreads for the publication, giving women a voice in the work that portrayed them. As a photographer her mantra then as well as now is to bring beauty, strength, and sophistication to everyone she shoots.
I was fortunate enough to be Freeman’s assistant during her four-day workshop at the New England Institute of Professional Photography (NEIPP) held annually in Cape Cod, Massachusetts. During that time, I watched and helped out as about 10 other pro photographers learned the Lou Freeman method of creating images.
No Shortcuts
Perhaps the first thing you learn is that there are no shortcuts, or “good enough” just doesn’t cut it in Freeman’s world. Every aspect of the final image, from the hair and makeup, background selection, props, lights, etc., needs to be spot on or it just isn’t going to work. And since this issue is all about light, we are going to see just how important each light and modifier is to each image.
First, hats off to EP Levine of Waltham, Massachusetts, for supplying us with mounds of equipment. Our Bowens 500R lights were augmented by just about every modifier they make, from strip boxes and grids to octaboxes and Fresnels and beauty dishes. Throw in some LED 1x1 lights and scrims for daylight shooting and you can see we had enough gear to tackle just about any lighting scenario possible!
Freeman comes from a different starting point when it comes to setting up lights. As a portrait guy, I’m usually thinking about a typical four-light setup: main, fill, background, and hair. Freeman comes from a different direction. Her first consideration is to highlight what is important in the image and build from there. Oftentimes it’s a commercial shoot and since she’s been working with the client she knows ahead of time what will be featured. In the case of model and people photography, Freeman will work to emphasize the best features of a person and also use lighting and posing to disguise features that you may not want to call attention to.
The Story of NEIPP
The Professional Photographers of America (PPA), which hosted this Lou Freeman workshop, has 15 affiliate schools across the country and one in the Bahamas. NEIPP (New England Institute of Professional Photography) is held once a year in Cape Cod, Massachusetts. It came into being in 1961 as a committee of the Professional Photographers Association of New England (PPANE) and is currently the oldest established PPA affiliate school. Its mission is to provide students with a high level of education in photography by using classroom instruction and real-world experience provided by world-class instructors. Each year it offers several two-day and four-day classes covering many aspects of professional photography, from lighting and posing to business and Photoshop. Classes are available at many levels, from beginner courses to master classes for experienced pros. For further information, visit neipp.com.
How To Light A Model Shoot
Let’s go through a typical model shoot like we did at the workshop. First, we chose costumes/clothing for the model. Next we chose a background that worked with the model and clothing/props. Then it was on to hair and makeup.
Since hair and makeup take a considerable amount of time, once the above decisions had been made, it was time to set up the lighting. Depending on the look we were going for, the light could be anywhere from one light to six or eight.
While many photographers like the soft light from a larger softbox, Freeman eschews them in favor of harder, smaller light modifiers. The only boxes we used were strip lights with egg crate grids so we could carefully control the direction and spread of the light. The strip boxes were also used as bottom lights in a “clamshell” setup with a harder source like a beauty dish as the top light. And while most photographers use beauty dishes directly above camera position, Freeman often uses them as the main light source in many different positions.
We used some other modifiers that you won’t find in most current studios like an adjustable Fresnel lens that gave us the ability to adjust the light from a wide source to a very tight spot. We even added barn doors to the light reflectors for more control and also worked with a spot attachment for directing a very precise beam of light.
Of course, having all this great equipment at your disposal doesn’t mean much if you don’t know what to do with it! And that’s why the class was there.


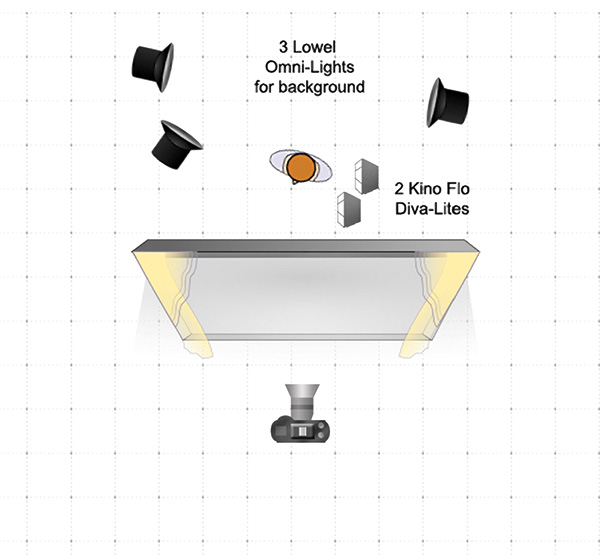
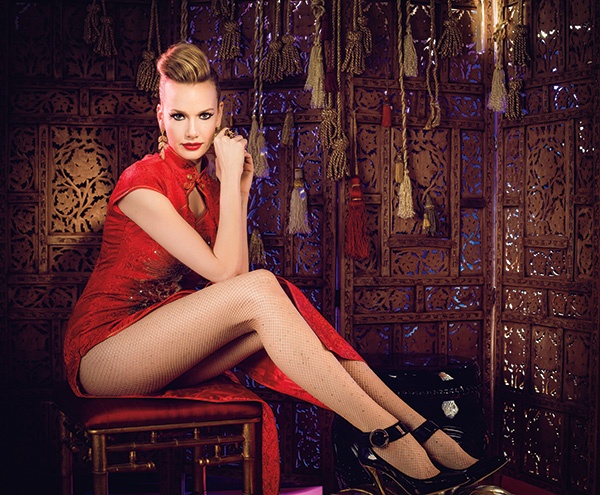
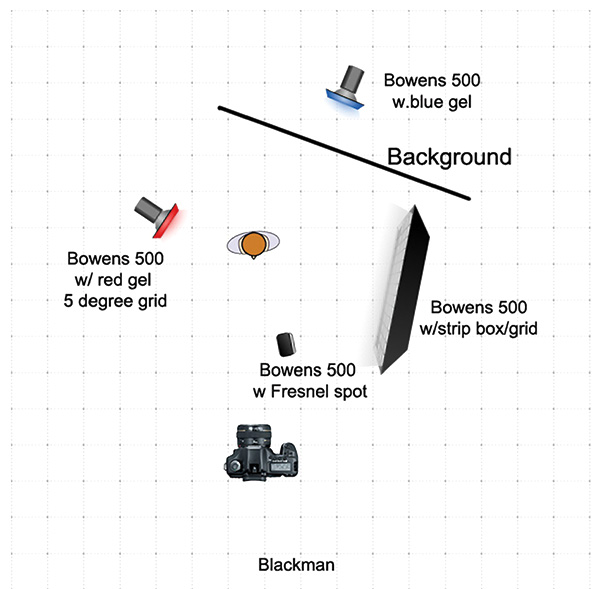
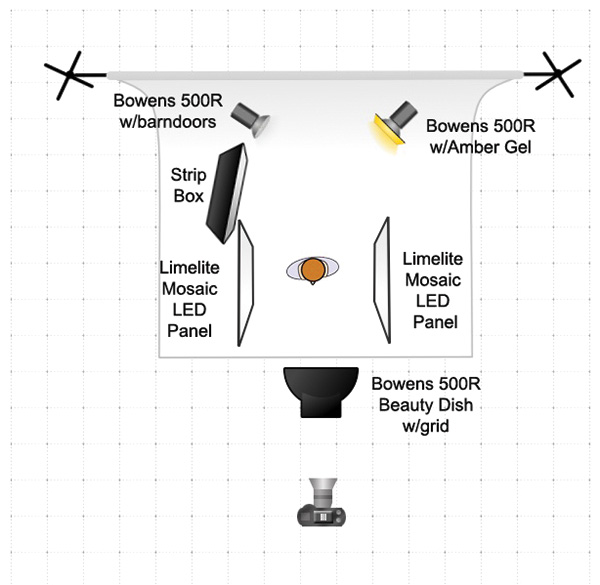
Capturing Tiffany
Here’s an example of a model shoot with Tiffany Hill who we captured during our week at NEIPP. This is a six-light setup. The model was lit with a Bowens 500R with a beauty dish and a grid. One Limelite Mosaic LED panel was placed on each side of the model. A Bowens 500R with a strip box was camera left and slightly behind the model. Two other Bowens 500R lights were used as accents from behind, and the camera right light has an amber gel. Makeup was by Rosangela McCann. Shot with a Nikon D3 and a Nikkor 80-200mm f/2.8 lens; ISO 640, 1/60 second at f/8, 92mm. Note: A relatively high ISO was used to allow the LED light panels to also contribute.


The Right Exposure
When Freeman approaches a set, she starts building one light at a time. Maybe she’ll use an octabox as the main light source, a strip from underneath, a spot on the background, and a couple of accent lights from behind. One thing that I had not seen before was her mixing flash with LED lights. Since flash has much more power, we would dial the power settings way down and set our exposure taking the LED lights into consideration as well.
Speaking of exposure, like me, Freeman is a big believer in light meters. Having a good reliable meter allows you to create the exact lighting ratios as you set up, instead of constantly adjusting and fiddling with the lights. After we had a set built and all the lights in place, we learned Freeman’s Rule #1: Take one photo, examine it, make changes, shoot another test, and you should be good to go. No endless “chimping” while your subject gets bored. It’s a good rule.
Workshops are all about spending time with a talented photographer you’d like to learn from. While there are many things you can learn from online courses and videos, there is nothing quite like working alongside someone in person. You can watch every little thing they do; sometimes it may be a small thing they don’t even call attention to that will give you an “aha” moment.
Then of course you get feedback, asking questions about why things are done, and even feedback on the work you are creating. Things that may take you years to figure out by yourself are discovered in a few days. Working side by side with a talent like Lou Freeman may cost a few bucks up front but to my way of thinking it’s probably the most cost effective way to advance your skills quickly.
To see more of Lou Freeman’s work, visit www.loufreeman.com.


![]()
Get the Latest Photo Tips, News & Reviews from Shutterbug!
| Camera Reviews Other Reviews | Mobile Reviews Photography Reviews Columns | News | Features | How-To | Resources |
 © 2026 Shutterbug
AVTech Media Americas Inc., USA
All rights reserved