Auto FX Mystical Lighting; 16 Optional Effects To "Light Up" Your Images

1
Photos © 2003, Anthony L. Celeste, All Rights Reserved

Although plug-ins are often referred to as "Photoshop Plug-ins," most of them can be used in many photo editors other than Photoshop (such as Corel Photo-Paint and Ulead PhotoImpact). Since everyone doesn't own a copy of Photoshop, it's good to see developers who bring us programs that can be used by just about everyone.

Such is the case with the Auto FX Mystical Lighting package, which contains 16 lighting effects and a powerful interface that provides numerous options for each effect. It also allows you to preview each adjustment before any changes are actually made to your photos.

2

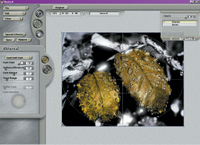
For those not familiar with the term "plug-in," a plug-in is a program that adds new features to your photo editing program. Plug-ins are normally added to your program's "filter" or "effect" menu. However, Mystical Lighting is unique in that it not only operates from within photo editors, it can also be opened as a stand-alone program by clicking on its desktop icon.

The Mystical Lighting Interface
The majority of Mystical Lighting's controls are located on the left side of the screen; the main work area is located on the right side of the screen (#1). In Mystical Lighting, buttons with arrows on the right are actually menus; the menu items appear when you click on the button or on the arrow.

The File, Edit, and View menus require little explanation, other than to note that undo/redo and preferences controls are available via the Edit menu. To the right of these menus you'll find the Pan, Zoom, and Memory Dot controls. When you click on a Memory Dot, a snapshot of your current settings is taken so you can then return to these settings at any time simply by clicking on the same dot.

3

Mystical Lighting's 16 lighting effects, along with presets for most of the effects, are accessed via the Special Effects menu. Beneath this menu are the Save button and the Remove menu. Note that the Save button is not used to save your work, it's used instead to save your current settings as a new preset. The Remove menu is used to remove presets. The large tab below Save and Remove contains controls for all of the effects. Each time you select a new effect, the tab updates its appearance, so that it displays only the controls needed for that particular effect.
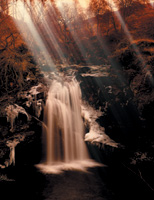
At the top of the screen you'll find Mystical Lighting's "Original" button. By holding down your left mouse button you can use the Original button to compare your photo's current look to the unedited original. In the top right corner of the screen there's a slider control that's used to set the overall opacity (transparency) value of any effect you apply (0 means complete transparency and 100 means no transparency). Beneath this slider, you'll find a list of effects that you've applied since opening the current photo. You can turn off any effect that you've already applied by clicking the small dot to the left of the effect's name.

4

Casting Light On A Photo Using The Ethereal Effect
The Ethereal effect is used to cast a diffused light onto an image. In this example, I'll use it to cast light through a series of trees and on to a waterfall (#2). The Ethereal effect is accessed by clicking Special Effects | Mystical | Ethereal (#3).

The Cast button is used to control how light is applied to your photo. It has four available options: Soft Cast (a standard non-directional diffused light); Light Cast (a diffused light that streams in the direction set by the Cast Direction control); SoftLight Cast (similar to Light Cast but provides a more diffused light); and Protect (used if you need to protect certain areas of your photo from the Ethereal effect).

5

For this image, I chose Light Cast, since it will display a moderately powerful directional light. I set the Cast Direction to the lower right of the Cast Direction control, since I want the light to look as if it's originating from behind the trees, and radiating down and to the right, toward the waterfall.

When you start using the Ethereal effect you'll notice that Mystical Lighting places a wire frame styled ellipse over the image. The ellipse is used frequently in Mystical Lighting effects. The inner circle shows the area where the effect is strongest and the outer circle displays the outer boundary area of the effect.

You can show or hide the ellipse by clicking on the Transform Ellipse button (this is the higher of the two buttons on the upper right of the Ethereal menu). When the ellipse is displayed, hovering your mouse over it will display a cursor representing one of the transform tools. As you move your mouse over various areas of the ellipse, the shape of the cursor will change, indicating which transform tool is currently available.

6

There are five transform tools: (#4) Scale (re-sizes and re-shapes the ellipse); Constrain (re-sizes the ellipse while keeping the current ratio of width to height); Rotate (rotates the ellipse); Move (moves the ellipse); and New (used to distinguish newly created ellipses from other ellipses). I used the Move Transform tool to move the ellipse to an area near the upper left of the photo so that the light will be cast from the area near the trees.

Some settings in the Ethereal menu need to be changed in order to achieve the desired effect. Clicking on the small white box next to the words "Cast Color" accesses the Mystical Lighting Color Picker, which is used to set the color of the light being cast. In this case, I chose an almost pure white color, with just a touch of yellow in it, so that the light would resemble sunlight. Note that when choosing the Ethereal effect's cast color it's usually best to select a bright color, since this will most closely resemble natural light.

7

The Cast Color slider is used to set the opacity (transparency) of the color you selected. To create a natural looking effect, a certain amount of transparency is built into the Ethereal effect, so you generally won't need to add much additional transparency here. Lower values increase the transparency level, while higher values decrease the transparency level. In most cases, you'll probably want to use a high value. For the waterfall image, I left the slider set to its default value of 100.

The Softness/Distance slider is used to set how far the Ethereal effect travels from its point of original near the center of the ellipse. As the distance increases, so does the softness, thus the name "Softness/ Distance" slider. In this case, I wanted the effect to travel all the way down to the waterfall, so I chose a value of 85.

8

The Cast Amount slider controls the overall strength and intensity of the Ethereal effect. This control has to be used cautiously to avoid adding too much light to your photo. In this case I found that raising the setting from 0 to 1 was sufficient to achieve the desired effect.

One of my goals in editing this photo is for the light to appear as though it's streaking in from between the trees, since light shining through the trees obviously wouldn't look very natural. The Tonal Range slider is used to control this effect. A low tonal range will cause the light to appear only in the areas between the trees, since a low tonal range allows the effect to become visible only in areas of the image that are already light. By keeping the tonal range set to a low value, the Ethereal effect is applied only to the areas between the trees.

The Soften Cast slider is used to control the softness (the amount of blending) when casting directional light. Lower values produce streaks of light, while higher values produce a more blurry, almost fog-like light. Since I wanted streaks of light for this image, I set the cast slider to a relatively low setting of 2.

9

Remember that the ellipse for this image is currently located in the upper left corner. Since light should also shine from between the trees in the upper right corner of the image, another ellipse, placed in the upper right corner, would be very useful. I duplicated the ellipse by clicking the Ethereal Ellipse tool (located directly under the Transform Ellipse tool). I then clicked the Transform Ellipse tool, hovered my mouse over the ellipse, waited for the new ellipse cursor to appear, and then moved the new ellipse to the upper right side of the image.

Note that by setting all of the Ethereal menu controls first, and then duplicating the ellipse, I did not have to set the controls again for the second ellipse. When you create a new ellipse, instead of using default settings, the ellipse adopts the settings of the most recently used ellipse. This is a major time saver. The new waterfall image, with the Ethereal effect applied, can be seen in #5.

Before opening a new image in Mystical Lighting, it's a good idea to click the Save button to save a preset for the effect you just created. This is useful if you want to edit the effect later, or use it as a preset effect for another image. Also, click File | Save to save your newly edited photo (if you're using Mystical Lighting from within a photo editor such as Photoshop, click the OK button, next to the Original button, to return the newly edited photo to your photo editor).

10

Adding A Rainbow To A Sunrise
The Mystical Lighting Rainbow effect is used to add a rainbow to your photos. The most efficient method of making a rainbow is to use the Rainbow Shape control, which is the lowest of the three controls located on the far right side of the Rainbow menu in #6.

In this example, I'll be adding a rainbow to a mountainous sunrise photo (#7). In keeping with the mystical theme of this plug-in, I'm going to create something that can't be seen in real life: a rainbow that appears on the same side of the horizon as the sun (you may never have noticed it, but rainbows always appear opposite of the sun).

To create a rainbow, click on the Rainbow Shape control. Move your mouse over the photo, press the left mouse button down at the point where you would like your rainbow to start, drag the mouse to the point where you would like the rainbow to end, and then release the mouse button.

Once you release the mouse button, the rainbow will be created (#8). If the placement of the rainbow is not quite right, it can be moved by hovering your mouse over the line used to create the rainbow, and wait a moment for the Move cursor to appear.

The most unique control available for rainbows is the Rainbow Colors button. When you click this button, you access a selection of rainbow color patterns that can be used to replace the standard rainbow color pattern. I also noticed an undocumented feature here: you can create your own custom color schemes to use as rainbow color patterns. To do so, use your photo editing software to create a new image 34 pixels wide by 218 pixels high. Add whatever colors you desire to the image, and save it as a high quality JPEG in Mystical Lighting's "mystical lighting\Mystical\Rainbows" folder. The next time you click the Rainbow Colors button, the new rainbow pattern will be available.

11

Adding Mist To A Lake Using The Mystical Lighting Mist Effect
The Mystical Lighting Mist effect is used to add realistic looking mist to your photos. The mist is literally painted on the screen using the Mist Brush (the middle of the three items on the far right side of the Mist menu, as in #9). Each brush stroke is controlled by the Brush Size Control (located beneath the Mist Brush).

The Brush Size Control (#10) accounts for more than size; it's also used to control Opacity (the transparency level of each brush stroke) and feathering (the amount of semitransparency on the outside edge of each brush stroke). It's this combination of size, semitransparent edges, and overall transparency that enable the Mist Brush to paint realistic looking mist.

Another method of adding realism is to occasionally remove a stroke of mist, since this helps to create a more natural, diffused appearance. To accomplish this, hold down the ALT key (Windows) or Option Key (Mac) while using the Mist brush. Also, making slight changes to the Brush settings after every few strokes can help to create a natural looking mist (#11).

Space does not permit a look at all 16 of the Mystical Lighting effects, so I've focused here on effects that demonstrate concepts needed throughout Mystical Light (such as using ellipses and brushes), and on effects that I feel may be most useful to you when editing photos. I encourage you to download the Mystical Lighting demo from www.autofx.com and experiment with using this powerful tool when editing and enhancing your photos.

Tony Celeste appreciates feedback from his readers, you may contact him at aceleste@attbi.com.

Contact
Auto FX Software
(205) 980-0056
www.autofx.com

X