- REVIEWS
Camera Reviews 
More Reviews Mobile Reviews Photography Reviews - GALLERIES
- VIDEOS
- BUYER'S GUIDES
Attention-Catching Animation Features; Blur & Sharpen Techniques
It’s common to see blinking buttons and scrolling banners and other animated graphics on websites that look pretty much the same as those on every other website. I want to show you how you can do something different with animation: blur an image, then use animation to grab your viewer’s attention by bringing the blurred photo back into focus.
I’ll be using Ulead PhotoImpact X3 as my photo editor and Jasc Animation Shop 3 as my animation editor; both are available from www.corel.com. If you desire, you can use your preferred photo editor and animation editor.
Selecting A File
You may have heard that you can’t use the GIF format with photos. This concept assumes that you’re going to reduce the photo’s color count using the “Web Safe” palette. Since the palette is outdated, so is the concept. Although GIF isn’t the ideal format for photos, it can be optimized to work for our purposes here.
The most important factor to avoid when selecting a photo is an excessive amount of gradient color. For example, a blue sky and mountains or buildings may work out fine, but a photo that consists entirely of a blue sky is basically a huge blue gradient, so it probably won’t convert well to the GIF format, even with the best possible optimization settings (#1 and #2).
 |
|
|
|
 |
|
|
|
|
Creating The Blur Effect
I’m going to use my original image plus five images with various stages of blurring to create the animation. I’ll use image dimensions of 480x360 pixels, which is slightly large for a GIF animation (320x240 is more typical for a photo), but I want the photo to show up well. You can usually go as high as 640x480 without file size becoming too much of an issue.
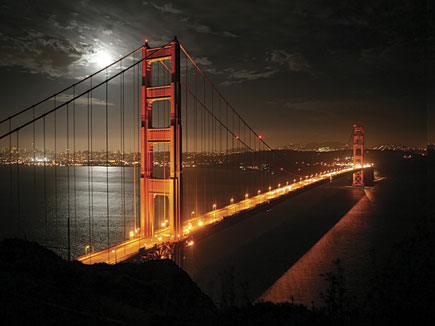
Start out by re-sizing your photo to 480x360 and make five duplicates. I’m going to use PhotoImpact’s Mosaic Blur filter, although any Mosaic or Blur filter can be used. If you’re using PhotoImpact, you’ll find Mosaic Blur in the Effect>Creative menu. The photo I selected is a night view of the Golden Gate Bridge; the colorful Mosaic Blur filter will show up particularly well on the dark background (#3).
 |
|
|
The next step is to apply the blur, each time at a different strength, to the five additional images. PhotoImpact’s Mosaic Blur filter has a strength setting of 1-50. I used settings of 35, 28, 21, 14, and 7, with the original photo having no effect applied.
You can now begin moving the images from PhotoImpact to Animation Shop. Copy the first image (the image with the highest blur setting) and paste it into Animation Shop by clicking Edit>Paste>As New Animation. Animation Shop automatically detects the dimensions of the file and the fact that there’s no transparency being used, saving you the step of adjusting these settings. Copy the next image (with the second highest blur setting) and paste it into Animation Shop by clicking Edit>Paste>After Current Frame. Repeat this process on the remaining four images, moving sequentially from the most blurred image to the original image (#4).
 |
|
|
At this point, it’s a good idea to save a copy of each of the six image frames in a True Color format such as BMP or TIFF before you begin applying GIF color reduction in Animation Shop. It’s important to keep the original True Color images available in case you’d like to experiment with different GIF compression options after closing Animation Shop.
To save all of the animation’s frames, click Edit>Select All and then File>Save Frames As. These two steps will save all of the animation’s frames, regardless of how many frames are used in the animation. When saving the frames, Animation Shop will automatically add the frame number to the file name you selected (such as Bridge Animation 1.tif, Bridge Animation 2.tif, etc.).


![]()
Get the Latest Photo Tips, News & Reviews from Shutterbug!
| Camera Reviews Other Reviews | Mobile Reviews Photography Reviews Columns | News | Features | How-To | Resources |
 © 2026 Shutterbug
AVTech Media Americas Inc., USA
All rights reserved