- REVIEWS
Camera Reviews 
More Reviews Mobile Reviews Photography Reviews - GALLERIES
- VIDEOS
- BUYER'S GUIDES
Attention-Catching Animation Features; Blur & Sharpen Techniques Page 2
Working In Animation Shop
Once in Animation Shop, you can set the time delay for the frames of the animation by right clicking each frame and clicking Frame Properties. If you cannot see all of the frames, use the scroll bar at the bottom of the frames window, or maximize the window and decrease the zoom to 1:3. When setting the time delay, time is measured as 1/100 sec.
I like to let the blur gradually unfold and then hold the final image still for a couple of seconds. So, I set the delays for each of the first five frames to 50 (1⁄2 sec) and the delay for the last frame to 250 (21⁄2 seconds). Note that you can set the delay for multiple frames by control clicking them, then right clicking and clicking Frame Properties.
The final step before saving the animation is to optimize it, which means to compress it into the GIF format using optimal settings. One option is to click File>Optimization Wizard, but the best option is to click View>Preview in Web Browser. This option accesses the Optimization Wizard, enables previewing the animation in your preferred browser, and provides a report comparing the original’s file size and download time with the optimized version’s file size and download time.
The Optimization Wizard
The Quality vs. Size slider sets a series of options, which you can then fine-tune by clicking the Customize button (#5). It’s always best to start with the slider set to “Better Image Quality” and then fine-tune using the “Customize” option.
 |
|
|
Clicking the Customize button accesses the Optimization Wizard’s advanced features. These are divided into two tabs, the Colors tab and the Optimizations tab. For your convenience, I’ll recommend typical settings below. The options that I’ll use work best for this file, but may not work best for every file.
The Number of Colors should always be set to the maximum of 255 colors (#6). Select “Optimized Median Cut,” as this typically produces the best color reproduction. The Nearest Color option will provide the best combination of color reproduction and file size.
 |
|
|
For best results, click the Optimizations tab and select the first three options, then deselect the final two options (#7).
 |
|
|
Finishing Up
When you’ve finished selecting options, click Next to allow the Wizard to optimize the file. When complete, it will report on the file size and download time for the optimized GIF animation (#8). If you’re not pleased with the results, you can click Back to start the optimization process over, or click Finish to view the optimized file in your web browser.
 |
|
|
If you’re not pleased with the results when you see them in your browser, you can undo them by closing the Preview in Web Browser dialog box and clicking Edit>Undo Optimize Animation. If you are pleased with the results, click File>Save As and save the animation in the GIF format.
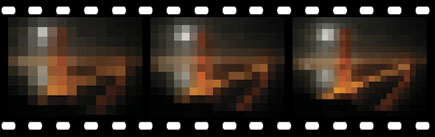
The final results of my animation are shown in #9 and #10.
 |
|
|
|
 |
|
|
|
|
To see the final result “live,” go to our Instant Links on www.shutterbug.com under the March 2009 issue.
Anthony Celeste appreciates feedback from his readers. You may contact him via e-mail at: anthony.celeste@gmail.com.
|
| |||||||||
- Log in or register to post comments


![]()
Get the Latest Photo Tips, News & Reviews from Shutterbug!
| Camera Reviews Other Reviews | Mobile Reviews Photography Reviews Columns | News | Features | How-To | Resources |
 © 2024 Shutterbug
AVTech Media Americas Inc., USA
All rights reserved