- REVIEWS
Camera Reviews 
More Reviews Mobile Reviews Photography Reviews - GALLERIES
- VIDEOS
- BUYER'S GUIDES
Adobe’s Photoshop Elements 5.0; Almost As Good As Photoshop…Almost
 Each
new version of Adobe's Photoshop Elements gets better than the previous
one. That's the case with this inexpensive ($99) program that has evolved
from Adobe's stepchild to a darn good imaging program for the money. The
interface of the latest version for Microsoft Windows even contains hints of
Adobe's as-yet-released Lightroom in its design, making it an even better
value. Best of all, Photoshop Elements 5.0's workflow takes your images
from capture to output in steps that a newbie will appreciate and more experienced
users will enjoy.
Each
new version of Adobe's Photoshop Elements gets better than the previous
one. That's the case with this inexpensive ($99) program that has evolved
from Adobe's stepchild to a darn good imaging program for the money. The
interface of the latest version for Microsoft Windows even contains hints of
Adobe's as-yet-released Lightroom in its design, making it an even better
value. Best of all, Photoshop Elements 5.0's workflow takes your images
from capture to output in steps that a newbie will appreciate and more experienced
users will enjoy.
What's New: The Big Stuff
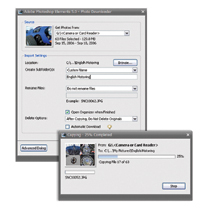
Photoshop Elements 5.0 expedites workflow by providing a fast, one-stop image
downloader utility. When attaching a camera to the computer or inserting a memory
card into a card reader, Photo Downloader automatically appears, even if Photoshop
Elements 5.0 is not running at the time. If you prefer not to use the Photo
Downloader (why not?) it can be disabled from Windows' System Tray. Otherwise,
the Downloader automatically starts to copy files and some of this utility's
Advanced Options can automate common tasks that may normally be required after
download.
 |
|
|
You can have "redeye" fixed automatically or choose how you want the photos on your card handled after downloading. The Automatically Suggest Photo Stacks option makes quick work of choosing the best shot from a group of shots and stacks outs below your favorite so they take up less room in Elements' Photo Browser window. After download, you can keep all of the files on the memory card or erase them, but I have to tell you this suggestion makes me nervous because of the possibility of digital trauma to the card. If you decide to do it, you have been warned.
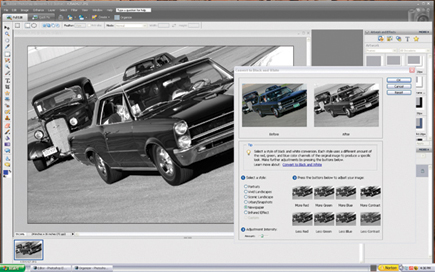
Photoshop Elements 5.0 lets you give color images a dramatic monochrome look with the Convert to Black and White command found under the Enhance (Enhance>Convert to Black and White) menu. Start by clicking the Choose menu, then under "Select a style" click on any of the seven monochrome presets--even digital infrared is included! These presets vary the intensity of red, green, and blue pixels in the original image, creating a selection of black and white alternatives. A tiny Adjustment Intensity slider lets you vary the effect's intensity. To further modify the end result, click on the thumbnail images along the window's bottom to make subtle changes.
 |
|
|
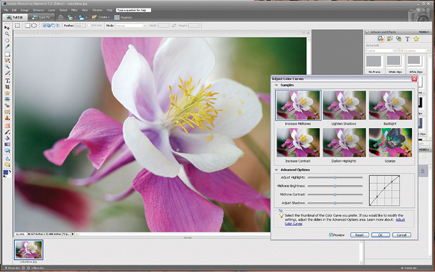
A new Adjust Color Curves control makes it easy to fine-tune color, brightness, and contrast. It's not "Curves" as we know and love it from Photoshop but a slightly different implementation that uses an instructional yet intuitive way to accomplish your imaging objectives without over-adjustment. When choosing Enhance>Adjust Color>Color Curves be sure to check the Preview box so you can see changes to the image in real time. In the top section of the dialog box, you will also see six adjustment preview thumbnails. Clicking on any of these previews instantly applies a set of adjustments to repair common photographic problems such as backlighting. Advanced Options reveals sliders for adjusting highlights, midtone brightness, contrast, and adjust shadows as well as the familiar (from Photoshop) curve graphic.
The new Correct Camera Distortion command lets you correct camera lens distortion at the edges of photographs as well as keystone effects--the old "falling over" building effect--that exaggerate perspective. Choosing Filter>Correct Camera Distortion opens a full-screen dialog box with controls for horizontal and vertical perspective control as well as lens vignetting. Photoshop Elements 5.0 brings all those adjustments together into a single, dedicated place where every one of these problems can be solved with a few slider moves.
 |
|
|
Adjust Sharpness Produces
crisper-looking photographs, even going so far as to remove some of the camera
or subject motion blurring that occurs when shooting under low-light conditions.
Unsharp Mask fans don't despair; that command still remains and Adjust
Sharpness can be found just below it in the Enhance menu. Adjust Sharpness settings
analyze an image's edges and detail to provide finer detail sharpening
while eliminating the sharpening halos that sometimes appear with over-application
of Unsharp Masking techniques. For blurring caused by camera or subject movement,
try the Motion Blur setting in the Remove pop-up window (it also includes Gaussian
Blur and Lens Blur) and specify the angle at which the movement occurred.
What's New: The Little Stuff
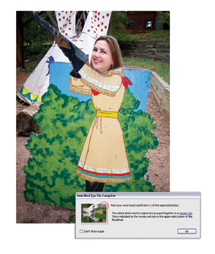
The New Photo Book Pages window offers a number of layouts for placing multiple
images on an album page. Themes offers specific backgrounds and frame treatments
for your photos. Adobe offers a variety of themes to get you started, but even
more themes or your own artwork can be used once the document has been created.
Make sure to click the "Auto-Fill with Selected Images" check box
and you can even "Include Photo Captions." After the program finishes
creating your page, you're in complete control. Using Photoshop Elements'
photo editor, every aspect of the page's photos and background are completely
editable. If the background doesn't match the color in your photos, click
on the Background layer in the Layer palette to select it, then create a Hue/Saturation
adjustment layer to colorize the background to suit. Want to add text on top
of your photos? Make a new layer and start typing.
 |
|
|
Photoshop Elements 5.0 lets you do a lot of things without leaving the program. You can upload new photo galleries directly to the web or some of the Adobe partner sites, including Kodak's EasyShare Gallery. While there you can order prints, photo books, cards, and calendars in a variety of styles and designs. You can even turn your photos into genuine US postage at PhotoStamps.com or control the display of a connected CEIVA (www.ceiva.com) digital photo frame.
|
| |||||||||


![]()
Get the Latest Photo Tips, News & Reviews from Shutterbug!
| Camera Reviews Other Reviews | Mobile Reviews Photography Reviews Columns | News | Features | How-To | Resources |
 © 2026 Shutterbug
AVTech Media Americas Inc., USA
All rights reserved