- REVIEWS
Camera Reviews 
More Reviews Mobile Reviews Photography Reviews - GALLERIES
- VIDEOS
- BUYER'S GUIDES
7 Tips On How to Display Photos in a Home or Gallery So They Look Gorgeous
(Editor’s Note: Jan-Ole Schmidt is an avid photographer and a Product Manager at WhiteWall.com, a professional online photo lab.)
Everyone has at least one folder of images labeled “my best shots,” or something to that effect, on their computers. The images run the gamut from stunning landscapes and sunsets to great family portraits, travel images from your last vacation, amazing street scenes, work from client assignments, and so much more.
But for many photographers, these great photos all share a common theme: they are all stuck in a folder on your computer and none of them ever get to grace the walls of your home or office. Oftentimes this is due to confusion – and fear – about properly reproducing your images so they look gorgeous on your walls. What type of substrate should I use and how do I properly display photos to create a great gallery wall or match the décor of a room?
Producing great prints for display also takes time, which is something many of us don’t have, and another reason why some of your best photos never make it to the wall. Creating the prints, determining the matting and framing, and designing the overall layout of a gallery wall all seems a bit daunting, and thus gets pushed off for another time that never seems to arrive.
But have no fear! Here are my 7 tips to help you select, print, and hang your best photos so they look gorgeous.
Tip 1: Create an “Assignment” for Yourself and Make it Fun
Creating a gallery of your photos takes time and it’s easy to delay the process, especially when work, family and life in general, get in the way. To get the process started, give yourself an assignment to create your gallery, complete with deadlines. Getting your photos physically on the wall requires several stages of planning. Working through those stages one by one with achievable deadlines for each will go a long way toward reaching your goal. Above all else, have fun with the process.
Tip 2: ICC Profiles and Paper Selection
Most photographers have experienced situations where image previews on their monitor do not exactly match the output from their printers. This may be caused by the monitor being too bright, not having the correct calibration or profile, or insufficient hardware. Calibration tools from companies such as Datacolor and Xrite can rectify this. If you are using an online lab to make your prints, many labs provide ICC profiles to create precise calibration for each paper surface they offer, including WhiteWall. Precise profiles can be achieved by downloading ICC profiles for specific papers and calibrating the photos you want to print, in Photoshop. In addition, different substrates such as acrylic glass and metal can effect the ICC profile, which is why WhiteWall’s ICC profiles take these substrates into consideration when creating profiles for its papers.

Tip 3: Think Outside the Design Box
By nature we think in terms of perfect symmetry. Exact sizes, even numbers of items, and identical shapes often prevent us from looking at specific walls or gallery spaces and seeing the true potential for utilizing that space. The secret is to trust your instincts and let your imagination take over.

Tip 4: The Right Print
If you’re a newcomer to the world of photo printing and gallery hanging, it’s easy to be overwhelmed by the large selection of materials you can print your images on — acrylic glass, aluminum, canvas, traditional wood frames, or something entirely different. Now that you have decided on the overall layout of your gallery wall using your paper templates, you should look at each photo individually and consider what materials or finish would make each photo look its best. If you want your wall art to still look amazing years down the road, it’s worth it to invest in really high-quality prints. Prints on different materials will have different auras about them, which can significantly affect the overall result. With the right choices, you can create your own personal work of art that will ideally continue to bring you joy for many years.
Tip 5: Have a Theme
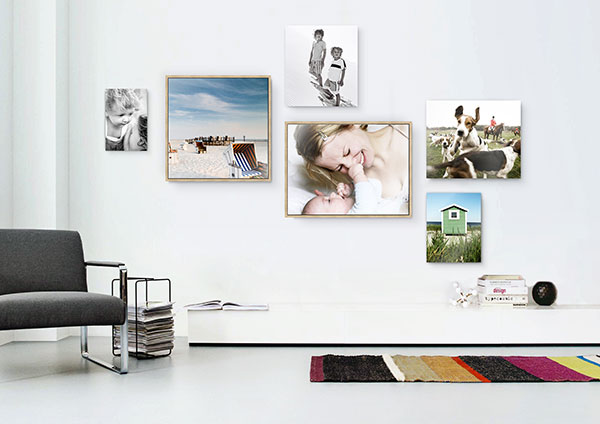
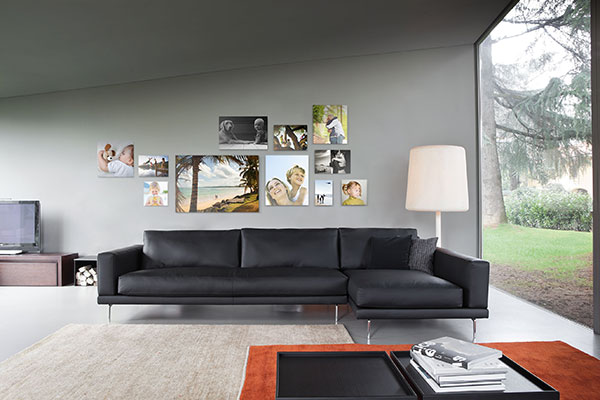
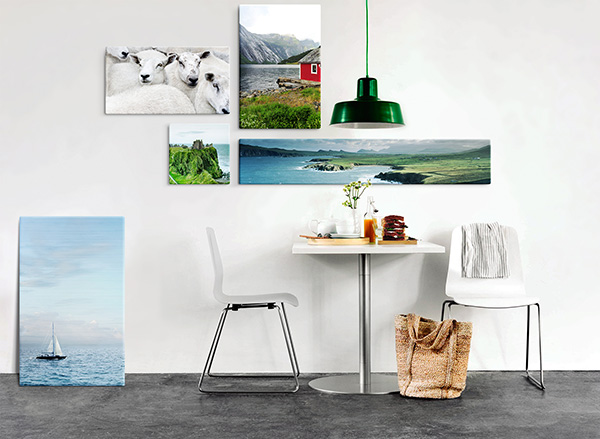
Like any good picture story there are certain photos that are integral to telling a complete story. It draws attention to what’s important. Telling a story with art on your wall should follow the same general rule. Having a consistent theme throughout your display gives it a sense of harmony and what you display says a lot about you as a person, and a photographer. Don’t underestimate the importance of picking the right pictures.

Tip 6: Make Connections
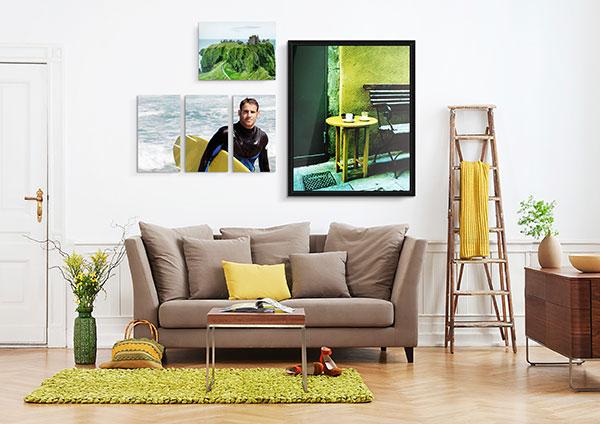
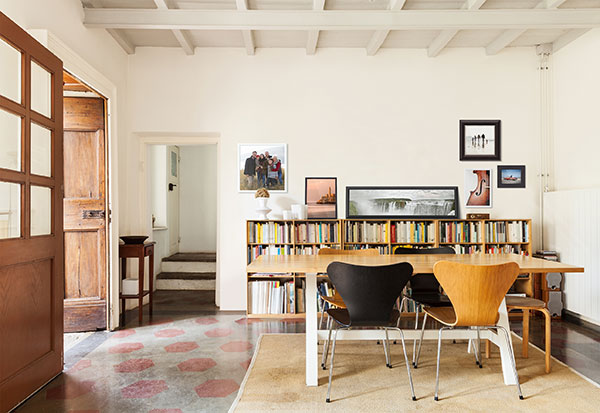
It is especially “atmospheric” when a particular hue, its complementary color, or a certain material can be found in multiple furnishings and pictures throughout the room. Pay attention to detail and let your pictures mirror the patterns and materials found in other furnishings. For example, WhiteWall offers a wide array of mattes in various shades and colors so you can always find the right color for your picture and the environment where they will be hung. In addition, select a picture frame with a color or material that recurs in other furnishings. Consider how the frame becomes a part of the picture, ultimately influencing how the photo itself is perceived.
Tip 7: Optimal Arrangement
To get a better idea of how your gallery wall will look, we suggest you take sheets of paper and cut them into the sizes and shapes you want your photos to be on your wall. Tape sheets of paper together to create a template for the larger images and mark the face of each shape with a brief description of the photo you are thinking to use for that specific shape. Gently tack them to the wall using small pieces of putty and feel free to move them around until you like the overall pattern of shapes and sizes.
As soon as your images arrive you can also get an impression of your hanging by laying the pictures out on the floor to get a feel for how they look together. You can easily move them around until you find the best arrangement for your wall. Once you like the layout, take a photo with your camera or phone and use it as a guide when it comes time to actually hanging the art.
Remember, larger photos at eye-level get noticed first and smaller pictures help provide additional details about the story you want to tell with your gallery of photos. Choosing the optimal ‘eye-level’ depends on whether you’ll mainly be viewing the pictures while standing or seated. Squares, rectangles, and ovals can all play nicely together and determining which photo gets certain treatment is completely up to you. The idea here is to not be afraid to mix it up. If you would like to hang a group of pictures together, you should put the best photos near the middle or position slightly higher in the grouping to draw stronger attention to these images first.
These are just a few tips to help get you started toward creating an amazing print gallery of your best photos. The important thing to remember is to trust your creative instincts and have fun with the entire process. In the end, you will have a beautiful collection of images you can be proud of every time you (and others) enter the room.
About WhiteWall
WhiteWall is a professional online photo lab based in Berlin, Germany. Their unique blend of custom photo processes and finishing services have provided photographers and consumers alike with gallery quality products since 2007. Best known for its photos under acrylic glass, brilliant HD Metal and aluminum prints, and hand-crafted frames, the award-winning online photo lab offers over 1,000 different product variations.


![]()
Get the Latest Photo Tips, News & Reviews from Shutterbug!
| Camera Reviews Other Reviews | Mobile Reviews Photography Reviews Columns | News | Features | How-To | Resources |
 © 2026 Shutterbug
AVTech Media Americas Inc., USA
All rights reserved