- REVIEWS
Camera Reviews 
More Reviews Mobile Reviews Photography Reviews - GALLERIES
- VIDEOS
- BUYER'S GUIDES
10 Low-Light Photo Tips
Ways to be bright when it gets dark.
Low-light photography can yield some amazingly striking and unusual images. But it also presents a problem. You need a fast enough shutter speed to prevent camera-shake-induced image blurring, and sometimes to "freeze" a moving subject. You often need to shoot at a small enough aperture to provide adequate depth of field. You want to use the slowest film possible for finest grain and best image quality. Yet the low light level requires slow shutter speeds, large lens apertures, and/or fast films. Here are some ways to deal with low-light shooting.
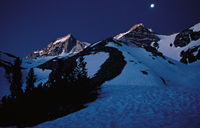 1 Use a Camera Support
Shooting in low light generally means shooting at slower shutter speeds. For sharp results, use a camera support. A tripod is the best camera support, but anything that helps steady the camera—a monopod, a beanbag, a handy wall or tree branch, etc.—will give you sharper photos of stationary subjects. And a camera support can help even with moving subjects: you can mount the camera on a tripod, and loosen the pan axis lock, so you can move the camera horizontally to track the subject while the tripod prevents up-and-down movement. Here, the photographer used a water glass as a "tripod" for the candlelight portrait, and an ice ax as a support for the landscape.
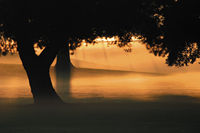 2 Use a Stabilizer Lens
If you use Canon or Nikon AF SLRs, you can get a lens with a built-in image-stabilization system (Canon's are designated "IS," Nikon's "VR" for vibration-reduction). Using such a lens will let you get sharp hand-held shots 2–3 shutter speeds slower than is possible with conventional lenses of the same focal length. The rule-of-thumb for hand-held shooting with conventional lenses is to use a shutter speed at least equal to the reciprocal of the focal length of the lens you're using: for example, with a 400mm lens, you need a shutter speed of at least 1/400 to get sharp hand-held shots (if your camera just has full-step shutter speeds, you'd shoot at 1/500 or shorter). With an image-stabilizing 400mm lens, you can get equivalent results hand-holding it at 1/100 or even 1/50. Here, Canon's EF 300mm f/4 IS image-stabilizer zoom lens was used on an EOS 10D digital SLR, providing the cropping (and camera-shake magnification) of a 480mm lens on a 35mm film SLR. The built-in image stabilizer provided a sharp hand-held shot in the foggy glow of sunrise.
 3 Use a Fast Lens
The faster your lens, the faster the shutter speed you can use in a given light level. If a 400mm f/5.6 lens requires a shutter speed of 1/60 in dim lighting, a 400mm f/4 will let you shoot at 1/125, and a 400mm f/2.8 at 1/250. That can make the difference between a sharp shot and a not-so-sharp one. That's why pro sports and wildlife photographers use superfast supertelephoto lenses. Of course, a 400mm f/2.8 lens costs many times what a 400mm f/5.6 costs. If your budget doesn't permit the acquisition of a superfast lens, you can rent one when you need it, or consider tip No. 4.
 4 Use Fast Film
Today's faster films are amazingly good, especially when compared to previous generations. While pro shooters prefer to use slower, finer-grained films and faster lenses, those of us lacking pro budgets can switch to ISO 400 films, and gain an two-stop "increase" in our lens speed. Most of today's ISO 400 color-print films, and Fujichrome Provia 400F color-slide film, provide excellent image quality. And their ISO 400 speed lets you shoot two shutter speeds faster than you could with ISO 100 film. You can even go with ISO 800 color-print film (as was done for the photo above) with good results.
 5 Increase the ISO
If the film you have isn't fast enough to let you get your shot, you can push-process it to a higher effective speed. Say you have ISO 400 film, and really could use an extra "stop" of shutter speed. Set your meter to ISO 800, make your shots, and have the lab "push" the film to EI 800. (ISO ratings are assigned by the manufacturers based on specific standards. Any other speed at which you rate the film is called an exposure index, or EI.) It's important to note that when you push film speed, you do lose image quality: contrast and grain increase, while sharpness and shadow detail decrease. But if it means the difference between getting your shot or not getting it, getting it is always better.
With many digital cameras, you can set a higher ISO, with the same caveat: image quality will go down as the ISO goes up. This "grainy" photo is actual a high-ISO digital image; in digital images, the grain is called "noise."
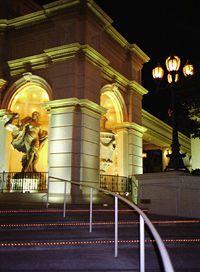
 6 Be Aware of Reci-procity Effect
We all learned the reciprocity law: E = It, Exposure is the product of the Intensity of the light and the amount of time that light hits the film. Increase the time, and you need less light. Increase the light, and you need less exposure time. An exposure of 1/250 at f/8 is the same as an exposure of 1/125 at f/11 or an exposure of 1/500 at f/5.6.
Well, for exposure times in the "normal" range, generally one second to 1/1000, the reciprocity law holds true (for practical purposes, anyway). But at very long or very short exposure times, the reciprocity law fails to hold true—the film loses sensitivity. In black-and-white, this appears as underexposed images, generally with reduced contrast. Color films have three or four emulsion layers, not all of which lose sensitivity at the same rate, so a color shift occurs along with the speed loss. You can just ignore this "reciprocity failure," and accept the results as a special effect (as in the Eiffel Tower shot), or you can compensate if accurate renderings are required. Film manufacturers generally supply reciprocity-correction data for their films (exposure and filtration), but for critical work with slide films, it's best to shoot your own test, trying different exposure times to see what happens with your particular system.
 7 Bracket Exposures
Dim lighting and contrasty lighting can fool an in-camera exposure meter, and low-light shooting encompasses both. To be safe, it's a good idea to bracket exposures: Take one shot at the exposure you think is correct, then shoot additional frames, giving more and less exposure than that. That way, you should get at least one "keeper." Many cameras have built-in automatic exposure bracketing, which makes this very easy to do, but it's not all that difficult to do manually, either. And if you've gone digital, you don't even have to pay extra for those extra frames.
 8 TV Pictures
Photographing images on a TV screen is low-light work, with exposures somewhere in the neighborhood of 1/8 second at f/4 on ISO 100 film. It's wise to use a camera support, and to bracket exposures the first time you do it (once you get your photos back, you'll know the right exposure for that particular TV for future shoots). A few considerations: First, make sure the camera is square-on to the screen if you don't want "keystoning." Second, turn off all lights in the room, so they don't reflect in the screen—you're shooting the light emitted by the TV screen (watch out for window glare in daytime, too). Third, TV images are produced by scanning. It takes a little time for the TV to scan the entire image onto the screen. If you shoot at too fast a shutter speed, you'll record only a portion of the TV image. With leaf-shutter cameras, you must shoot at 1/30 or longer, with focal-plane shutters, you might have to go as slow as 1/8 to get an entire image. Finally, TV images are not high-resolution from a still-photography standpoint—so your photos of them aren't going to be high-res, either. Here, the TV image was just used to add a little humor to a view of apartment kitty guarding the fort against almost all intruders.
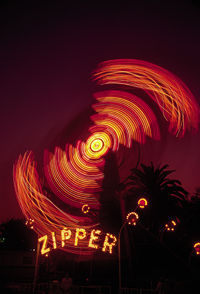 9 Blur Effects
You can get some neat blurred-effect images by hand-holding the camera at a very slow shutter speed—even deliberately move the camera during the exposure. Or, if the subject is moving, mount the camera on a tripod to keep stationary portions of the scene sharp as the subject blurs through it. Experiment with different exposure times, and you'll come up with lots of interesting—and sometimes surprising—images.
 10 Practice Makes Better
As is the case with most physical skills, you can greatly improve your ability to hand-hold the camera steadily at slow shutter speeds through practice. If you like to shoot in low light, this is a skill well worth the effort to acquire. You'll be surprised to see how slow a shutter speed you can hand-hold successfully after some serious practice. This shot of apartment kitty was made hand-held at 1/6 second with a zoom lens at 75mm. It's not pin-point sharp (kitties don't hold perfectly still for photos) but it preserves the nice feel of the available light, which would have been lost had the camera's built-in flash been used.


![]()
Get the Latest Photo Tips, News & Reviews from Shutterbug!
| Camera Reviews Other Reviews | Mobile Reviews Photography Reviews Columns | News | Features | How-To | Resources |
 © 2026 Shutterbug
AVTech Media Americas Inc., USA
All rights reserved