- REVIEWS
Camera Reviews 
More Reviews Mobile Reviews Photography Reviews - GALLERIES
- VIDEOS
- BUYER'S GUIDES
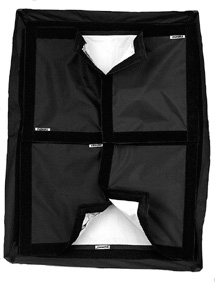
XP Innovations’ LiteShaper; Customizable Light Modifiers
When asked to do a report on the LiteShaper, I said, "Great." I'd seen the product mentioned in previous Shutterbug issues and it looked very interesting and unique. A box full of several LiteShaper panels and a couple of softboxes soon arrived on my doorstep. I worked with small- and medium-sized Chimera softboxes. After putting the boxes together and adding the speed ring for my Photogenic light, we were good to go. Now all I needed to do was figure out what to do with these slabs of nylon with touch fasteners all around the edges! They came in different sizes and were all black on one side and white or silver on the opposite side. A quick visit to the product's website (www.liteshaper.com) and a look at the enclosed flyer told me what I needed to know. Basically, you stick these floppy rectangles all over the front of your softbox to modify the light however you desire. Sounds easy. Let's get to it and see how it works and how useful it is.
I had a model scheduled for the afternoon but figured I'd better get
used to how the LiteShaper worked and get all my exposure stuff done early so
I wouldn't be slowed down later. So, my first subject was a yellow rose.
I mounted the medium softbox on my light and then proceeded to change it from
a square box to a "strip" light. A strip light is a narrow, long
light source, hence the name. I figured I'd use it to light the flower
from the right side and then light the background independently, since I wanted
to use a yellow gel to match the flower.
Using broad sources is nice, but I wanted to use the strip so that no light
from the main light would strike the background and weaken the colored light.
This was all very easily accomplished by using four panels to leave a strip
of light in the center of the softbox. I could have used two to split the box
in half but I wanted the stronger light from the middle. Of course, I had to
adjust exposure blocking off parts of the light.
It worked like a charm. The narrow beam lit the flower nicely and didn't
come near the background, which was about 5 ft away (#1). Time to move on to
the model!
 |
|
|
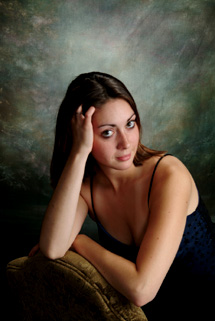
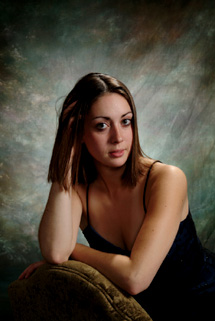
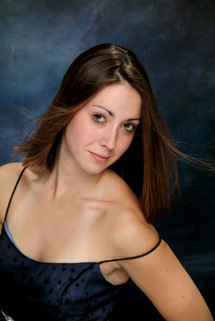
I started with the medium softbox and took a few comparison photos of Corinne Duquette with no LiteShaper panels attached. After I had a light I was happy with (#2), I used LiteShapers to once again create a strip light. As you can see from the comparison images, the shadows are deeper and more sharply defined, just as you'd guess from using a smaller light source (#3). Which look is better? It's totally up to you. The point is, with LiteShapers you can use one light or softbox and create many different effects instead of buying several different lights or softboxes.
 |
 |
||
|
|
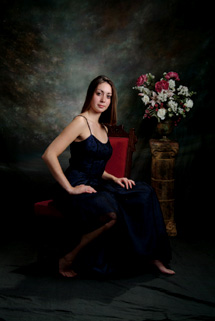
After the first setup, I figured for the next shot we'd use the LiteShapers to control just where we'd want the light to strike. I set up a full-length pose of Duquette and wanted to keep the attention on her face and torso with the light dropping off on her legs and feet. This was easily accomplished by using LiteShapers to create a small box in the center of the light (#4). Image #5 shows the same image without being blocked off--notice the difference in the foreground and right leg. Could you create this effect in Photoshop? Yes, but do you want to be working on every image? And (gasp), what if you're still shooting film and printing from the negs? Isn't it nice to be able to create the shape of light you want during shooting, like in the BD (Before Digital) era? LiteShapers can help you accomplish that goal.
 |
 |
||
|
|
Our next goal was to create a "beauty light." Many photographers use a curved silver reflector on a stand with an overhead main light to create this style of lighting, often seen on fashion magazine covers. The main light bounces off the silver reflector to create an almost shadowless light that has sparkle and creates a long catchlight in the bottom of the eye. We were able to accomplish this look by moving the main light with the softbox on it directly over the camera and aimed slightly down. By sticking three panels together with the silver side up and placing them under Duquette's chin, we were able to accomplish this goal (#6). Note to LiteShaper: Make some kind of stand to hold the panels. I had to jury rig it with chairs and stools.
 |
 |
|
|
||
|
| |||||||||


![]()
Get the Latest Photo Tips, News & Reviews from Shutterbug!
| Camera Reviews Other Reviews | Mobile Reviews Photography Reviews Columns | News | Features | How-To | Resources |
 © 2026 Shutterbug
AVTech Media Americas Inc., USA
All rights reserved