- REVIEWS
Camera Reviews 
More Reviews Mobile Reviews Photography Reviews - GALLERIES
- VIDEOS
- BUYER'S GUIDES
Why I Still Shoot with a Vintage Kodak Brownie Hawkeye Film Camera
Today’s digital cameras have become so adept at almost any shooting situation that, paradoxically, they can inhibit creativity by always delivering a technically perfect result. With little effort, a photographer can produce a sharp, clear, well-exposed image, color balanced and, well, a bit too perfect.
The truth of this is made clear by considering the myriad of digital filters, tonal corrections, softening tools, analog film simulations, and other software conversions that have flooded the market, for better or worse, and that allow you to move away from the “straight” image produced by digital cameras. They are a recognition that great photographs are often a long way from technically perfect photographs.

I myself fell into this trap because I spent my professional career with high-end cameras in both the analog (film) and the digital domains. As a retired pro now shooting for my own enjoyment, my creativity got locked into always seeking perfection with my images.
And so, to break out of this pattern, I decided to try shooting with the simplest (and least perfect) camera I could find: a 1960 vintage Kodak Brownie Hawkeye film camera. Going back in time with a box camera might be just the thing you need to unlock your own picture-taking creativity. It won’t cost you much and is just plain fun.

Classic Design
I found my Brownie Hawkeye on the Goodwill Industries auction site for a price of $7. They also show up a lot at yard sales, flea markets, and charity drop-off places. I didn’t really know much about the camera itself, having just a vague recollection that Kodak sold them in great quantity to amateurs. It is a triumph of old-school Bakelite plastic design, charming in a retro sort of way and ideally suited for its intended purpose.
You won’t need an instruction manual for the Hawkeye as there isn’t much to explain. The camera has no focus adjustments, no aperture settings, and no shutter speed settings.
As best as I can determine, the shutter goes off at about 1/50 second and the aperture is fixed at around f/16. The lens is a plastic single element, which is set at a focus point somewhere between five feet and infinity. The lens sits behind a flat glass cover plate, which in my camera had become cloudy with age.
I took the trouble of unscrewing the screws holding the cover glass in place so I could clean it; you may or may not need to do this. The same goes for the viewfinder. None of these dismantling steps requires any more skill level than being able to use a small Phillips screwdriver, but be careful that you don’t misplace the screws as they are quite small.
Loading the camera with film is straightforward: load the unexposed roll into the space at the top, drag out the paper backing to the take-up spool at the bottom and wind it a turn or two to make sure it “catches,” then close and latch the back and wind the film until you see the number “1” in the little red window. There is something delightfully reassuring about this simple process, which is remarkably low tech, reliable, and unchanged since George Eastman introduced it over 100 years ago.
In short, the only thing you can do with this camera is push the shutter button down, make a snapshot, and then advance the film to the next exposure by viewing the numbers through the red window.
Film Issues
There is one slight snag in this whole process, relating to the camera taking 620-sized film. I am not sure of Kodak’s intentions with the 620 format, as its width is the same as 120 film made today, a format that was quite commonplace back when the Brownie Hawkeye was popular. Perhaps, and this is only speculation, Kodak wanted to control the emulsions put into the camera, to ensure that amateurs didn’t load films that would not work well in a fixed-exposure camera such as the Hawkeye.
In any event, you will have to find a workaround to the film incompatibility problem, because the spools for the two film formats are different. The 620 spool is/was metal with thin flanges at the end, whereas the 120 spool is plastic with thicker flanges and a different key shape for the advancing knob. Both film sizes will fit with no problem into springy metal holders on the supply side, but only 620 spools will key into the advancing knob on the take-up side. In other words, you will have to load the film onto a 620 spool. (More on this workaround in the last section of this story titled “Converting a Hawkeye to Take 120 Film.”)
As for choice of film, the Hawkeye was designed to use the films of its day, which were around ISO 100 in color and black and white. The fixed shutter speed and f/stop were set for a partially sunny day, so that a bright sunny day gave you a negative of about one stop overexposed and a cloudy day of one stop underexposed.
Before jumping to conclusions about the possibility of exposure errors, keep in mind that when using negative films, either color or black and white, exposure latitude is wide-ranging. Errors that would result in blown-out highlights with a digital camera are of much less consequence when shooting film.
I can attest to this directly when I inadvertently overexposed color negative film by three full stops and was still able to extract a decent scan of it on my Epson 750 film scanner. The wide tolerance of film is the only reason the fixed exposure of a box camera can work at all.
The images shown in this story were either from Kodak T-Max 100 black-and-white film or Kodak Ektar 100 color negative film. But any modern film in the ISO 100 to 200 range should work just fine. If you plan on shooting on overcast days, or any lower-light environment, my suggestion would be to load an ISO 400 film.
Now let’s get going with some shooting tips, in no particular order.

Don’t Try to Make Close-ups
The Brownie Hawkeye, like all box cameras, has a fixed focus lens set at about six feet. The f/16 or so aperture allows you to move in to perhaps four to five feet and still register an image that looks sharp enough. In any case, this is not a camera designed for razor-sharp images and you have to plan your photographs around that.
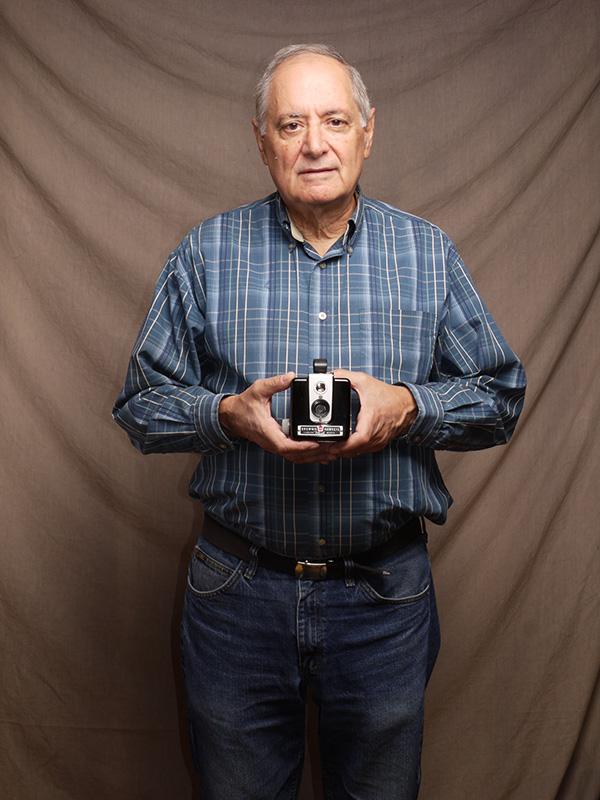
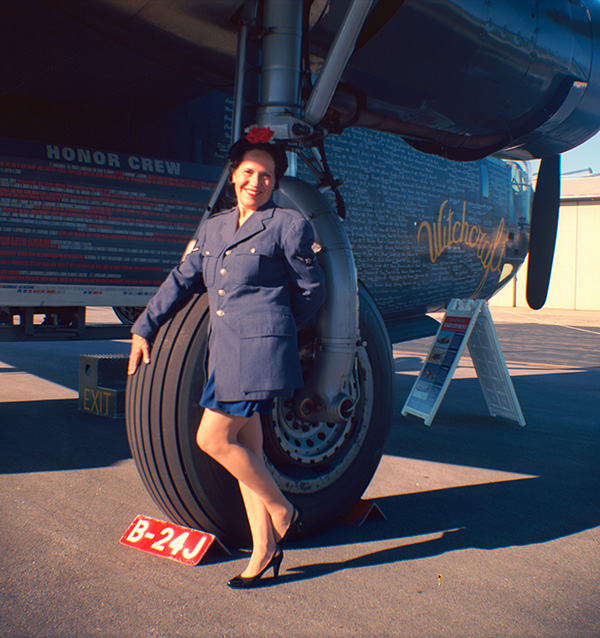
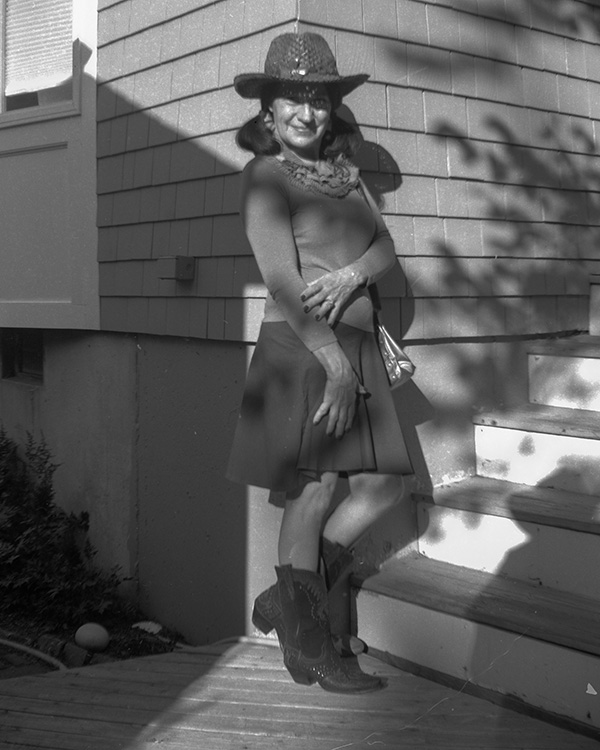
I would not recommend it for landscapes, where you are looking for lots of fine detail; the camera just can’t deliver that. On the other hand, it does pretty well with full-length portraits and graphic subjects out to infinity, and the large negative size scans up nicely and shows little or no grain. Kodak knew what they were selling: a camera intended to take family member snapshots.
Don’t Get Hung Up on Proper Exposure
I have a personal hang-up about getting the exposure right, a legacy of my transparency film shooting days. It was actually a bit difficult for me to lighten up and just press the shutter button without dragging out light meters and overthinking the picture before me.
To have no control of the exposure was liberating for me, within limits, of course, and it led to pleasant surprises. My general advice is simple: shoot outside during normal hours and the camera will deliver an image. Then do fine adjustments in post-processing with your favorite software. (I use Lightroom most of the time.)
Watch Out for Lens Flare
The Brownie Hawkeye lens is just a piece of clear plastic and wants to flare out at the least provocation. Backlighting is always problematical which is why Kodak used to give advice about always having the sun at your back. Today’s lens coatings are so advanced that shooting into the light is seldom a problem and has led to complacency about lens flare. Shooting into the light with the Hawkeye is not recommended, plain and simple. (Unless, of course, you want lens flare in your images, which I hear is all the rage with some younger photographers these days!)
Compensate for the Primitive Viewfinder
The Brownie Hawkeye viewing system is not exactly a model of precision. You look down into a magnifying lens and then a right angle mirror and viewing lens, all of which sit slightly above the taking lens. Light shining onto the camera will obscure the viewfinder image so it’s best to hold the camera close to the body and thus block the light if you can.
Further, the viewfinder image does not line up precisely with the actual lens image, so be careful about image details around the edges—leave extra room. In a couple of my photographs, I clipped off the top of a subject’s head because it looked well clear of the edges of the frame through the viewfinder, but not in the actual exposures; the viewfinder is not that accurate.
Double Expose and Time Expose
Double exposures and time exposures have become somewhat difficult with digital cameras and can’t be done at all in some cameras. The Brownie Hawkeye is made for double exposures: just push the shutter button a second time, or a third time. However, standard practice should be to advance the film to the next number seen through the red window on the back, just after taking a picture. You don’t want to unintentionally take a double exposure.
Kodak designed the Hawkeye to take time exposures, which is puzzling because the camera lacks a tripod thread on the base. I guess you are supposed to prop the camera on a flat surface and hope for the best. The light gray plastic molding on the top left, when lifted up, will reveal the word “LONG,” at which point the shutter will remain open as long as you hold down the release on the right side…cute. I need to do more with double and time exposures, just for the sheer fun of it.
Pick Your Subject Matter to Fit the Camera
This is not a camera for fine landscape photography or close-up (macro) photography or action-stopping photography, and on and on. You get the best results from working with, not against, its limitations.
Indeed, in the shots accompanying this article, I made a point of doing just that: taking modern pictures in a 1960s snapshot style. This means keeping your distance to at least five feet, and with the sun at your back, just as Kodak recommended a half-century ago.
With proper attention to clothing and posing, the result will be a quirky mixture of old and new “looks,” which will leave the viewer wondering if the photographs came out of an old album from an attic somewhere…or maybe not. The resulting pictures will have a charm of their own, while also stimulating creative ideas when you use modern cameras.
Converting a Hawkeye to Take 120 Film
And finally, if you are thinking of shooting with a Hawkeye camera, consider the following advice.
Kodak cleverly prevented the loading of 120 film in the Hawkeye camera by bending a little “tail” into one of the metal spool holders on the take-up side. The slightly wider 120 spool causes this tail to interfere with closing the camera. So you will have to defeat this little bit of engineering with a little engineering of your own.
The obstructing “tail” can be bent out of the way with a pair of pliers, or you can cut it off with a pair of tin snips or with a Dremel tool and a cutoff wheel. This all sounds a lot harder than it actually is and can be done by anyone who has used a nail clipper.
Once done, you are all set to load any 120 film, always keeping in mind that you will have to save the 620 take-up spool for loading the next time. This means letting your lab know that you want the spool back rather than thrown away, if you go outside for processing.
Another workaround, which I used once, is to buy film already wound onto 620 spools. Although Kodak stopped selling 620 film years ago, there is apparently enough of a market that this obsolete format is now available once again from suppliers who respool 120 film onto 620 spools.
This is a time-consuming and tedious process, and the resulting film is selling at more than twice the price of the same emulsion in 120 size. Two suppliers I know of are B&H and The Film Project, and it might make sense to start off this way if only to get a couple of 620 take-up spools.
Michael Chiusano is a retired advertising photographer who owned a studio for many years and now shoots personal projects and occasional client assignments.


![]()
Get the Latest Photo Tips, News & Reviews from Shutterbug!
| Camera Reviews Other Reviews | Mobile Reviews Photography Reviews Columns | News | Features | How-To | Resources |
 © 2026 Shutterbug
AVTech Media Americas Inc., USA
All rights reserved