- REVIEWS
Camera Reviews 
More Reviews Mobile Reviews Photography Reviews - GALLERIES
- VIDEOS
- BUYER'S GUIDES
Wedding And Portraiture
Friendly Tips For Photographers
A Reminder About Effective Techniques
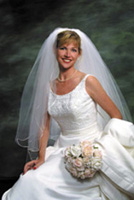
A recent class in South Carolina brought to mind quite a few things that photographers have heard before, but for one reason or another just never seem to remember at the appropriate time. So, skimming through some of the images that I created that week, I thought that it would be a good idea to bring them to your attention. Let's start by taking another look at my typical 3/4 length seated bride, undoubtedly my most successful bridal portrait. Without question a light behind the veil is essential. The same f/stop as the main lens or even a little less is okay. But you have to use it. Otherwise the veil goes dark. Take a look at where the portrait is cropped, well below the knees. Don't crop it up so high that she looks cutoff at the waist. Keep her bouquet down! Don't cover up her waistline or bustline, unless you're trying to do that for one reason or another. |
|||
Posture is everything! Lean her forward, toward her knees. Keep her body at a slight angle to the camera and lift her body up to its full height. Don't let her be comfortable. Let her be gorgeous! Turn and tip her head to her high shoulder. The feminine pose is beautiful. Turn her body away from the light, so that it crosses over her gown, showing shape and texture to her dress. Show the side of the hand, not the back. In this particular portrait I have taken her train and placed it over her arm. This is a particularly good idea for today's brides, since many of them are wearing sleeveless dresses and bare arms aren't usually photogenic. This also works well for brides who are wearing sheath dresses that really don't look too good in a seated position. Camera height is just about at her waist level. |
|||
Simple & Open Lighting Don't make the mistake of placing the main light directly in front of her face, as so many photographers do. I see this especially with window light portraits, where photographers often turn the face directly into the light and create totally flat lighting. |
|||
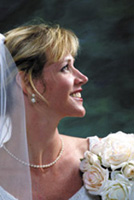
Notice in this profile portrait how the main light is brought around sufficiently enough to put the side of her nose in shadow. See how it outlines the shape of her profile, while creating a great three-dimensional look of her face. How does this profile lighting differ from that of the full face? It doesn't. That's why it's necessary to continually move the main light around as the face moves away from the lens. I also tend to keep my fill light on the same side of the camera as the main light. That way there are no conflicting shadows created by the fill light. All the light wraps from the same direction. Thus, for this profile portrait, my fill light is camera-right, as we're facing the bride. |
|||
Notice, too, that I lower my camera position for the profile, so that you can see a definite space between her shoulder and her chin. Also, be aware that I have removed any hair or veil that might be coming out from the back side of her profile. A clean, uninterrupted outline of the face is what I'm looking for. When the bride's flowers are included close to her face, as they are in this portrait, I make certain that they are positioned so that they don't take away attention from her face and that the picture is cropped to keep the bride's eyes 1/3 of the way down from the top of the portrait. You don't have to show the entire bouquet. Outdoor Portrait Lighting |
|||
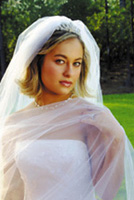
| In this portrait, for instance, we found the late afternoon light quickly setting toward the horizon. At first I tried to backlight the bride with the direct light from the sun. It was still too bright. Then, I got the idea of having a couple people hold up my Westcott Translucent Panel. It filtered the strong sunlight down to beautiful, soft backlight for the bride. I had another person hold my Westcott Monte's Illuminator (a silver/black reflector) to create the main light. For this 2/3 view of her face the reflector was positioned at a 90 angle from my camera. Thus, the light coming through the translucent panel was turned around by the silver reflector to create the light pattern on her face. Pretty simple and effective, wouldn't you say? How easy can it be? |
|||
| Outdoors, Look For Cover!
We first seated our model on the pavement just underneath the cover. I exposed for the light on her, completely disregarding the light in the background. Since the sky at that time was slightly overcast, there wasn't that much difference between the two areas. The fact that there was light falling on the background was definitely to our advantage, as it would create a great feeling of depth. Plus, there was substantial foliage close to the ground. This prevented a lot of blotchy areas from showing close to the ground. |
|||
| This first picture was exposed completely for the ambient light on her face--totally natural light. I turned her body and face slightly toward the opening so that I would get highlights on the back side of her face and body. The resulting picture was "okay," but I knew that I could add more punch to it. So, I took the reflector off my Quantum flash and pointed the flash tube away from the lens so that the body of the flash would prevent it from flaring my lens. I measured the flash to be about 11/2 stops below the ambient light. The results looked good, so I went for it! Notice, by the way, that I asked her (and most of my subjects recently) to remove her shoes for the picture. Today's shoes just aren't very attractive, in my opinion. They seem to draw attention to themselves. |
|||
Notice how the flash opens up her face and just cleans up the whole portrait. At the same time it doesn't overpower the ambient light. Can you still see the highlights from the daylight coming around from the back side of her? Also notice how I had her straighten her back. Posture is everything. Not comfortable, not natural, but it appears natural! That's all that matters. Since she's facing to my left side, the flash is camera-left, her face going toward the light. |
|||
Evoke Emotion With Your
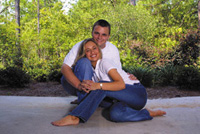
Family Groups Remembering how effective it was to photograph under cover of the carport, I also began this portrait session there. Exposure was simple: ambient light under cover, adding a bare-bulb flash about 1-2 stops less. I didn't know how I was going to bring them together. All I could think was that I wanted the two of them to connect physically in a way that would represent the mother/daughter attachment. |
|||
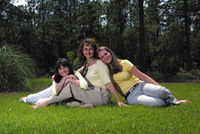
I started with the mother in a typical pose that seems to be a good base from which to build a group. Then, I got the idea of laying her daughter down on her side, her chin resting on her mother's knee. I used arms and legs to build a pyramid composition. Everything fell into place. It's so much nicer than having everyone sitting up straight, totally detached from one another, isn't it? By this time the older daughter had returned with a better top for her outfit. It was a simple matter of adding her to the composition, balancing the other side of the portrait. Telling her to place her head on her mother's shoulder was totally natural. Look at the expressions the posing evoked. Is there any question about how close the three of them are? |
|||
Don't you get an emotional tug at the heartstrings when you look at these portraits? That's what I'm going for. This is, perhaps, what makes my family groups stand out from those of others. The family members aren't just positioned in the photographs as individual people. They're joined together in their portraits as they are in life. "What about going out into the bright midday sunshine?" someone asked. "No problem!" I found an area that had a solid base without patches of sky coming down to the ground to distract from my subjects. There was light hitting the background so it retained detail, even when I added a flash. There was even a great clump of tall grass to my left, adding another layer of depth to the composition. It was Perfect! |
|||
I brought them into the bright light and asked them to sit back down exactly as they had done in the previous picture. I didn't feel that I could improve on what I had already done. I was right. I loved it! Exposure was for the bright sunshine. I added a strong flash close to the camera to fill in the shadowed faces. The flash was almost the same exposure as the sun--just a little bit under. As far as I'm concerned, it just doesn't get any better than this! CPPPI Comes Through, Again! |
|||
I set up my Zuga Green background
from Denny's. It works all the time! I posed her on my ALM Posing Stool
(also known as the Monte Posing Stool), leaned her forward onto the
Photogenic Tony Posing Table and added a Westcott Monte's Illuminator
below her face to brighten her eyes. Notice how the reflector is turned
up toward the light source. Putting It All Together I guess you just have to keep in practice. You can't retain things if you don't put them to use. You're not going to learn how to ski by reading ski magazines. You've got to get out on the slopes and get half scared to death before you really know what you've learned and what you still need to practice. It's the same with creating portraits. |
|||
Finally, the class challenged me one more time to go out into the open and create something good. So, what was the first thing that I did? Yes, I selected the background. At different times of the day the background changes considerably. This morning I selected a wooded area for the same reasons I had selected other backgrounds earlier in the week. There was no sky coming down to the ground. Plus, the fact that bright sunlight was scattered throughout the trees made this an ideal background. The problem was how to light the couple while still retaining good detail behind them. In a stroke of "genius" I had two of the class members once again hold up my Westcott Translucent Panel to change the bright, splotchy sunlight on them to a soft, shaded setting. It was great. Then, when I had her look up at him, the highlight on her face was perfect. Nothing more was necessary. What we saw was what we got on the film. Oops! (There wasn't any film!) The pictures for the entire week were made with my Canon D30 digital camera! Boy, if there were any doubters when the week began, there certainly were none left by time the class was finished. Seeing was believing. And seeing my D30 in action did the trick! So, here's one more "friendly tip," digital imaging isn't "coming" any more. It's here, baby! |


![]()
Get the Latest Photo Tips, News & Reviews from Shutterbug!
| Camera Reviews Other Reviews | Mobile Reviews Photography Reviews Columns | News | Features | How-To | Resources |
 © 2026 Shutterbug
AVTech Media Americas Inc., USA
All rights reserved