- REVIEWS
Camera Reviews 
More Reviews Mobile Reviews Photography Reviews - GALLERIES
- VIDEOS
- BUYER'S GUIDES
Wedding & Portraiture
Create Your Own Outdoor Portrait Studio
Portraits can be created
outdoors in just about any environment. The key is to learn how to make
just about any lighting situation work for you. Sometimes, when you
choose your background you might find yourself photographing your subject
in direct sunlight. At other times, you may be placing your subject
in complete shade. It shouldn't matter to you. You should be able
to adapt your lighting to whatever situation presents itself. |
|||
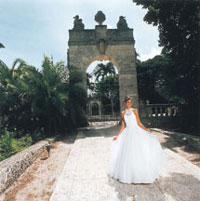
We began the portrait session
just outside of a building where the Quincenera girl changed into her
gown. It was a bright, sunny day. I wanted to show the brilliance of the
day, as well as to show the beautiful settings in which we were working. |
|||
A bright sunny background to
me always means setting my camera at 1/125 at f/16. That was a given.
The backlighting created a beautiful separation light between the girl
and the background. But her face and body were in total shadow. No problem.
Since I knew that my exposure was f/16, I used a Quantum flash at full
power to bring the light up on her face to f/16. |
|||
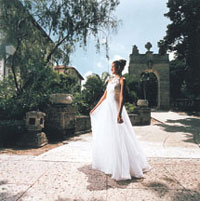
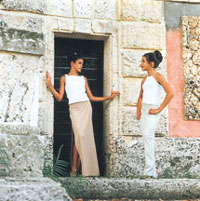
Using The Environment
For Framing. With so many great trees and buildings surrounding
us, it was a natural to use them as a composition aid to create even more
depth (Photo 2). Profiles were a natural for this young lady. In the future
I'd have a second flash close to the camera, or I'd use a
reflector to help keep detail in the shadowed areas. The reflector could
pick up the flash or daylight, whichever works best in a given situation. |
|||
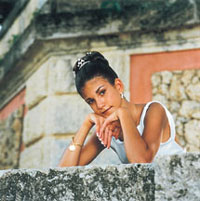
The photograph was made with all natural light. The camera was very carefully positioned to place the outline of her profile against a very plain background, so that there would be no distracting elements behind it. The exposure was for bright sunshine. There was enough ambient light to fill the shadows on the right side of her face without my needing to use a reflector or flash. What If You're In A Completely Open Space? When I'm in a completely open space--no shade around--I simply try to position the subject's gaze, so that he/she is not looking directly into the sun. Then, because there are probably dark pockets of shadow in the eyes, I use a strong flash to open up those areas. |
|||
For Photo 4 I was lucky enough
to be able to have a shaded area behind me, so that when she was looking
toward the camera her eyes would not be squinting. Since the same light
is falling on the subject as on the background, there's no need
to do anything but flash on or near the camera to open up the shadows.
As you can see, it's still possible to create portrait style lighting
with direct sunlight. |
|||
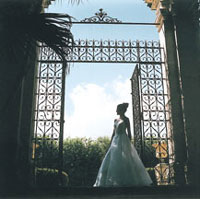
If you could find or even build the perfect outdoor lighting situation, what would you look for? Without a doubt it would be a covered gazebo. That's what I found when we walked through the grounds of Vizcaya. But to be even more specific, the gazebo had four or five windows of light all around it. To make it still better each of those openings were separated by a 3 or 4' enclosed wall. What this actually created were individual light sources that worked as main, side, and rear 45° lights. It couldn't have been nicer. Photo 6 is a perfect indication of what I was able to do, simply by split lighting her face with one of the openings and allowing the rest of the light sources to completely wraparound her. The light was all available, ambient light as it came in from the areas surrounding them. |
|||
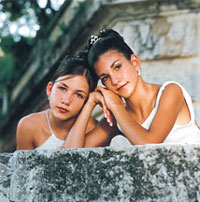
I was on such a roll, I decided
to push a little farther and pose the two sisters together--still with
all available light through the gazebo's openings (Photo 7). Outside,
the sun was blazing hot. Underneath the gazebo it was tranquil, quiet,
and beautiful. The images reflected the atmosphere that was prevalent
there. |
|||
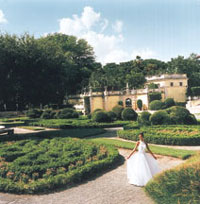
Exposing again for the bright sunlight of the entire scene, I turned up the power of my flash to come as close to the brilliance of the sun as possible. At the distance I was from my subject it was just about impossible to overpower the bright sunlight with a flash. I had the flash up to full power. The balance of the sunlight and flash was perfect. Had I not selected an overall viewpoint like this for Photo 9, there wouldn't be anywhere near the magnificent depth that I was able to create in this scene. Even in this view of the gardens and buildings I was still able to find a viewpoint from which the area was partially backlit or sidelighted. In all of this grandeur I was still able to place my flash just out of view on the same level with the girl, keeping detail on the shadowed side of her face. |
|||
Which Is More Important, The Light Or The Background? How can you make a decision like that? Truthfully, they're both pretty much inseparable. If I had to make a choice, however, I'd probably say that the background is more important. The reason why? It's usually quite easy to change the lighting. You can manipulate that much more easily than the background. The backgrounds can be changed, however, by under or overexposing them, putting them out of focus, changing the camera's viewpoint, changing lenses, cropping--I never before realized how much control we do have over our backgrounds. |
|||
Special Effects?
Why not? The silhouette in Photo 10 was achieved simply by exposing for
bright sunlight and keeping her face in complete shadow. So simple. We
even got color in the sky. Want just a little detail in her face? Use
a reflector or weak flash, but keep the exposure the same. It's
that simple. |
|||
The light was coming from the
end of the wall, far right, creating a small highlight along the left
side of their faces (Photo 11). There was no additional lighting that
I used here. I was simply taking advantage of what I created by keeping
the sisters close to the wall. There was no other direction that the light
could come from, except the open area. |
|||
The Grand Finale Of
The Day. I was debating as to whether or not we should wrap it
up for the day. I knew that I had a great selection of portraits already
and could probably go home with a feeling of great accomplishment. As
I started to carry my equipment down the steps I turned and saw my young
subject resting wearily on the rail. It was worth a few more pictures,
I thought. The only problem was that the light was completely flat. No
direction of light. "I can deal with that," I thought. |
|||
My final thought for this series
was to add her sister back into the picture (Photo 14). All I did was
to lean the younger sister onto the arm of her big sister. Their expressions
could not have been any nicer. I was in heaven. The light coming from
behind beautifully highlighted the right side of the younger girl's
face. The reflector lit them both with a strong enough light to make it
appear as if they were both in some kind of spotlight. Just look at those
eyes and those slight smiles. How could I resist? I couldn't. And
you're witness to it all right here. |


![]()
Get the Latest Photo Tips, News & Reviews from Shutterbug!
| Camera Reviews Other Reviews | Mobile Reviews Photography Reviews Columns | News | Features | How-To | Resources |
 © 2026 Shutterbug
AVTech Media Americas Inc., USA
All rights reserved