- REVIEWS
Camera Reviews 
More Reviews Mobile Reviews Photography Reviews - GALLERIES
- VIDEOS
- BUYER'S GUIDES
Want Perfectly Exposed Outdoor Photos Every Time? Use These 5 Simple Steps (VIDEO)

It’s can be challenging to achieve perfectly exposed photos when shooting outdoors under difficult lighting conditions with a broad range of tones from highlights to shadows. While it’s often possible to rehabilitate poorly exposed images during the editing process, wouldn’t you rather get it right in the camera?
In the very helpful tutorial below you’ll learn several powerful techniques for consistently nailing exposure, while watching in-the-field demonstrations for getting the job done.
Instructor Duade Paton is an Australian pro specializing in nature and wildlife photography, and he uses images of birds to illustrate his tips. As you’ll see, his powerful method for achieving perfect exposure works equally well when photographing all forms of wildlife and a myriad of other nature subjects.
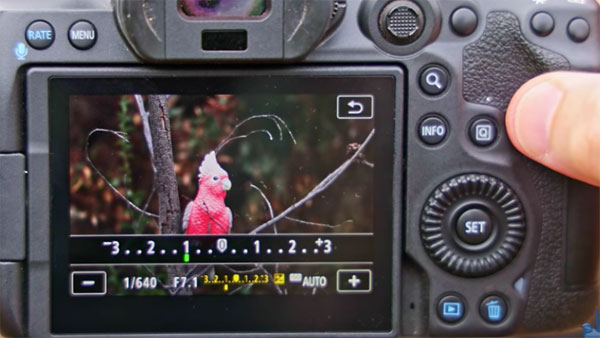
To prove his techniques don’t rely upon the latest high-end gear, Paton shoots with both an old 10MP Canon EOS 40D and the state-of-the-art Canon EOS R5 full-frame 45MP mirrorless camera. While Paton says shooting in Manual mode isn’t absolutely necessary, that’s the approach he recommends.
Paton also offers tips for shooting with your mode dial to Auto, but he begins by answering the question, “Why would you shoot in Manual when Auto mode is easier?” He then provides an overview of how the meter in a camera works, and discusses his most-used settings.
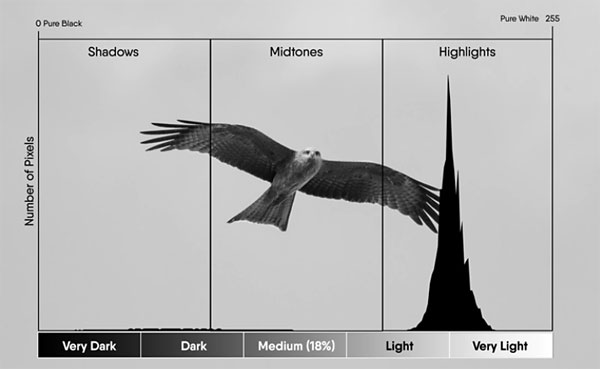
You’ll also learn how to harness the power of your camera’s histogram, why it’s important to pay attention to overexposure warnings, and the difference between Manual and Auto ISO settings. Other tips include dealing with uneven light and how to keep image noise to a minimum at various ISO settings.
You can find more great advice on Paton’s YouTube channel, so be sure to take a look and subscribe.
And don’t miss the tutorial we posted from another outdoor photography expert, explaining how to shoot beautiful cityscape photos on vacation or at home.


![]()
Get the Latest Photo Tips, News & Reviews from Shutterbug!
| Camera Reviews Other Reviews | Mobile Reviews Photography Reviews Columns | News | Features | How-To | Resources |
 © 2026 Shutterbug
AVTech Media Americas Inc., USA
All rights reserved