- REVIEWS
Camera Reviews 
More Reviews Mobile Reviews Photography Reviews - GALLERIES
- VIDEOS
- BUYER'S GUIDES
Use SELECTIVE COLOR to Fix Hot Spots in Photoshop (VIDEO)
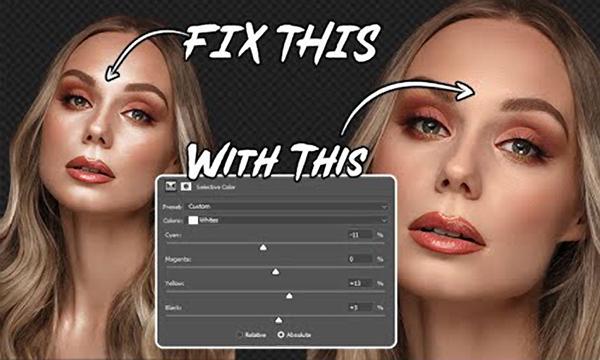
Hot spots and highlight blowouts are the bane of portrait photographers and others. They can occur with images shot in the studio under artificial illumination, as well as those captured with natural light outdoors. Fortunately there’s a simple and effective Photoshop fix, as you’ll see in the quick tutorial below.
This nine-minute episode comes from the f64 Academy, an instructional YouTube channel with the goal of presenting “the best Photoshop tutorials for photographers of all skill levels.” This one pays off on that promise, and is easy enough for anyone to accomplish.
If you’ve watched previous lessons from image-editing expert Blake Rudis you know that Selective Color is one of his favorite Photoshop tools for a variety of tasks. Today he begins with an exuberant question: “How in the heck can Selective Color fix a highlight blowout or portrait hot spot?”
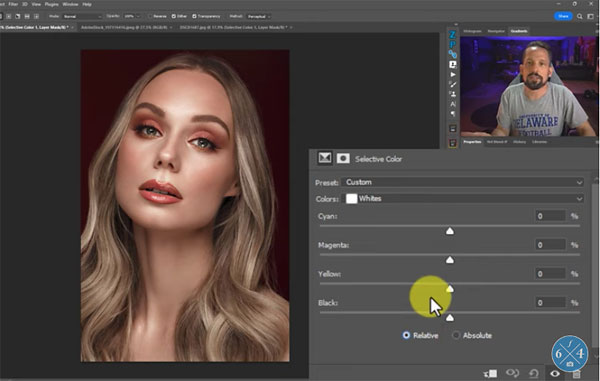
The typical approach for these kinds of corrections is Luminosity masking. But Rudis insists that the method you’ll learn today “will blow any Luminosity Mask out of the water.” In fact, he has a three-word description for the image he repairs here using Selective Color: “WOW that’s insane.”
As you’ll see, this remedial effort employs Selective Color for two purposes: One to eliminate hot spots on the model’s face, and another to color grade the distracting highlight blowouts. Rudis says he recently experimented with the absolute values of a Selective Color layer in terms of tonal values, “and I was shocked, I mean shocked, at what I was able to do.”
If this tool elicits that response from a pro like Rudis, it’s definitely a method the rest of us to should learn how to use. And the implications range far beyond portraiture alone—including landscape photography as he demonstrates near the end of the video. So give his tips a try and take care not to shock yourself too much when viewing your results.
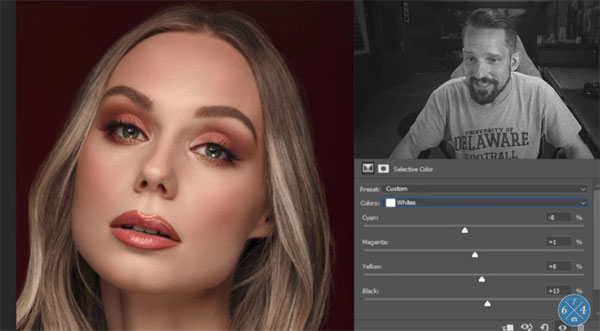
Rudis describes the difference between relative and absolute values, and explains why you should rely upon the latter for these particular tasks. He then walks you through the simple step-by-step procedure for getting the job done.
We encourage you to visit the f/64 YouTube channel frequently, especially if you’re a regular Photoshop user, where there are many more techniques to learn. It’s also a great source of solutions whenever you run into a problem.
And be sure to check out the tutorial we posted from another image-editing expert, explaining how to eliminate ugly bright halos in landscape photos.


![]()
Get the Latest Photo Tips, News & Reviews from Shutterbug!
| Camera Reviews Other Reviews | Mobile Reviews Photography Reviews Columns | News | Features | How-To | Resources |
 © 2026 Shutterbug
AVTech Media Americas Inc., USA
All rights reserved