- REVIEWS
Camera Reviews 
More Reviews Mobile Reviews Photography Reviews - GALLERIES
- VIDEOS
- BUYER'S GUIDES
Use the Point Color Tool for Full Control of Your Photos (VIDEO)
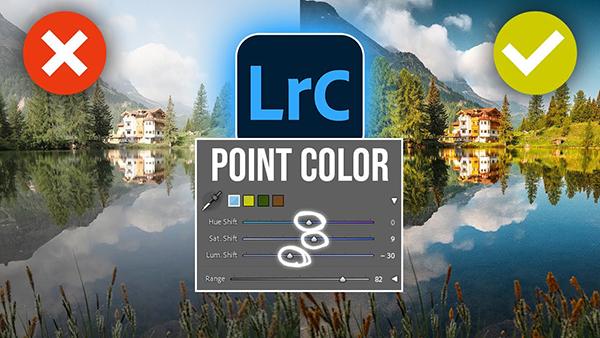
If you're unfamiliar with Lightroom's powerful Point Color tool, this comprehensive beginners guide from the PHLOG Photography YouTube channel will set you straight. In barely 10 minutes you'll learn how to expand your workflow by gaining full control of the colors in your images.
Instructor Christian Mohrle is a highly acclaimed German pro whose instructional channel boasts over 100K enthusiastic subscribers and almost 900 shooting and editing how-to videos. He promises that what you'll learn in today's Lightroom episode will definitely make your colors POP!
Before getting started download the demonstration Raw file from the description beneath the video so you can follow along in real time and make the adjustments yourself as the steps are explained. Mohrle explains Lightroom's Point Color tool in the context of landscape imagery, but it's benefits are equally transformational for all types of outdoor imagery.
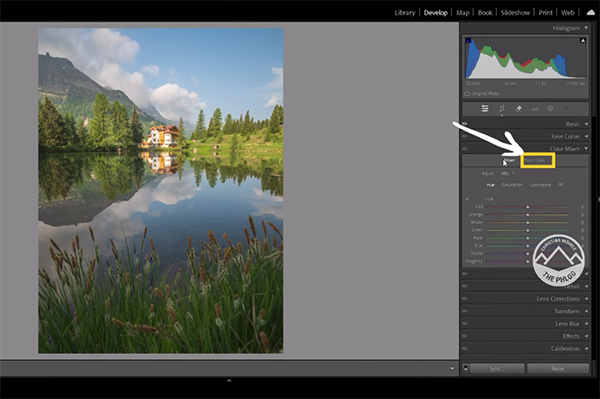
As always, Mohrle kicks off his edit with several global adjustments to prepare his shot for the selective enhancements that follow. He starts the preliminary adjustments by expanding Lightroom's Basic panel and changing the default profile to Adobe Landscape which instantly increases base saturation for a more vibrant look.
Other initial enhancements involve bringing up exposure while dialing down highlights, opening up shadows for more detail, and raising contrast in the whites. Mohrle completes his global moves by boosting clarity, texture, and dehaze while adding a big bump to vibrance.
Now Mohrle turns his attention to Lightroom's Point Color tool that's found on the right side of the screen when you open the Lightroom's Color Mixer panel. You won't see anything going on until you first select the color you want to adjust. Once you do that a variety of options become available, and Mohrle's describes what they how and explains how they work.
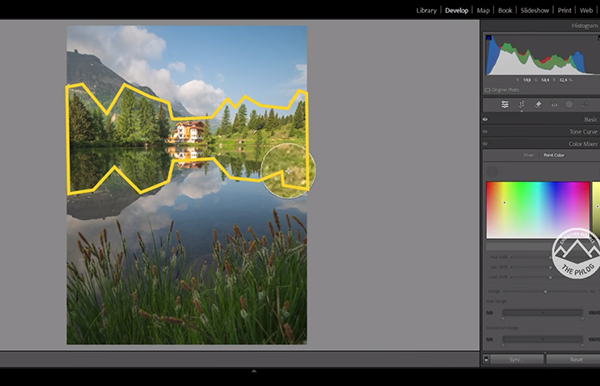
He then demonstrates the power of Point Color enhancements in combination with thoughtful masking. The lesson concludes with a bit of quick calibration and subtle sharpening. Check out the before/after examples and you'll be very impressed.
There's much more to learn on the PHLOG Photography YouTube channel, especially for landscape shooters, so be sure to pay a visit then you have time to explore.
We also encourage you to watch the tutorial we featured with a globe-trotting expert who demonstrates a Photoshop technique for brushing in a realistic direct light effect to make travel and landscape photos really stand outs.


![]()
Get the Latest Photo Tips, News & Reviews from Shutterbug!
| Camera Reviews Other Reviews | Mobile Reviews Photography Reviews Columns | News | Features | How-To | Resources |
 © 2026 Shutterbug
AVTech Media Americas Inc., USA
All rights reserved