- REVIEWS
Camera Reviews 
More Reviews Mobile Reviews Photography Reviews - GALLERIES
- VIDEOS
- BUYER'S GUIDES
Unlocking HDR; Examining Photoshop’s HDR Mode: Are There Better Ways To Deal With High Dynamic Range Images?
It's a fact of photographic life that some of the most exciting lighting
conditions are also the most challenging. Bright sunlight produces intense colors
but also areas of very deep shadow, and with heavily backlit subjects the difference
in brightness between the highlights and shadows may be so great that one or
the other must be sacrificed. And yet, the conventional photographic wisdom
is that a "good" photograph should have detail in both shadows and
highlights. This isn't always essential, but it's nevertheless often
true that large areas of blocked-in shadows or featureless white highlights
will spoil a photograph.
One approach is to choose which is the most important--shadow or highlight
detail--and then sacrifice the other. The more attractive alternative for
photographers, though, is some technique which will allow both to be preserved.
This can be achieved in two stages. First, the photographer must shoot the same
photograph at two different exposures, calculated to reproduce the shadows and
the highlights respectively. Secondly, these must be combined in some way.
This is much easier to achieve in an image-editing program like Photoshop than
it ever was in the darkroom, and there are a range of techniques for doing it.
One of these is Photoshop's HDR mode, introduced with CS2. This attempts
to blend two or more /images/archivesart/exposures and generate an image with a much wider
dynamic range than either on its own. This sounds like a technically perfect
solution, and much better than the seemingly cruder technique of simply sandwiching
two bracketed images together and blending them manually. But is it really superior,
even in principle?
Anyone experienced in black and white film development will know that it's
possible to achieve a huge dynamic range with the appropriate exposure technique
and developer. But translating this into an effective print is another matter.
The tonal range of paper is limited, so the tonal range of the negative must
be compressed to fit within it. This produces a print which does indeed contain
a full range of tones, but with such compressed contrast that it's hopelessly
flat. In reality, the negative tends to be treated simply as the raw material.
The photographer can use a harder grade of paper to restore good contrast levels
and apply dodging and burning techniques during printing to bring areas of the
image back into the tonal range of this paper--for example, burning in
a bright sky so that it's not rendered as a featureless white expanse
in the print.
It might seem as if dodging and burning is somehow cheating, and that the scene
is not being captured as it really is. Surely it's better to capture all
the tones in the scene in their correct relationships? But perhaps that's
a naive assumption. When we look at a real-world scene, our eyes and brains
don't absorb it instantaneously as a single image. Instead, we constantly
scan across and around the scene, assimilating and interpreting small sections
in instants so brief that we're usually not aware we're doing it.
You might argue that the eyes and brain are "dodging and burning"
instinctively, and that this process applied in the darkroom is perhaps closer
to what we really "see."
In principle, then, a Photoshop HDR image which contains a huge range of tones
might seem comparable to a carefully-processed negative. However, while you
can print from a negative directly, HDR files must go through a conversion process
before they become editable images. And this conversion process is problematic
because the conversion options are complex and seldom yield particularly satisfactory
images to work from. So why make things harder than they need to be? Scenes
with high dynamic range can be handled much more simply using conventional layering
and masking techniques, and this has the advantage that it concentrates your
attention on the pictorial quality of the image rather than distracting you
with technical red herrings.
The walk-through that follows demonstrates both processes for comparison: how
to prepare and combine images into HDR files, and how to layer and blend them
in a perhaps conventional way.
 |
 |
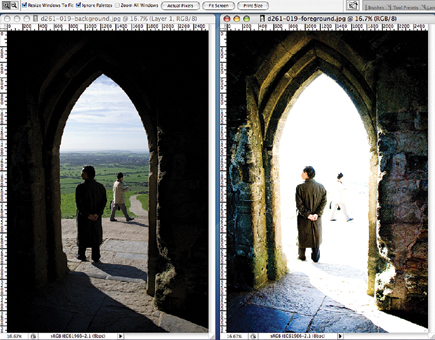
The HDR Workflow
Sometimes it's not possible to achieve a wide enough dynamic range with
just a single shot, and instead you need to bracket at different exposures and
combine two images. Or you can use a different technique, exploiting the extra
dynamic range of digital camera raw files. By using different "Exposure"
settings during the raw file conversion, it's possible to produce two
versions of the same image, one optimized for shadow detail, the other optimized
for the highlights.
Photoshop's HDR mode is not so easily fooled, though. If you try to merge these two images as they are, it will insist the dynamic range isn't wide enough. In fact, it's not analyzing the tonal range of the images to find this out, it's just checking the EXIF data! The solution is to cut and paste the converted images into new, blank files with the same pixel dimensions. These don't have any EXIF data to give the game away. Now, Photoshop will allow you to merge them and simply prompts you to enter the exposures used--you can estimate these based on the "Exposure" settings you chose when processing the raw image.
|
| |||||||||


![]()
Get the Latest Photo Tips, News & Reviews from Shutterbug!
| Camera Reviews Other Reviews | Mobile Reviews Photography Reviews Columns | News | Features | How-To | Resources |
 © 2026 Shutterbug
AVTech Media Americas Inc., USA
All rights reserved