- REVIEWS
Camera Reviews 
More Reviews Mobile Reviews Photography Reviews - GALLERIES
- VIDEOS
- BUYER'S GUIDES
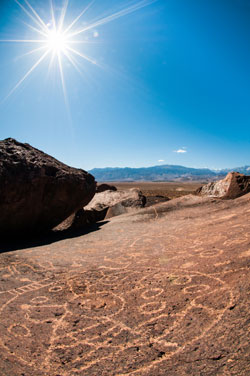
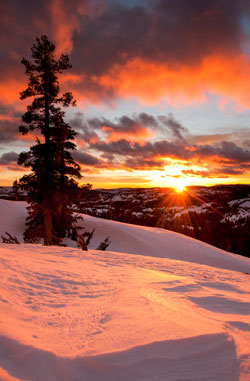
Sunstar Photos: Creative Diffraction Effects
Sunstars are a great way to fill an otherwise boring, cloudless blue sky with a feeling of drama and excitement. They are often a way to add a compositional element that helps draw a viewer into a scene. Technically, any light source can create a “sunstar” as long as it is a tiny point of light and the camera is set correctly. We often see the star effect in shots of buildings with their lights twinkling at dusk, or the moon in the night sky. Most commonly we see star patterns when the sun is setting on the horizon, but in this case we only see half of the sunstar because the other half is being blocked by the horizon.

All Photos © Josh Miller Photography
How They Happen
Sunstars are the result of light waves being bent around the edge of an object. They can occasionally be seen by the naked eye when sunlight is being diffracted, or bent, over the edge of an object, such as the horizon or a tree. They are not the result of glare, which is reflected light interference, although to the camera meter they may have the same effect. You should always avoid looking directly into high-intensity light, but you can use your camera and lens to capture their dazzling effects (see “Eye Protection” sidebar).
First, a bit of practical optics. Lenses by definition are created in order to refract and focus light on the plane of a digital sensor, but, along with focusing the image, lenses also diffract the light as it passes the aperture blades. While spending money on pro-grade lenses helps us get sharper images as we push toward the extreme apertures, every image is subject to the effects of diffraction.
It is common knowledge among photographers that lenses are sharper when stopped down a bit from their maximum aperture. With new, high-resolution sensors, photographers are becoming aware of how, as they stop down to the narrower apertures like f/16 and f/22, their images become softer as a result of increased diffraction. This is nothing new. The “sweet spot” (middle of the aperture range) remains the sweet spot.
If a photographer’s main goal is to make the technically sharpest image possible, then they should always be shooting at apertures like f/8 and f/11, but the reality of the situation is that we often need more depth of field than these apertures offer. Thus it is a balance between depth of field and sharpness; often a “softer” image will appear sharper than the “sharper” image because of increased depth of field and “perceived” sharpness.

Sunstar Creation
Like much of life, we often find ways to find beauty in supposed “flaws,” and that’s the key to sunstar creation. Rather than opting for the absolute sharpest image when shooting into the sun, stop down to maximize the diffraction in the image. Because the aperture diaphragm within a lens is made up of individual metal blades, it is never perfectly round and as the light bends around the blades it creates our dazzling effect.
The number and shape of the aperture blades within a lens changes the characteristics of the sunstar that is created. Lenses with an even number of blades will produce the same number of sunstar rays as blades, while lenses with odd numbers will produce double the number of rays as blades. While portrait photographers prize lenses with as many as nine diaphragm blades for their silky smooth bokeh, the best sunstar lenses often have fewer blades, thus making the aperture less circular and creating more points for the light to diffract around.
While zoom lenses work, they are often not the best sunstar lenses because they include more moving glass, which often creates more internal reflections than fixed focal length lenses. While personal preferences vary, there are some legendary manual focus lenses from the 1970s that still hold their value today because of their simple design and prized sunstar effects, including the prized Nikkor 20mm f/4.
Exposure
So, now that we know that sunstars are best created by closing down the aperture to its smallest size of f/22 or f/32 and shooting into the sun, how do we meter this often blinding light? It is important to understand that the sun will confuse the camera’s light meter and thus lead to underexposed images. By including such a bright light source the meter is often overwhelmed. What you want is the scene to be exposed properly and the sun to be a blaze of light. There are two ways I do this. Either I spot meter off a part of the scene not including the sun, or use exposure compensation to increase the exposure when in multi-pattern (Matrix/Evaluative) metering.
I have found that for my style of shooting I prefer using multi-pattern metering rather than spot metering because it allows me to work quicker in changing environments. But, just like using spot or center-weighted metering under “normal” conditions, it is important to understand when the meter will be fooled.
In the case of sunstars and using multi-pattern metering, the meter tries to “properly” expose the sun as a midtone and renders the rest of the scene as severely underexposed. While the size and position of the sun within the frame will greatly affect the overall meter reading, it is important for photographers to override exposure to have truly properly exposed images.

Exposure Compensation
While every situation is different, I typically start by setting my exposure compensation to +1.3 EV and then check the image and histogram to see that I have brought detail back into the shadows. Though I start at +1.3 EV I often find scenes need even more compensation, and in some rare cases I have applied more than +2 EV. The same principles apply for shooting cameras with Live View mode, with the added advantage, with many models, of seeing the effects of your settings in real time prior to exposure.
Another option would be to add fill flash or use a reflector in order to create a better balance between the darker foreground and the bright sun. The ability to check the LCD display as you work is a huge plus for sunstar shooters, as is the histogram readout. A properly exposed sunstar image will be very contrasty and the histogram should have the sun pegged to the far right while making sure not to lose detail in the shadow areas indicated on the left.
In addition to setting your exposure correctly, it is important to make sure your lens and sensor are clean because as you increase the depth of field any spots on your lens will become more obvious and are likely to create unwanted spots or reflections when hit by the sun.
While there are times I use a circular polarizer or Graduated Neutral Density (GND) filter to help control light and exposure, I rarely use filters while shooting sunstars because they often create unwanted reflections within the image. One rare exception is when I use an ND filter to darken the entire image, allowing me to use slow shutter speeds to blur moving water, despite having included the bright sun within the frame.
And sometimes, a bit of post-processing helps as well. Keep in mind that these are tricky light situations and that you may have to tweak exposures later to get them right where you want them. As you see from some of the images here, that’s just what I do.

Eye Protection
Just as your mother told you never to look directly into the sun, the same rule applies when using your camera, especially if you are using a telephoto lens, which will focus the sun even more in your viewfinder. I once melted part of the mirror assembly in a brand-new camera while shooting a solar eclipse with my 500mm, so your mom’s advice is worth heeding.
The key is to wear sunglasses and only look through the viewfinder from a distance so as to avoid permanent eye damage. If your camera has a depth of field preview button, another trick is to hold it down when looking through the viewfinder. It will stop the lens down and significantly darken the image.
Author Contact
Josh Miller’s images have been featured in publications throughout the world and his work is represented by Aurora Photos. To find out more about his work or his photo workshops throughout the world, visit his website at www.joshmillerphotography.com.


![]()
Get the Latest Photo Tips, News & Reviews from Shutterbug!
| Camera Reviews Other Reviews | Mobile Reviews Photography Reviews Columns | News | Features | How-To | Resources |
 © 2026 Shutterbug
AVTech Media Americas Inc., USA
All rights reserved