- REVIEWS
Camera Reviews 
More Reviews Mobile Reviews Photography Reviews - GALLERIES
- VIDEOS
- BUYER'S GUIDES
Soap In A Frame: Color, Light And Surface
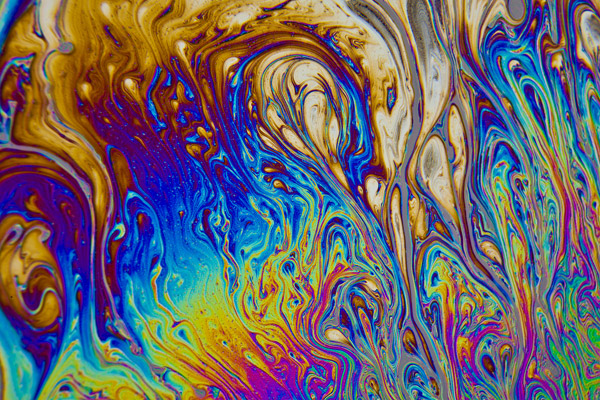
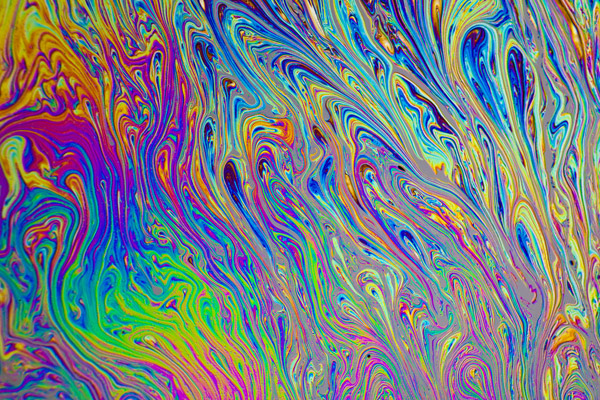
The pearlescent colors that appear in soap bubbles are endlessly fascinating if you take the time to look at them closely. It is chaos at its most beautiful—a random mix of color that, unfortunately, we can’t freeze with our mind to examine any one instant in time. With a camera and flash, however, we can capture these amazing works of art and examine every detail, even though each design lasts only milliseconds.
What I am talking about photographing in this section is not the typical round bubble children blow from a plastic wand. Instead, it is a sheet of bubble solution stretched across a frame. This circumvents the problem of photographing the beautiful colors on a curved surface, which is a depth of field challenge, and you can also shoot a stationary subject instead of being forced to follow-focus on a floating bubble.
Materials And Setup
I start with an off-the-shelf bubble solution. There is no need to mix your own. Any toy store or toy department carries the kind of soapy solution that children use to blow bubbles. I simply get a large bottle of this, and to make the bubble material last longer I add about 20 percent glycerin. This is available in any pharmacy.
Next, you need some sort of frame. In the past, I used the top of a plastic container. I cut out the center, leaving only the thicker, outer frame. That works, but this time I decided on a different approach. I made a makeshift wire frame from a coat hanger and then I wrapped the wire with absorbent foam material. The purpose of this is to allow the foam to absorb some of the soap solution and it would therefore feed the bubble sheet to make it last longer. You can see in figure A the frame I used to take all the photos of bubbles. It isn’t pretty but it worked. When you are ready to shoot, the frame is dipped into a shallow pan containing the bubble solution, and when it is pulled out there is a fascinating sheet of bubble material stretched across the frame.

All Photos © Jim Zuckerman
The set up is the critical part of this technique. You can see in figure B the arrangement of the various elements, and it’s important not to change anything. The bubble sheet has to reflect some kind of translucent white material as seen from the camera’s point of view. In other words, as you look through the lens, the plane of bubble material in the wire frame has to be angled so you can see the white surface. This can be a studio soft box, a white piece of Plexiglas, foam core, or even a white sheet. The bubble surface is reflective so you don’t want anything else visible beside this white surface. The light source that illuminates the bubble should be behind the Plexiglas or white fabric. A flash is required because it will give you enough light to use a small lens aperture, and at the same time it won’t overheat the white diffusion material or cause the bubbles to burst prematurely. You can use a portable strobe or a studio light. To make the images you see here I used a White Lightning unit from Paul C. Buff, Inc. (www.white-lightning.com).

Behind the frame holding the bubble sheet I set up a black background. You can use a black piece of foam core, cardboard painted matte black, or a section of fabric. I used black velvet because I like the fact that it doesn’t reflect any light.
As I mentioned (but it’s important to mention it again), from the camera’s point of view you must see the reflection of the white diffusion material in the surface of the bubble sheet. When you do that, the plane of the bubble material in the frame will not be parallel with the back of the camera, i.e. the plane of the digital sensor. This means that depth of field will be an issue. Since this is macro photography, and focusing so close to a subject will result in a loss of depth of field, you must use the smallest lens aperture available.
The Lens
I tried my 50mm macro lens, but to fill the frame with the abstract colors and, at the same time, exclude the frame, meant that I had to get too close to the bubble sheet. The lens itself was reflecting in the bubble. Therefore, the ideal lens for this project is a telephoto macro. Extension tubes can convert any medium telephoto lens into a telephoto macro, so that’s what I used. I placed two of the three extension tubes that comprise the extension tube set between a 24-105mm lens and used the lens in the 105mm position. This enabled me to shoot from about 16” away and that worked out well. I tried to angle the camera to make it as parallel as possible with the plane of the frame with the bubble solution, but as you can see from most of these images they are not as sharp as they should be from edge to edge. There is no solution other than cropping the out of focus portions out of the picture.
The Exposure
The exposure in this kind of situation is obviously a challenge. The shutter speed was basically irrelevant because I was using flash, and the lens aperture had to be the smallest available on the lens. In my case, that was f/22. I didn’t want to vary it at all. I chose ISO 100 to minimize digital noise and maximum picture quality, and therefore the only way to adjust the exposure was to vary the distance from the flash to the subject or change the power output on the strobe. I did the latter. On the White Lightning unit I used, there is a slider that increases or decreases the amount of light being emitted from the unit without affecting the modeling light. Your flash and/or flash camera combo might offer Flash Exposure Compensation, which has the same effect by going to the minus side.
Checking the LCD monitor, I varied the power of the flash until my exposures were perfect. In post processing, I altered the contrast and color saturation a little to make these images pop more, but I didn’t change the colors or distort the images in any way, (#1, #2, #3 and #4).


![]()
Get the Latest Photo Tips, News & Reviews from Shutterbug!
| Camera Reviews Other Reviews | Mobile Reviews Photography Reviews Columns | News | Features | How-To | Resources |
 © 2026 Shutterbug
AVTech Media Americas Inc., USA
All rights reserved