- REVIEWS
Camera Reviews 
More Reviews Mobile Reviews Photography Reviews - GALLERIES
- VIDEOS
- BUYER'S GUIDES
Smart Objects/Smart Filtering & Digital Lith Prints; Nondestructive Editing Techniques
There is no doubt that a well-crafted lith print is, to borrow an oft-used
phrase from my father-in-law, "a thing of beauty is (therefore) a joy
forever." The trick, for the experienced and occasional darkroom users
alike, is the production of such a print. I have always had difficulty getting
consistency with the production of my prints. Despite this frustration, my love
affair with the process still continues. There is something quite magical about
the quality of images created using this technique; they are distinctly textured
and richly colored, and their origins are unmistakable.
The process, full of quirky variables like age and strength of developer and
the amount of overexposure received by the paper, is unpredictable and almost
always unrepeatable. In this regard at least, most printers, myself included,
found the whole lith printing process both fascinating and infuriating. This
said, it has been over a decade since lith printing started to become more commonplace
and there is no sign of people's interest declining.
The good news is that the digital worker with basic skills, a copy of Photoshop,
and a reasonable color printer can reproduce the characteristics of lith printing
without the smelly hands, or the dank darkroom. What's more, arm that
digital worker with a copy of Photoshop CS3 and the technique can be completed
totally nondestructively.
 |
 |
|
|
||
If you ask most photographers what makes a lith print special the majority
will tell you it's the amazing grain and the rich colors. Most prints
have strong, distinctive and quite atmospheric grain that is a direct result
of the way in which the image is processed. This is coupled with colors that
are seldom seen in a black and white print. They range from a deep chocolate,
through warm browns, to oranges and sometimes even pink tones. If our digital
version is to seem convincing then the final print will need to contain all
of these elements.
Whether you source your image from a camera or a scanner, make sure that the
subject matter is conducive to making a lith-type print. The composition should
be strong and the image should contain a full range of tones, especially in
the highlights and shadows. Delicate details may be lost during the manipulation
process, so select an image that still works when the fine details are obscured
by coarse grain. Good contrast will also help make a more striking print. Here's
how I do it:
 |
|
|
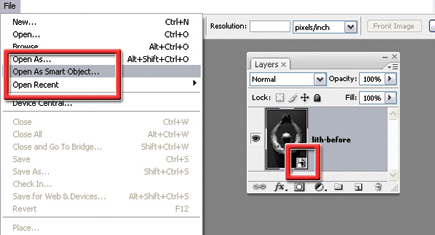
1) Open the file in Photoshop as a Smart Object (File>Open As Smart Object). Basing your adjustments around a Smart Object will ensure that they can be tweaked at any time later and the original pixels are always maintained. Immediately save the picture as a .PSD file (this helps with the Smart Object editing steps later on).
 |
|
|
2) Now let's add some color. Photoshop CS3 provides a couple of options for adding the distinctive lith colors. The simplest approach uses the Tint options in the new Black and White control. Previously we would have used Hue/Saturation but this new feature has the added bonus of providing the chance to manipulate the monochrome conversion (convert to gray) before adding the tint hues. As we are using a Smart Object-based workflow the Black and White feature is applied via an adjustment layer (Layer>New Adjustment Layer>Black and White). If your original is in color start by adjusting the color sliders in the upper section of the dialog. These allow you to control the way that specific colors are converted to gray. Try to maintain good contrast and a full range of tones. Next, move to the bottom of the feature and check the Tint option. Use the Hue slider to select the color for the tint and the Saturation slider to adjust the vividness of the effect.
 |
|
|
3) To simulate the texture of the lith print we will add a
Noise filter to the photo but rather than applying it directly, more control
is possible if the texture is applied to a separate layer first, and then blended
with the image. Start by creating a new layer (Layer>New>Layer) and filling
it with 50 percent gray (Edit>Fill then choose 50% Gray from the Contents
menu). Name this layer Texture.
To ensure that we can adjust the settings used for the filtering effect later
on, convert the Texture layer to a Smart Object (Layer>Smart Objects>Convert
To Smart Object) and change the mode of the new Smart Object layer to Overlay
or Soft Light. Next, Smart Filter the layer using either the Grain (Filter>Texture>Grain)
or Noise (Filter>Noise>Add Noise) filter.


![]()
Get the Latest Photo Tips, News & Reviews from Shutterbug!
| Camera Reviews Other Reviews | Mobile Reviews Photography Reviews Columns | News | Features | How-To | Resources |
 © 2026 Shutterbug
AVTech Media Americas Inc., USA
All rights reserved