- REVIEWS
Camera Reviews 
More Reviews Mobile Reviews Photography Reviews - GALLERIES
- VIDEOS
- BUYER'S GUIDES
Simple Lighting Makes For Effective Portraiture
It Is All About Highlight And Shadow
| Before we delve into portrait lighting and lighting techniques, it's important to understand what portrait lighting is and why it's an invaluable tool for three-dimensional photography. In trying to create a three-dimensional effect on a flat piece of paper, one has to create the illusion of depth with highlights and shadows. An on-camera flash and/or lighting that comes from directly in front of the subject's face does nothing except to give a rendition of the subject, but with no feeling of actually "being there." So, a photographer who is truly looking for lighting that actually does its job must understand how lighting can and should be used in portraiture. Good portrait lighting involves creating highlights and shadows that make areas of the face protrude and recede, giving the viewer a three-dimensional rendition of the subject. It is universally acknowledged by all artists, regardless of medium, that the best lighting is when the light comes from slightly above the eye level of the subject and slightly to one side. The trick, now, is to achieve that angle of light wherever you're shooing and by any means that you can. So, whether using natural light or artificial light, the light has to be directional. Being out in the open does nothing for a subject and is not enough to attain our desired effect. With that in mind, let's tackle a few instances where we know that we can find ready-made lighting that will do the job for us. |
|||
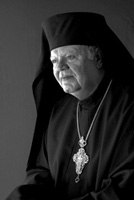
Black On Black Is Easy To light his face I posed him in an area between two open archways. The one beside him lit the right side of his face and also created specular highlights on that side of his face. The open archway in front of him became the main light, bringing light around onto the left side of his face. Two silver reflectors were held outside the covered area, picking up direct sunshine and reflecting it back onto his face and clothing. The reflector that brought light onto his face created the crisp modeling light and the sharp catchlights. The reflector held out to his right brought light directly across his robes. That, I explained to the class, was what was creating the beautiful textures in the solid black material. A solid black Westcott background behind him was held at an angle to the outside light, creating detail there as well. Finally, to intensify the feeling of black on black I changed the color image to black and white by selecting only the green channel in Photoshop and then adjusting the contrast in Levels. |
|||
Photographing In Bright
Sunshine Here's a picture that I made of Bryan with his family one morning out on the beach. I backlighted them with direct sunshine and used a strong flash to bring the shadowed side of their faces up to the exposure that I was using for the general background area (1/250 at f/16, setting the ISO on my Canon D30 to 200). That exposure always gets me good color saturation even in the brightest light. On another day/another similar setting I began photographing with my class late in the afternoon. The sun was beginning to go down to our right. Once more I posed our models on a sand dune, so that I could get a low camera angle and position them against the plain sky. I used the direct sunlight as the main light, positioning him to get perfect profile lighting on his face. From that same angle the sunlight crossed over his body, defining his chest perfectly. She was in just about complete shadow. With their two faces going in opposite directions I had to use a flash fairly close to camera position. Using a Quantum slave sync and a Quantum flash I again used the technique of bringing the light on the two of them up to the exposure for the bright sunshine area that surrounded them. |
|||
Learn From Success Remembering that picture, I sought to duplicate it with Bryan. I started by positioning him in a similar way. I wasn't happy with the way he looked bending over. I asked him to straighten up. When he did that he kept his arms extended. I flipped! "Hold it!" I used a strong flash to light the front of him. Being able to see the results immediately on the back of my digital camera was perfect for this situation. I saw what the light was/wasn't doing for him. I moved my flash around more to the right side of him and continued shooting until I could see that the light it was creating was defining his body perfectly. The resulting image was one of my favorites of the day. It almost appears as if the light were coming from the sun at noontime, doesn't it? |
|||
Go Under Cover To begin with, look how we found great lighting under the cover of this porch in front of the church where I was holding my class. Bryan was posed a couple of feet under cover, all the light coming through one of the arches. I posed him so that his body would be chiseled in light, turning him away from the light source until the light crossed over his chest. The natural light lit one half of his face. I placed a Westcott Monte Illuminator (a reflector that is silver on one side and black on the other) camera-right, aiming the silver side toward the light€not toward him. Once it picked up the light, I angled it a little at a time until it reflected the light onto the shadowed side of his face and body. That way, the light wrapped around him. |
|||
Something Special For Family
Groups In creating this series of family portraits I once again came under cover, placing them where they would get somewhat of a sidelighting through an archway that was right next to where I placed them. This first picture was exposed for the ambient light with no extra light added. When printed for detail in the faces, you can see how the background simply washed out. For this next picture I added a bare-bulb Quantum flash (triggered by a Quantum Radio Slave). I created the broad, soft light source by bouncing it off a neutrally colored wall to my right. |
|||
With the flash added (11/2 stops below the ambient light) you can get the benefit of seeing the eyes much better. At the same time, with the slight build-up of density from the flash, you also get more detail in the background. I don't change the exposure at all when I add the flash. Of course, when photographing any family you're always going to get one person who spoils each picture. That's no problem any more. With Photoshop it just takes a couple of minutes to switch heads and come up with a composite photograph that's the best of everyone. All of the pictures in this article were made digitally with my Canon D30. One of the things that I like about shooting digitally is that you can see right away what you're doing. That, plus the fact that it doesn't cost you anything to keep shooting€you just can't beat it. So, I just keep shooting and shooting until I've just about exhausted the group. Hey, if you're still with your film camera, no problem! I still find a lot of use for my Hasselblad. When you know that you really want the ultimate sharpness you can always count on your medium format camera, scan the negative and you're in the digital area just that easily! |
|||
Add A Little Something Extra,
Just For Kicks When doing this you need to be careful not to photograph the tops of heads. You really need to carefully direct the position of each person's head, usually telling them to tip the top of their head a little bit more away from the camera. Then, of course, you don't always get everyone to do what you ask them to do. But it only takes seconds to give directions once more and come up, hopefully, with something like this. Throughout this entire series you can see how simply I've achieved the lighting. It's merely a question of knowing what you need and learning where and how to achieve it. You can't beat technique! For more information about my photographic techniques check out my web site: www.zuga.net. |


![]()
Get the Latest Photo Tips, News & Reviews from Shutterbug!
| Camera Reviews Other Reviews | Mobile Reviews Photography Reviews Columns | News | Features | How-To | Resources |
 © 2026 Shutterbug
AVTech Media Americas Inc., USA
All rights reserved