Roundshot 28 220
A Rotating, Panoramic Camera

Roundshot 28/220

The 28/220's extreme vertical angle of view makes it ideal for interiors and other close quarters. New Cornelia Mine from Greenway mansion, Ajo, Arizona. Approximately 360Þ rotation.
Photos © 2002, Dave Howard, All Rights Reserved

The Roundshot line of professional, full-rotation (360Þ horizontally) panoramic cameras is easily the most extensive and best known in this decidedly small niche of the special-purpose camera market. The product of Seitz Phototechnik AG of Switzerland, they are not inexpensive. They are, however, worth every penny to any professional or dedicated amateur photographer having a genuine (e.g., income producing) need for the unique capabilities of this type of camera.

Built like the proverbial tank, Roundshot products are typically employed by industrial and commercial photographers, as well as event photographers specializing in large groups of people. The company produces several models in several film formats (35mm, 120/220, 70mm, and 5" roll film), some with fixed lenses, others with interchangeable lens capability.

The latest model is the 28/220, referring to the lens focal length and maximum film load, respectively. There are two versions available, the "full" 28/220 and the 28/220 Outdoor. The latter is a more economical ($2950), "stripped-down" model of the more deluxe 28/220 ($3650). We'll be examining the top model here, though I'll note the main differences along the way.

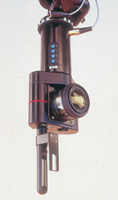
Roundshot 28/220 with AF Nikkor 28mm f/2.8 lens, swiveling finder.

Lens/Film Combo
Since the lens/film format combination is rather unique, let's start there. The camera features a lens mount that accepts 35mm format Nikon lenses (Leica R and Contax mounts available on special order). However, the 28/220 is designed to work with only one focal length: 28mm. Specifically, any of the following 28mm Nikkors: AF f/1.4 and f/2.8; manual focus f/2 and f/2.8; PC Nikkor f/3.5. Other "Brand-X" 28mm lenses in Nikon mount may work, but try before you buy; their image circle may be insufficient, resulting in "soft" top and bottom edge areas of the film frame. Pictures taken with other focal lengths will be blurred and/or distorted.

The 28mm focal length, film transport speed, and point of focus are inseparably linked; for this camera, focus is 7 meters (23.5 ft). Detailed instructions are included for testing the ideal focus setting for your particular lens, but it will generally be between 3-5mm inboard of the lens' infinity mark. With the aperture set at f/8 or f/11, depth of field is of little concern.

Rear view, showing control buttons, LCD panel, dual levels, and remote release.

How It Works
You may already have picked up on the fact that this is a 35mm format lens, paired with medium format (120/220) film. So how does the lens manage to cover the larger film? If it had to cover the corners of a normal rectangular frame, it couldn't. However, this type of camera exposes through a narrow vertical slit onto film that's being transported past the slit during the exposure. The slit occupies a thin slice through the center of the lens' image circle, further taking advantage of the extra coverage that good optics are designed with in order to minimize light falloff at the edges of the frame.

Simply put, the greater the lens' image circle, the sharper the top and bottom edges of your 28/220 negs and transparencies will be (lens shades and thick filters are a no-no). It should therefore be fairly obvious that the ideal lens for this camera will be a "PC" (Perspective Control) lens, which has a much wider image circle to accommodate its rise/fall and/or lateral shift movements. Indeed, although a non-PC 28mm may work, as far as I'm concerned, anyone desirous of maximum results from this camera will consider the PC mandatory, both in the interest of maximum edge sharpness and the ability to adjust the placement of the horizon line.

This lens/format combination creates an extreme (83Þ) vertical angle of coverage that distinguishes the 28/220 from otherwise similar cameras. Most medium format partial and full-rotation panoramic cameras have lenses in the 50-75mm focal length range, in the interest of a reasonably "normal" perspective rendering. This is fine for landscapes and most other general subject matter, but the accompanying limited vertical angle of view can be frustrating to industrial and commercial photographers, a group comprising a large percentage of Roundshot customers. Full-rotation cameras are regularly used to document building site progress, architectural environments, and interiors both cramped and expansive. These situations often cry out for great vertical coverage as well as the encompassing full circle, and this is where the 28/220 really shines.

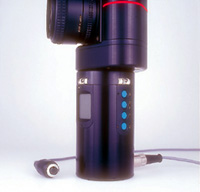
Close-up of control buttons, LCD panel, levels, and remote release.

Some Limitations
This immense vertical angle of view does, however, limit the camera's usefulness for general outdoor scenic photography. Even with a PC lens, you will have huge areas of sky, and foreground nearly up to your tripod legs, as well as a very rapidly receding background. Towering mountains will be reduced to the proverbial molehills. If the sun is in the field of view, it will cause flare; solutions include hiding it behind a tree or building, or shooting near high noon (also the best means, other than an overcast day, of obtaining even lighting with a 360Þ outdoor composition). On the other hand, the 28/220 would be a great asset within dense, tall forests, such as the California redwoods or the towering firs of Washington's Olympic Peninsula.

Operation & Controls
Operationally, the 28/220 is quite straightforward. Although the camera could conceivably be handheld for impromptu (offbeat, "creative"?), spontaneous use such as journalistic coverage of "sea-of-humanity" events (e.g., demonstrations, riots) of up to 270Þ horizontal coverage or thereabouts, for normal applications, careful leveling is proper technique. To this end, the cylindrical base features two vial levels, mounted 90Þ from one another.

A detachable, rotating, "sport"-type finder is supplied, allowing exact determination of the vertical angle of coverage; it is adjustable by 8mm up and down to mimic any rise/fall movement of a PC lens. From a practical standpoint though, I found the 83Þ vertical angle to be so all-encompassing as to make consulting the finder fairly superfluous; just level the camera, determine the start and stop points for your desired horizontal coverage, and shoot.

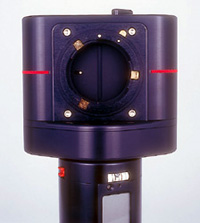
Lens mount, sans lens. Brass tab at upper right is lens release. Small, sliding switch to the left of the exposing slit selects high/low shutter speed range.

Degrees Of Rotation
The degree of rotation is selectable in 45Þ increments; the manual suggests adding a 60Þ overlap at the beginning and 30Þ at the end (90Þ total, or plus two 45Þ increments). This allows the camera's motor to get up to full speed before the exposing slit gets to the critical image area of your composition and ensures that the slit is past the far limit of your picture before braking.

For example, if you want a full 360Þ image, set the camera for 450Þ (10 increments of 45Þ). In practice, I found this to be a generous overlap, but it does provide extra leeway for your final cropping. You can get three such exposures on a roll of 120 film, seven on 220 (there's a few inches of "leftover" film on a 120 roll that adds up to the seventh exposure on 220). For motion studies, you can make exposures extending beyond 360Þ; set at 999Þ, the camera will run continuously through the whole roll.

Readouts
All settings appear on a LCD screen in the handle-like motor base (the screen is absent in the Outdoor model). In addition to the degree of rotation, the LCD readout shows effective shutter speed (rotation speed); film length (120/220); frame counter (represented as remaining number of 45Þ increments); state of charge of the rechargeable battery; 10-second start-delay timer. Four buttons adjacent to the LCD display select or adjust the functions. The top one (START) switches the camera on and triggers an exposure (it can also be triggered via a remote release cord). The second is the MODE button, which selects shutter speed, rotation angle, the delay timer, "NEW," when loading a film, and "END" to wind off the film after the last exposure. The bottom two are up/down buttons, used to adjust the shutter speed and rotation values. There is also a red main switch that prevents accidental exposure release and turns off the power. When on, standby mode is automatic after 2 minutes.

Top housing removed, showing film path. Note rubber drive belts ("O"-rings) conforming film edges to curved film drum.

Shutter Speed Range
Effective shutter speed range is 1/500 sec to 8 seconds on the 28/220; the Outdoor model has only 1/60, 1/125, and 1/250 sec speeds. The "full" 28/220's speeds are divided into high and low ranges; to select either, remove the lens and move the then-exposed small brass slide switch to the left (outside) for slow range, right (inside) for high.

Actual camera head rotation speeds for a 360Þ exposure are 0.7 seconds at 1/500 sec, 5 minutes at 8 seconds. At 1/60 sec, the rotation is 6 seconds, which is about the minimum time that you can beat feet around your tripod, staying out of range just behind the exposing slit as it rotates for a 360Þ or greater run; for faster speeds, set the 10-second delay and run for cover, if there is any. For rotation angles of 225Þ or less, just stand in the unexposed "dead spot" of the circle.

Film Loading
Loading a film is simple. Unscrew the large thumb screw atop the main housing, then lift off the cover. This exposes the film feed and take-up spool holders and the hinged pressure plate. From there, except for having to swing the pressure plate out, it's pretty much the same as loading a medium format film back. After inserting the paper leader into the take-up spool, winding to the film's start mark and closing the pressure plate, replace and secure the top housing. Then switch the red main switch on, cycle the mode button to "NEW" on the LCD screen and use the up/down buttons to select 120 or 220 film. Press the START button; the camera head will rotate, transporting the film to the proper point to begin the first exposure (transport to frame one differs on the Outdoor model).

Do not rotate the head manually; film will be transported without being exposed (e.g., wasted). There is no winding operation following an exposure as with traditional cameras; at the completion of an exposure, the camera is ready for the next. If you are bracketing exposures, however, you will have to move the camera to the proper starting point for the composition before each succeeding frame.

If your last exposure (rotation angle) happens to exactly coincide with the remaining film length, a blinking "END" will appear on the LCD screen. Push the START button to wind off; the camera head will rotate three times in the process. More often, though, you will end up with a remnant length too short for another exposure; to initiate wind off, cycle the mode button to "END" and push the START button.

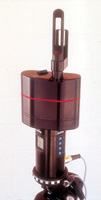
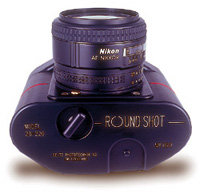
Top view. Large key is screw that secures top housing to battery/control base unit. Small button in horseshoe shaped recess is spring-loaded, retains swiveling finder.

Evaluation
The Roundshot 28/220 performed flawlessly, as have all other Roundshots that I've used. I consider the "full" 28/220 well worth the $700 difference in price over the Outdoor model; the latter's lack of slow speeds would be too limiting for the variety of subject matter and lighting conditions that I regularly deal with, and the absence of a full-function LCD read-out would be too "bare bones" for me. Your needs, of course, may differ from mine. Tripod socket is 3/8". The camera, which weighs 3.2 lbs without lens, comes with a battery charger (10 hours for full charge with 110v model), remote release cable, and hard transport/shipping case.

The 28/220 opens up a world of panoramic picture possibilities in cramped locales that demand extreme coverage vertically as well as horizontally. If you don't need the awesome vertical capability, with its attendant rapidly receding background, then by all means investigate the several other Roundshot cameras available; there are many specialized requirements within the already specialized niche of full-rotation panoramic photography, and Seitz Phototechnik builds a solution for nearly any panoramic problem.

Contact: Roundshot cameras are distributed in the US by Custom Panoramic Lab, 1387-85 W. Palmetto Park Rd., Boca Raton, FL 33486; (561) 361-0031; www.roundshot.com. The owner, Peter Lorber, is a recent president of the International Association of Panoramic Photographers and is extremely knowledgeable on all things panoramic. And if you need to have your long pan negs professionally printed, his lab is one of the few dedicated panoramic facilities in the country.

A Quick Guide To Full-Rotation Camera Technique
· Level the camera carefully; a wavy horizon line is the penalty for
not doing so.
· Use lens rise/fall (if available) to adjust placement of
horizon line.
· Choose a camera with a lens focal length (and therefore
perspective) best suited to the subject matter you shoot most
often (e.g., landscapes and groups vs. interiors and exteriors).
· The 220 (or 70mm) film capability avoids overly frequent film
changing.
· Check for evenness of lighting; overcast days or noon sun are
best for 360Þ compositions.
· Color negative materials best handle wide exposure variations
within a full-circle image.
· Negative materials require big enlargers (5x7" min) or specialized
panoramic printers.
· Avoid polarizing filters; the effect is disturbingly uneven with
large rotation angles.
· Flash is not an option; any supplemental lighting must be
continuous in nature.
· Slow shutter speeds can produce interesting blurs and/or
distortions of moving objects within the scene.

X