- REVIEWS
Camera Reviews 
More Reviews Mobile Reviews Photography Reviews - GALLERIES
- VIDEOS
- BUYER'S GUIDES
Like Printing Cash: How Photographers Can Make Money Selling Photo Prints at Events
There's a mantra attributed to event photographer Michael Weeks:
• If you don't take it, you can't sell it
• If you don't show it, you can't sell it
• If you can't print it, you can't sell it
• If you can't take payment, you can't sell it
At the dawn of the century I owned a camera store with a minilab but was hungry for extra bucks, so I'd photograph groups at events – golf foursomes at charity tournaments, family and class reunions, industrial school sessions.
I'd drive to the spot, take the photos as quickly as possible, head on back to the lab to process the film and make 5x7 or 8x10 prints, and drive back to the venue to make delivery before all the subjects scattered to the corners of the earth. There was no time for remakes or a flat tire, the schedule was brutal.
Now huge progress in digital technology has made it easy for photographers to skip the lab and the trip back to the venue for delivery.
The same technology that led to portable photo booths has made selling photo prints right at the event easier – dye sublimation printers and more recently, high volume ink jet printers. You can take the pictures on site and with a laptop computer create customized images on the spot to sell to happy customers.
Here’s how you do it.
Choosing the Right Printers Is Key
Consumer Ink Jet printers, designed for the home or office, can make surprisingly good prints when paired with photo quality paper. But when set to make photo-quality paper print those printers become extremely slow and use a lot of expensive ink. Cartridges that last for 600 8x10 letters might be good for 25 8x10 photographic prints. You can easily find yourself spending close to a dollar and waiting two minutes for a 4"x6" print.
Dye-sublimation printers use a very long single-use ribbon with heated heads that sublimate the inks onto a continuous roll of paper. How long is that roll? For 700 4x6 prints, it's 933 feet!
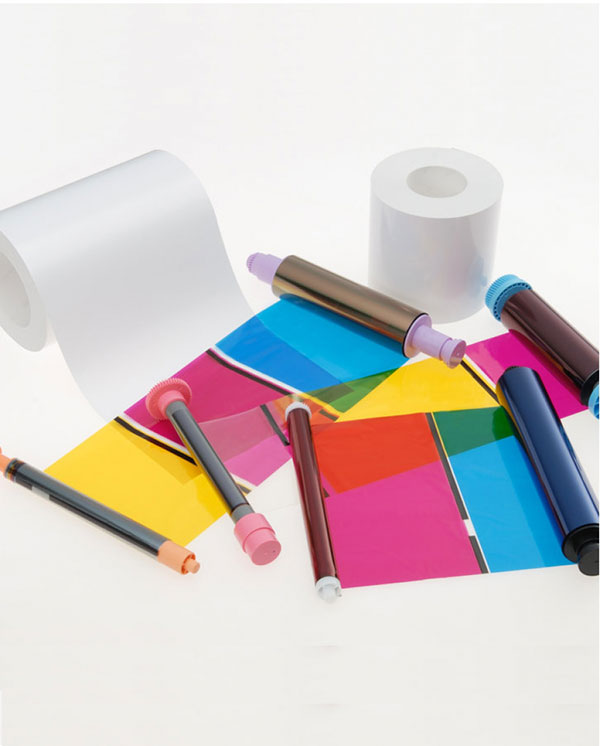
For each image, three color passes are made: cyan, magenta, and yellow. A fourth segment of the ribbon produces a clear protective overlay. So, to make a single 4" x 6" print, a segment of ribbon 6" wide and 16" long is used up. The paper roll is advanced 4 times between segments and finally clipped off.
Until recently, dye sub printers required different ribbons for each print size, primarily 4" x 6" or 6" x 8". Upgrades in printer firmware now allow for more choice; most printers can now cut 2 2"x6" strips from a 4"x6", and some can actually use 3 or 4 segments to produce panoramic prints up to 6" x 22"
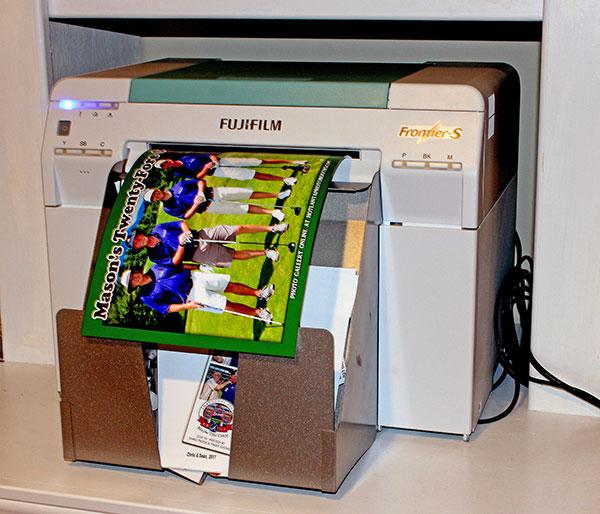
Ink jet printers using continuous paper rolls are relatively new to the on-site printing market. This is not your father's ink jet printer! The Fuji DX100 uses big rolls and has huge ink tanks. It's super fast compared to consumer printers and produces dry-to-the-touch photo quality prints.
Fuji's DX100 uses the same tech as their digital Frontier minilabs. In fact, it's even called a "Frontier." Introduced in fall 2013, it's flexible, making prints from 3.5" x 5" up to 8"x39". Because the paper roll is continuous, and it uses ink jets instead of segmented dye-sub ribbon, you're not locked into a limited choice of print sizes. Downside: it's comparatively big and heavy, tipping the scales at about 60 pounds, and it's slower than dye-sub.
The Primera IP60 is like a cute little brother to the Fuji - smaller and lighter, with only one width paper available initially - 6". But you can opt for any length print you want, within reason. It's preprogrammed for 2" to 24" feeds and spits out 2"x6" proof prints in just over 3 seconds. Quality prints take quite a bit longer.
The overall size of the IP60 has about the same footprint as a dye-sub printer, but the weight is much less: 8 pounds compared to the 30 pounds of a DNP RX-1HS, for example.
It's by far the lightest printer capable of using in the field and making usefully sized prints.
4 Steps to Automatically Create Onsite Custom Prints
Take the photo. You can use any digital camera. I happen to use Canon DSLRs most of the time. When outside, a powerful speedlight flash fills in the shadows nicely. A solid tripod reminds me to keep the horizon horizontal.
It's extremely important to get the exposure and the framing dead on. If you're going to let smart software create the finished image, it's up to you to give it consistent images to work with.
Get the photo into the computer. There are several ways to do this. You can use a "sneaker network,"carrying memory cards back and forth from the camera to the computer. Even if you've got a classy wireless network this will be your fallback method when something goes wrong.
I like to use a good USB cord directly from the camera to my computer. Not too long, more than five meters and you'll get signal falloff, maybe even total failure. Canon's EOS Utility software includes file transfer modes to move your pics from the camera to a folder you select. It's free for most model Canon DSLR cameras.
TetherTools makes really sturdy USB cords and devices to keep them from getting unplugged.
You can also go wireless in many cases. Some cameras have built-in Wi-Fi, or you can use a wireless SD card.
Take two or three pictures of each subject group, so if somebody blinks or makes a horrible face you have others to choose.
Transferring the photos into the computer is where you're most likely to have a problem, and if you do you can always go back to using your memory card and the sneaker network.
Make the plain files into something special. You could do this using Photoshop one picture at a time, you could even design a simple action to size each image and add an overlay. Or you could use software designed for exactly this kind of job.
I use Breeze's Hotfolder Prints to size the photos and put a custom overlay upon them. I set it up to constantly monitor the folder where the Canon Utility is depositing my photos as I take them.
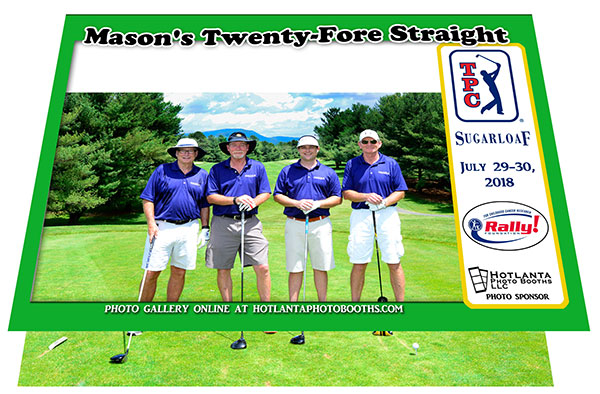
Because dye-sublimation printers expect to receive files that are just the right size, if printing a 4"x6" I make the file 1240 pixels by 1844 pixels. This process can run automatically so that all your shots - even those with the closed eyes or photo bombers - become printable products. HFP sizes your original photos and slaps the overlay on top of them, then saves the completed product in a new sub folder.
The system works pretty fast, generally faster than you can snap photos.
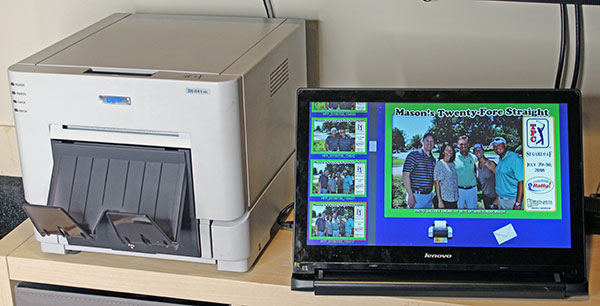
You don't need an elaborate ordering system. I use a Lenova Yoga-series lap top sitting next to or on top of the printer. The lap top is rotated 270 degrees revealing only a 15.6" touch screen.
The printer shown above is the DNP RX-1HS, which kicks out 4"x6" prints in about 14 seconds.
Select and print the photo you'll deliver. Breeze's software Kiosk monitors the pictures being generated. You can examine the thumbnails on your computer screen to choose the ones you want to print, and select the quantity.

For some events we let customers email a file to themselves. That depends on our fee structure. If we've collected full payment from a sponsor we've got no vested interest in making extra prints, so we're happy to let the subjects send their photos home to do with what they want. On the screen shot above we have a choice between tapping on the printer icon or the email icon.
Once we choose to print we can select the quantity. If I'm letting the customers choose the quantity I've limited the maximum number that can be input. As soon as I hit the "print" button we go back to the previous window.
Kiosk can also run a slide show of your photos and intersperse them with pre-made ads or instructive slides. If there's a large screen or projector in the venue, you can mirror that slide show for everyone to see.
Offer a Wide Selection
When you're running the equivalent of a portrait studio on location – taking photos with Santa, for example – you want to be able to sell a wide variety of products and sizes. This really puts a strain on most dye-sublimation printers, which are usually set up to make only one size print at a time.
The DNP RX-1 HS, probably the most popular dye-sub printer at time of writing, has ribbons available to make either 4" x 6" or 6" x 8" prints. The largest dye-sub printers, such as the DNP DN-820 or DN-80, can make 8x10 or 8x12 prints. (some can also make panoramic prints as big as 8x24)

The Fuji DX100 Frontier S ink jet printer has a bigger footprint but still easy to take onsite. We've got one of those little red wagons that folds flat but carries everything we need in one trip. The biggest drawback is that it's heavier that its dye-sub brethren.
When you're using a larger printer capable of 8"x10" or larger, you'll often offer your customers a choice of "sheets," with multiple prints making up the package.
Adobe Photoshop, within its "automate" selection, can create many packages that you can print directly. The one show here prints 2 4x5, 2 2.5x3.5, and 4 2x2.5" prints all on one sheet of paper. It's not necessarily the fastest way to make this type of project.

Some sheets you might offer, each of which takes up one 8x10 page:
• 1 8x10
• 2 5x7
• 4 4x5
• 8 wallets
• 1 5x7 with 4 wallets
Specialized software such as Darkroom Core is designed especially for this type of work. On the input side it can take photos directly from the camera – almost any camera – and get them into your computers' picture bank almost as fast as you can shoot.
You can create overlays with the software or import graphics from other sources, and readily prepare multiple packages. You could easily prepare "team mate" composites, and even insert the names of the individual players more rapidly than with just about any other software.
Darkroom Core also has a fully functional ordering mode, so you can let your clients choose which photo and which package they want while the software keeps a running tab on their charges. It will even create priced-out receipts for you.
You can send your order to several printers, or you can get one printer capable of a wider range of print sizes.
With a flexible printer like the Fuji Frontier S DX-100 you can build a complete order station. Here's one I've seen in use at trade shows:
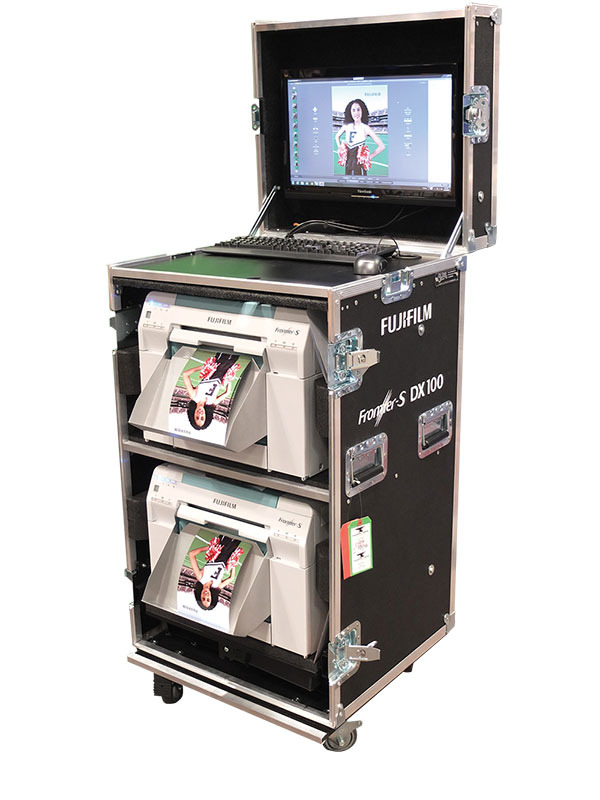
This ATA-style case opens up to be a double decker, with computer and monitor in the lid and two of the printers occupying separate decks.
I've seen Fuji use this setup at a number of trade shows, where they'll be operating for several days.
Setting Pricing
So far, we fulfilled 3 lines of Michael Weeks mantra:
• Taking the photo
• Showing the photo
• Printing the photo
How will you charge for these services? In many cases you will have one event photo sponsor who will pay a flat rate.
Randy Licht of Borel Photography in Roseville, CA told me “I started out doing on site instant photos more than 25 years ago with Express Digital Software, which is now Darkroom Pro.
"I charge $300 per hour for 4x6" images and $400 per hour for 5x7" images. This not only includes time, talent and materials, but a Dropbox of all the images for the client to have, use for any purpose they wish, many use them for publications etc.
"I have a three-hour minimum and do charge for travel, tolls, parking and sometimes have to charge for set up because some of my events they want all the gear set up the night before (that's extra labor, transportation and parking costs)."
For some events you may sell individually. For example, at a class reunion you might charge $10 for a souvenir 8"x10" print. That figure would be on the low side, with the assumption that you're doing other things there already. Quite frankly I'd prefer to get a lump sum payment from the event sponsors.
If you're charging by the print, however, you'll want to have a way to take cash and a way to take credit cards.
Now you just need to take the money to complete the cycle! Make sure your pricing comes out to a convenient dollar figure (including sales tax where required) and that you've got some change on hand.
With a phone or tablet and a Square credit card reader, you're ready to get out there and start making money selling photo prints at events!


![]()
Get the Latest Photo Tips, News & Reviews from Shutterbug!
| Camera Reviews Other Reviews | Mobile Reviews Photography Reviews Columns | News | Features | How-To | Resources |
 © 2026 Shutterbug
AVTech Media Americas Inc., USA
All rights reserved