- REVIEWS
Camera Reviews 
More Reviews Mobile Reviews Photography Reviews - GALLERIES
- VIDEOS
- BUYER'S GUIDES
Post-Processing Lightens The Load; Raw Conversion As A Studio Tool
When I think about all of the photography equipment I have added to my collection over the years—cameras, lenses, lights—I would have to put my finger on the raw conversion window in Photoshop as probably the most effective tool I currently have for making my images look good. It has even lightened the load in terms of the amount of equipment I use for taking the shot in the first place. Besides bumping up those slightly dark shadow areas and bringing down some highlight areas, another former fear of mine has been erased; Kelvin temperature, or the color of light.
Shooting film and people? I always used an 81A (at least) filter. Any mix of daylight and tungsten used to send shivers down my spine and get me scrambling to pull out the Rosco conversion gels, not to mention the challenge of getting a good color balance when working under fluorescent lights in office settings. Now, I honestly don’t worry about the color of light because I know that once I’m back in the comfort of my cave with Photoshop in front of me, the raw conversion window is going to fix it all. But not all at once.
The Setup And Follow Through
The first step happens before I start shooting where I now know that I can lighten the load quite literally, as I no longer use meters for measuring the amount of light or even the temperature of light. This isn’t about arrogance; I just feel more comfortable making sure that the exposure looks good in the histogram. I have all the information I’ll need to make the image look great when I get to my computer. My days of using an incident light meter ended when I began to understand the histogram. I want to capture as much information as I can, and then deal with the rest later.
Mixed Light
With this shot of my wife in her gallery, she’s standing in an area that has skylights and windows; in short, available light that’s all about the same color temperature. The gallery space behind her to the right? All halogen bulbs. The camera’s Automatic White Balance (AWB) setting has put its money on daylight, ignoring that space to the right, which we know won’t look great if it remains orange. No problem. I’ve set the ISO to 200, and with the 1⁄8 sec shutter speed (camera is on a tripod) at f/5.6, I’m getting all the information I need.
 |
|
|
Camera Raw
So, now it’s back to the cave (the darkened area where my computer lives) and into Photoshop’s Camera Raw window. The next step, after making a pick for a great smile, is to get a good average exposure with the right color temperature. I used the Eyedropper tool on the white wall just above the entrance into the other room to get a neutral gray wall. (I used RGB numbers of 202, 202, 202.) I’ve also used the Fill Light slider to open up the brick wall, a bit of additional Blacks, and the Clarity slider. Often, at this point, I make a note of the Kelvin and Tint settings. Before I open the file, I click the “Workflow Options” link at the bottom of the window to have the image open as large as I can at a resolution of 300 pixels/inch. By working at a large size, chances of any retouching required will be minimized this way.
 |
Curing Mixed Light
I click “Open” and now have the main, working image. Next, I go under File to Open Recent and back again to the original raw file. This time, with the Eyedropper tool, I head into the other room, where it appeared orange in the first opening. I click on the wall in between the two framed prints on the wall and I now have neutral colors, but a little dark, so I bump the Exposure slider up until I get RGB readings similar to the entranceway (200, 201, 202). Click “Open Object.”
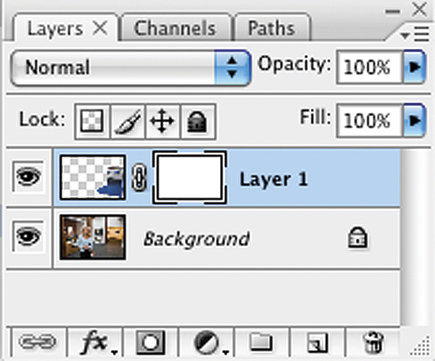
Now I have two files open. One image of a very bluesy gallerist along with my first main file. (For this next step, make sure you have the Layers window open. Find this under Window on the menu bar.) On the Photoshop toolbar, I want to use the Lasso tool. But for this, more specifically, I want to use the Polygonal lasso. (Note: Under Preferences, “Cursors,” I have checked “Precise” under “Other Cursors.”) I make a selection of the doorway and an area of the carpet that has been influenced by the tungsten light. Pressing “Command/J” I make a copy of the selected area. Then I press “V” (the Move tool) and click on the new layer, “Layer 1.” Now, for the magic. With my left hand holding down the shift and option keys, I click the cursor on “Layer 1” and drag that onto my first file and then release/unclick the cursor. The layer from the bluish file has positioned itself exactly in the same position on top of the main file’s orange room. Now I just have to smooth it all out.
 |
Erasing the blues begins with adding a layer mask to the doorway, “Layer 1.” I do this by clicking on the little icon (third from the left) at the bottom of the Layers window. (My reason for working within a layer mask is that it allows me to go back, at a later time, and make changes. For instance, if I decide that I’ve gone too far with the “blue” removal in the carpet, I merely have to click “B,” the Brush tool, and going back over the carpet, I will reinject the orange light back into the carpet. Call it an insurance policy.) Clicking on the mask makes it the active window of the layer (it adds a secondary black line around the window).
 |
I then click on Black at the bottom of the toolbar to make it the active foreground color. Initially, I’m going to work with the Gradient tool. Here are the settings I want:
• Gradient picker set to “Foreground to Transparent”
• Linear Gradient
• Mode-Normal
• Opacity at 100 percent
|
| |||||||||


![]()
Get the Latest Photo Tips, News & Reviews from Shutterbug!
| Camera Reviews Other Reviews | Mobile Reviews Photography Reviews Columns | News | Features | How-To | Resources |
 © 2026 Shutterbug
AVTech Media Americas Inc., USA
All rights reserved