- REVIEWS
Camera Reviews 
More Reviews Mobile Reviews Photography Reviews - GALLERIES
- VIDEOS
- BUYER'S GUIDES
Photoshop Trick: Precise Highlight Masks in Just a Couple Clicks (VIDEO)
Making complex masks and precise selections can be an intricate chore, especially if you’re using a Raw editor in Lightroom or Adobe Camera Raw. That’s why one pro turns to a Photoshop trick whenever he needs accurate control over a specific area in an image.
Sony Artisan Matt Kloskowski says he loves teaching photography, and his personal mission is to simplify the process of taking great photos and explaining how to edit them to achieve the results you’ve always wanted. The video below, demonstrating a simple masking trick, is a great example.
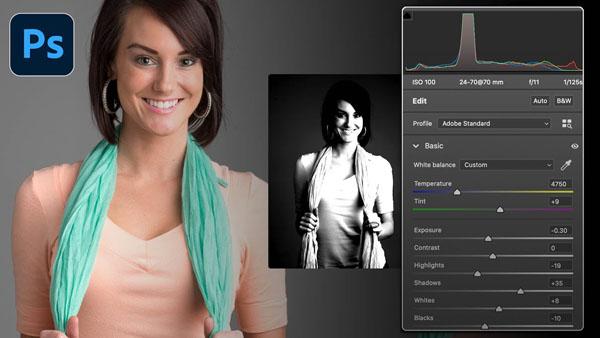
This episode is devoted to adjusting the highlights in a photo—an enhancement that can make a big difference in an Image. This involves luminosity masking, for which some editing methods involve Channels, numerous layers, selections, and Panels.
Fortunately, Kloskowsi demonstrates a remarkably easy technique that he says “Takes that same concept, and with just a couple clicks creates the most complex and precise masks possible. Best yet, you can this this method with all sorts of images from portraits and landscape shots to wildlife, travel photos and more.
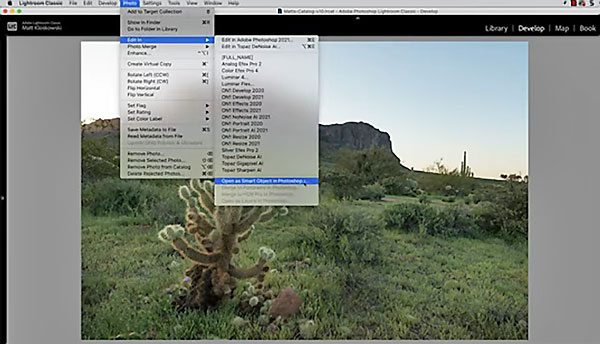
Kloskowski begins with a landscape image that has a blown out sky, and he later demonstrates the technique using a portrait photograph that also needs some work. He first demonstrates the conventional, more involved approach using Lightroom that can be also accomplished using Adobe Camera Raw.
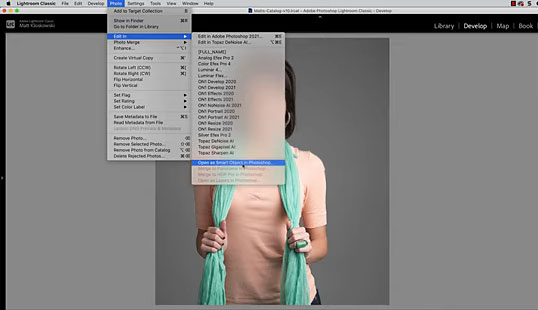
The meat of the tutorial begins when Kloskowski walks you through his simple Photoshop method, and you’ll be very glad you learned this powerful timesaving trick.
After watching the video be sure to visit Kloskowski’s YouTube channel for image editing advice. And check out a tutorial we posted from another pro recently, explaining how to automatically create and apply interesting background patterns to images in Photoshop.


![]()
Get the Latest Photo Tips, News & Reviews from Shutterbug!
| Camera Reviews Other Reviews | Mobile Reviews Photography Reviews Columns | News | Features | How-To | Resources |
 © 2026 Shutterbug
AVTech Media Americas Inc., USA
All rights reserved