- REVIEWS
Camera Reviews 
More Reviews Mobile Reviews Photography Reviews - GALLERIES
- VIDEOS
- BUYER'S GUIDES
Photoshop Tips: Learn to Fix Underexposed Portraits and Pump Up Color in Just 2 Minutes (VIDEO)
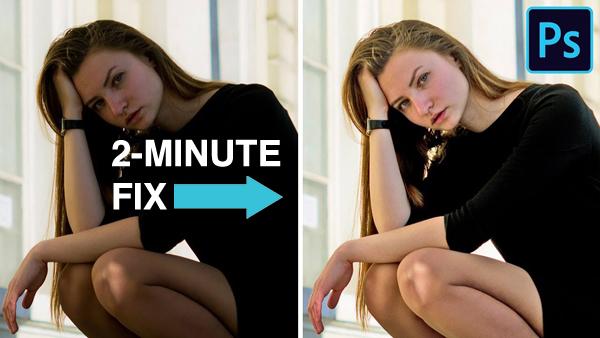
The next time you mistakenly shoot flat, underexposed portraits, and it’s too late for a do-over, the simple tutorial below will save the day. This Photoshop technique is as quick to accomplish as the video is to watch, and you’ll be surprised at the excellent results.

Photographer Aaron Nace explains that there’s more going on with underexposed photos than the obvious fact they are too dark—especially with portraits. That’s because there are two byproducts of getting the exposure wrong; namely desaturated colors and unnatural skin tones.

It only takes Nace two minutes to demonstrate how to brighten portrait photos and return colors and skin tones to their natural values. He uses the power of Photoshop’s Shadow and Highlight sliders, and explains how to tweak the settings for optimum results.
Nace also illustrates how to use a Curves layer to draw out the contrast in photos. The final step involves a few tricks for color-correcting the shot, and, BOOM, you’re done!
You can find more helpful tips on the PHLEARN YouTube channel. And be sure to check out an earlier tutorial from Nace we shared, explaining how to shoot better portraits by using a simple reflector.


![]()
Get the Latest Photo Tips, News & Reviews from Shutterbug!
| Camera Reviews Other Reviews | Mobile Reviews Photography Reviews Columns | News | Features | How-To | Resources |
 © 2026 Shutterbug
AVTech Media Americas Inc., USA
All rights reserved