- REVIEWS
Camera Reviews 
More Reviews Mobile Reviews Photography Reviews - GALLERIES
- VIDEOS
- BUYER'S GUIDES
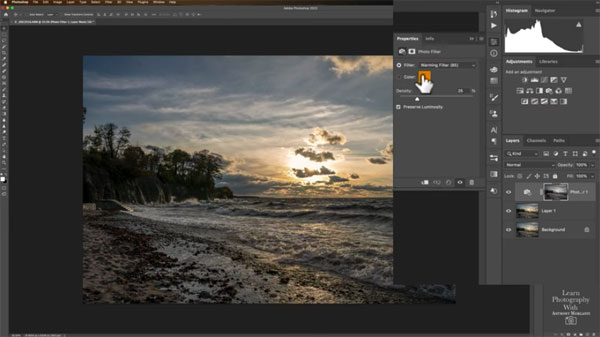
Photoshop Luminosity Masking 101 (VIDEO)

Luminosity Masks are simple image-editing tools that enable you to make significant improvements to the impact of certain types of photos. While offering remarkable control, Luminosity Masks aren’t widely understood—especially by inexperienced Photoshop users.
In basic terms, Luminosity masks are selections based upon the brightness (or darkness) of various portions of a scene. As you’ll see in the quick tutorial below, they enable you to discretely select the bright, dark, or midtone pixels in an image and then make whatever adjustments you desire.
Image-editing expert Anthony Morganti explains the process from beginning to end in barely seven minutes, and this is definitely a technique you’ll want to immediately add to your post-processing bag of tricks.

This episode covers the necessary basics to get you started today. The first trick is knowing what types of images are best suited to this technique. As Morganti explains, Luminosity Masks work great on images with a lot of dynamic range.” Sunset scenes are a great example as they typically have plenty of dark and light areas within the frame.
By using Luminosity Masks you can target the brightest areas, and just adjust those, or perhaps you want to work on the dark areas instead. And, of course, with more than one mask you’re able to easily do both.
Morganti demonstrates the process using Photoshop’s “Photography Workspace,” and you’ll find it easier to follow along if you set up your Photoshop in the same manner per his instructions. Once you’ve done that, with an appropriate image on the screen, making the necessary adjustments is a piece of cake.
Morganti provides helpful keyboard shortcuts for speeding up the process for both PC and Mac users. This is one of those straightforward techniques that you’ll never forget after doing it once.
You can find more editing tips and tricks on Morganti’s YouTube channel, and he adds to his offerings frequently.
And for something even easier, check out the tutorial we posted from another editing expert, explaining a two-minute trick for fixing hot highlights in Photoshop and Lightroom.


![]()
Get the Latest Photo Tips, News & Reviews from Shutterbug!
| Camera Reviews Other Reviews | Mobile Reviews Photography Reviews Columns | News | Features | How-To | Resources |
 © 2026 Shutterbug
AVTech Media Americas Inc., USA
All rights reserved