Olympus’ E-30; All The Filters Of The Rainbow Page 2
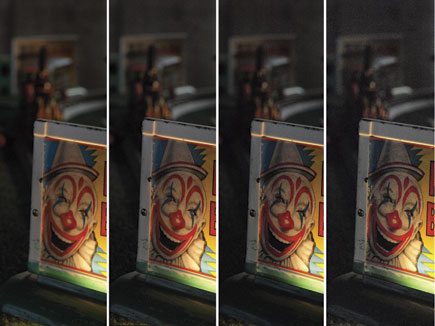
Turning on the Image Overlay option allows the photographer to combine a raw image from the memory card with another (to be) captured image to create a multiple exposure. Images made one week, six weeks, or six months earlier can be used in a multiple exposure as long as they were recorded in the Olympus raw file format. But get this: in Live View you can see the first image so you can line it up with the image you’re about to make. There is another way to combine images by using the Multiple Exposure Edit command found in the Edit menu in Playback mode. This allows up to four Olympus raw images from a memory card to be combined into one image and lets you manually adjust the brightness in each individual image.
 |
|
|
In The Field & Studio
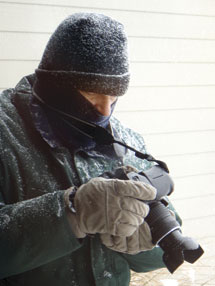
The ergonomics of the E-30 are similarly comfortable to those of the E-3, and I quickly got used to everything, including the quirky sliding on-off lever that orbits the four-way controls like Pluto rotates outside the inner planets. The controls are well placed and fall readily at hand even when wearing bulky gloves as I discovered when doing cold weather testing at 4?F during a snowstorm. The large LCD preview screen worked great under these conditions and I shot everything during that test in Live View mode.
I was able to test the E-30 with the optional ($199.99) HLD-4 Power Battery Grip that was originally
designed for the E-3 and it’s splash- and dust-proof. It holds two rechargeable BLM-1 lithium-ion batteries instead of one in the body and allowed me to shoot all day without running out of power. The HLD-4 provides a vertical grip and shutter release with controls such as a programmable Fn button and adds 2.7” in height and 11 oz (plus batteries) in weight. Photographers who prefer big cameras will like it but even Mary, who has small hands, found the HLD-4 comfortable, even though she didn’t like the E-1’s similar grip. It must be the ergonomics.
 |
|
|
A studio shoot using Adorama’s (www.adorama.com) Flashpoint II monolights went flawlessly, tripping them with Booth Photographic’s Flash Waves wireless transmitter and receiver. (See the October 2008 issue of Shutterbug.) What was most striking about all of the photographs made using studio lights was how correct the color was right out of the E-30. No additional tweaking was required to get accurate skin tones.
All of this activity played out in increased battery usage because—and you will notice this when you shoot—Art Filter JPEGs take additional time to process. That manifests itself in longer than normal write times to the memory card and increased battery consumption. Tip: On a long shoot like ours, two fully charged batteries in the HLD-4 are more than a good idea. It’s sanity protection and those who need the additional power for lots of photographs, such as wedding photographers, should use the HLD-4 grip despite any concerns about its extra bulk.
 |
|
|
I ran the E-30 through my standard low-light tests and saw that the noise levels produced were admirably low for a camera with a relatively small (13x17.3mm) imaging chip. Based on the testing procedures described in my story “Noise Reduction Comes Of Age” (see the March 2009 issue of Shutterbug), I shot the JPEG files test with Noise Reduction (NR) ON and used the Standard NR filter to maximize image sharpness while reducing noise levels. At ISO 400, noise was fine and evenly distributed. At ISO 800 and similarly at 1600, the noise remaining after applying the Neat Image (www.neatimage.com) NR plug-in was so fine that only Ansel Adams wannabes would find something to complain about. At ISO 3200, it’s noisy even with the in camera reduction so you just have to live with it. Out here in the real world Mary shot available light raw files of a wedding ceremony using her Olympus E-500, a circa 2005 camera that’s much further down the NR food chain than the E-30, at ISO 1600 and was able to do a double-page album spread of the photograph. Tip: One of the best ways to minimize noise is to use raw capture to minimize JPEG artifacts and any noise that remains on your processed raw file can then be eliminated or at least minimized using NR software.
Image quality in both Raw and JPEG modes was of high quality but in the megapixel race you gotta be asking, “Is 12 megapixels enough?” I think it is for many readers and if you don’t agree, ask yourself why you were previously happy with images made with 6-megapixel cameras. If you liked those image files, you’re gonna love the 4032x3024 photographs from the E-30, especially when captured in raw format.
 |
|
|
Wedding photographers will find that the E-30 is the perfect companion to their E-3 and the ability to shoot using Art Filters will let them add many impressive images to a bride’s album. Photographers fond of using camera filters, such as Cokin’s, will have fun making images with the E-30 as well. The E-30 is a tough, semipro camera that should find its way into many pro or aspiring pro photographers’ camera bags. Its clever combination of Live View, mechanical Image Stabilization, and Dust Reduction built around a framework of creativity provided by the Art Filters and Multiple Exposure function make it a triple threat in a world of increasingly blah D-SLRs.
For more information, contact Olympus Imaging America Inc. at: www.olympusamerica.com.
E-30 AF Tips
For faster autofocus response in low light, set the E-30’s active target points to “Group” by pressing and holding the AF target direct access button on the upper right-hand corner of the back of the camera. When pressed, the AF target menu appears on the LCD screen. Use the camera’s front control wheel to select one of three options:
All 11 points active, Single point active, or Group of five active points.
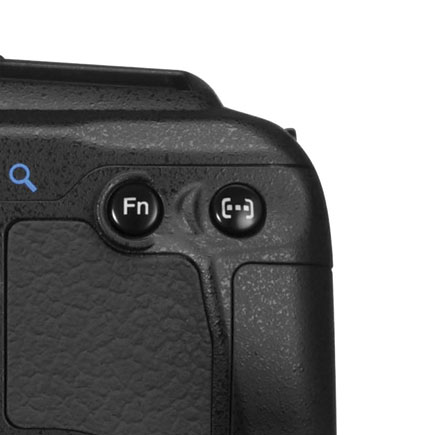 |
Group AF target works great for general shooting and in low light. Single AF target works great for macro photography or when shooting through extraneous objects that surround your subject. All AF targets ON is a good choice in situations where the contrast of your subject stands out against the background. After you adjust the AF target area you can adjust the position of the AF targets by using the control wheel on the back of the camera, which is handy for situations where the subject may not be centered in the frame and the camera is on a tripod.
Sync And Safety
Mary and I shot a daylong series of portraits with several models using various Art Filters before switching to a conventional capture mode. The E-30 lacks a traditional sync connection but that shouldn’t keep you from using your studio lights. Traditionalists might decide to use a hot shoe to PC adapter to connect the sync cord from camera to main light but because of the high voltages across the tip of a sync cord, using a cheapo adapter can fry the electronics inside your camera. Don’t! It’s a better idea to use one that, like Booth Photographic’s (us.boothphoto.com) High Voltage Safe Hot Shoe Adapter, only allows 3v to touch the camera’s sync circuit.
 |
|
|
The Lens, Boss, The Lens II
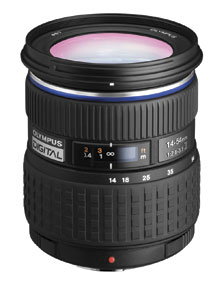
Adding to the line of Four Thirds lenses, Olympus sent me their new Zuiko Digital 14-54mm f/2.8-3.5 II to use with this camera and, unless otherwise noted in the captions, all of the images in this report were made with this versatile lens. The design features 15 elements in 11 groups, including three aspherical elements. The lens has a circular seven-leaf aperture mechanism that adds a subjective element of bokeh to the image, creating perfectly circular out-of-focus highlights. The lens provides the equivalent field of view to a 28-108mm equivalent zoom range, making it ideal for everything from wide angle shooting to telephoto shots to zooming in for close-ups with its closest-focusing distance of 8.66”! The Zuiko Digital 14-54mm f/2.8-3.5 II lens has a 67mm filter thread, is bundled with a well designed lens hood, and costs $599.
 |
|
 |
|
|
Technical Specifications
Lens Mount: Four Thirds
Effective Pixels: 12.3 million
Viewfinder Field Of View: Approx. 98 percent
Focusing Screen: Fixed (Neo Lumi-Micro Mat screen)
Metering System: TTL open-aperture metering system: (1) Digital ESP metering (49-point multi pattern metering; (2) Center-weighted average metering; (3) Spot metering
Metering Range: 1-20 EV
Exposure Modes: (1) Auto; (2) P: Program AE (Program shift can be performed); (3) A: Aperture priority AE; (4) S: Shutter priority AE; (5) M: Manual; (6) Scene program AE (Portrait, Landscape, Macro, Sport, Night + Portrait); (7) Scene select AE (Children, High Key, Low Key, DIS mode, Nature Macro, Candle, Sunset, Fireworks, Documents, Panorama*
(*available only with the Olympus xD-Picture Card), Beach & Snow
ISO Sensitivity: Auto (ISO 100-3200)/Manual (ISO 100-3200), 1⁄3 or 1 EV steps
Exposure Compensation: ±5 EV in 1⁄3, 1⁄2, 1 EV steps selectable
Exposure Bracketing: Three or five frames in 0.3, 0.5, and 0.7, 1 EV steps selectable
ISO Bracketing: Three frames in 0.3, 0.7, 1 EV steps selectable
Picture Modes: Vivid, Natural, Portrait, Muted, Monotone, Custom (default setting: Natural)
Shutter Speeds: P (Ps), S, A, M mode: 60-1/8000 sec
Sequential Shooting Speed: Approx. 5 frames per sec (fps) in sequential shooting H, 1-4 fps selectable in sequential shooting L
Built-In Flash: GN=18 at ISO 200
Compatible External Flashes: FL-50R, FL-36R, FL-50, FL-36, FL-20
Art Filter Modes: Pop Art, Soft Focus, Pale & Light Color, Light Tone, Grainy Film, and Pin Hole Camera
Number Of Pictures For Multiple Exposure: 2-4 pictures
Size: 5.57x4.23x2.95”
Weight: 23.1 oz
Cost: $1299.99, body; $599, 14-54mm f/2.8-3.5 II lens
Joe Farace is the author of the long out-of-print book “Plug-in Smart,” a look at special effects plug-ins that was originally published by Rockport Press.
- Log in or register to post comments


