- REVIEWS
Camera Reviews 
More Reviews Mobile Reviews Photography Reviews - GALLERIES
- VIDEOS
- BUYER'S GUIDES
nik Color Efex Pro 2 Page 2
Included in the 32 new filters is Infrared: Black and White, which converts color originals into dramatic, contrasty monochrome images imbued with mystery. It works effectively with a wide range of subjects, from traditional landscapes to buildings or even portraits. If you prefer your infrared in living color, there's also an Infrared: Color filter. When you're back in the funky black and white mood, try the Solarization: Black and White option.
Taking it up a notch, if you prefer weird color and high contrast, nik presents two Cross Processing options: both C41 to E6 and E6 to C41. These simulate wet darkroom twists where film is intentionally processed in the wrong chemistry. C41 to E6 causes the highlights to shift to a warm, peach color, while the shadows take on a blue cast. E6 to C41, on the other hand, renders a contrasty image, with blue highlights and fringes around detail.
 |
|
|
Now, heading back toward more realistic color, three Reflector series filters
have been added: Gold, Soft-Gold, and Silver. I have to admit that I was skeptical
when I first spotted these in the filter menu. They'll simply color the
whole image equally, I thought. Not! They indeed perform like reflectors in
the real world, adding fill light and color casts. What's more, the effect
is very naturalistic, with nik's typical wide range of control options.
More new tricks up nik's sleeve include the Dynamic Skin Softener which
softens skin tones only while preserving some detail and leaves other colors
untouched; Graduated Fog which allows you to apply fog with a gradient, gradually
fading in realistically; Paper Toner emulates different types of monochrome
toners used on black and white prints.
B/W Conversion: Tonal Enhancer converts the image to black and white while providing
adjustments to increase details in the image. This filter simulates the traditional
black and white darkroom technique of using contrast filters while printing
on multigrade papers. B/W Conversion: Dynamic Contrast uses a Contrast Enhancer
adjustment to create an exaggerated dynamic range for artistic effects and dramatic
black and white images.
Version 2 is offered in three different collections for both Mac and Windows,
list priced from $99 for 19 filters, to $159.95 for 45, to $299.95 for the nik
Color Efex Pro 2 Complete Edition with all 75 filters. See the website for details,
a demo download, lessons, and extensive before and after examples. While the
original was great, this new collection can take you even further into dramatic
new visual territory.
 8 |
 10 |
|
 9 |
||
 11 |
||
|
||
How To Apply The Filters
In review let's take a couple of these plug-ins out for a test drive.
First, always duplicate your image and work on the copy. After opening your
photo in your image-editing program, access the nik Color Efex filters from
within the Filter menu. I tried the Reflector: Gold filter on a portrait, #1,
taken outdoors on a very overcast day, and the way it added a warm fill knocked
my socks off. It performs as if you had a real three-dimensional gold reflector
(and assistant to position it) with you when you shot your original.
From the filter control window, #2, you can even change the position of the
reflector relative to the subject. I chose a Light Intensity of 50 percent,
a Light Falloff of 50 percent, then I set the position to 60 percent and moved
the Source Direction slider to 194 percent. We are now entering the Twilight
Zone--you can control the realistic effect of an imaginary gold reflector
that wasn't there on your subject that was really there. What's
more, the effect is very naturalistic, #3, enhancing skin tones and hair without
going over the top.
 12 |
Having done a lot of black and white infrared work both with film and digitally,
I was anxious to try the nik Infrared effect. First I opened a color shot of
a New York City park with the Empire State building in the background, #4. Then,
from the Photoshop CS filter menu, I chose the nik Infrared: Black and White
filter, bringing up the box shown in #5. First, you choose from one of four
styles under "B/W Infrared Method." You can sample the styles by
dragging down over each with your mouse. I've found that all work with
landscapes, while numbers 1 and 2 are best for portraits. After choosing style
4, I adjusted the Lighten Highlights to 33, Brightness to 40, and Contrast to
50 to obtain the striking and dramatic final image, #6.
Ladies and gentlemen, please play with the sliders. Try them throughout their
range--you never know what you might discover. Click OK if you're
satisfied with the effect, or click on Advanced, just below the filter name,
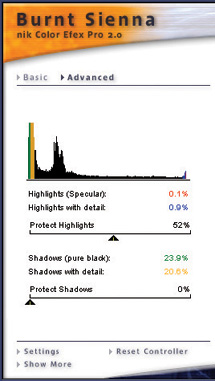
to bring up the histogram and sliders to protect highlights and shadows, #7.
Ultimately, I found this to be the best black and white IR plug-in I've
tried. It yields striking results with a minimum of work.
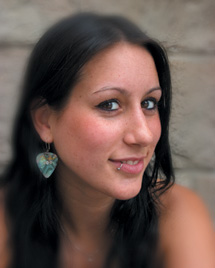
Among the new color offerings, Burnt Sienna renders a range of effects, including
a warm 1950s home movie look. Play with the sliders and Edit>Fade Filter
blend modes and you can also use this filter to create a fine warm sepia effect
(fade 80 percent, mode: color), or a high contrast hot color interpretation,
such as that used in the film Amelie, (fade 100 percent, mode: multiply). Starting
with Jaime's portrait, #8, I set the Contrast to 0 and Brightness to 66.
I then chose Edit>Fade Burnt Sienna which brings up the Fade dialog box,
#9. After bringing down the Opacity to 89 percent, I changed the Blend Mode
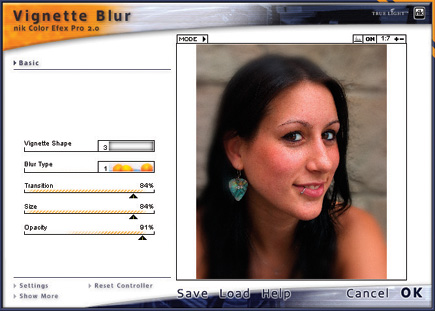
to Vivid Light for the contrasty, high temperature result seen in #10. The Vignette
filter, #11, allowed blurring of the hair, shoulders and background to achieve
the final image, #12.
Contact
nik Multimedia, Inc.
(619) 725-3150
www.nikmultimedia.com
|
| |||||||||
- Log in or register to post comments


![]()
Get the Latest Photo Tips, News & Reviews from Shutterbug!
| Camera Reviews Other Reviews | Mobile Reviews Photography Reviews Columns | News | Features | How-To | Resources |
 © 2025 Shutterbug
AVTech Media Americas Inc., USA
All rights reserved