- REVIEWS
Camera Reviews 
More Reviews Mobile Reviews Photography Reviews - GALLERIES
- VIDEOS
- BUYER'S GUIDES
Mamiya’s 645AFDII; Medium Format Quality In Digital Capture Page 2
Camera Settings Menu |
|
 |
|
|
Leaf Aptus
While the Aptus back attaches to other cameras than the Mamiya, it is ideally
suited for this camera. It attaches with a solid click and once attached functions
as if it were an integral part of the 645AFDII. The 6x7cm touch screen is as
good as it gets. The functions are laid out in four easy to access menus: Camera,
Shoot, Edit, and Setup. To enter a menu or a function in the menu is a simple
matter of tapping it with the metal stylus that comes with the camera. The stylus
tucks neatly away into a slot on the Aptus back.
Each menu is easy to comprehend and navigate. If you have ever used even a basic
digital SLR you will know the use of most functions. There are a number of features
which I especially enjoyed using. My favorite was the auto gray balance. To
use this feature select an area in the image that should be neutral gray. This
is easily accomplished by placing an 8x10" gray card in the first image.
Tap on the gray area with the stylus and the color will be perfectly balanced
(see the portrait of Mark Palmer--as taken and with the gray balance control).
The settings will apply to all subsequent images until you choose another area.
The back takes about 10 seconds to fire up, but this should not be an issue
with medium format. If you need instant access for street, sports, or wildlife
you should be using a digital SLR which is intended for these subjects. Once
turned on the shooting rate is somewhere between 1.2 fps and 1.7 fps.
Auto Gray Balance |
|
 |
|
|
The Leaf back can be used untethered with a battery pack and CompactFlash
card. A 4GB card will record approximately 41 images. The weight for this configuration
with an 80mm lens is a little less than 5 lbs. With the 20GB Digital Magazine
(DM) the combined weight is about 51/2 lbs. However, with the left hand under
the carriage and both elbows tucked against your sides, the camera is well-balanced
and easy to hold even for vertical images. Even so, medium format is often used
on a tripod. A carbon-fiber Gitzo G1227 with a Manfrotto 488RC4 held the unit
steady in the studio and on location.
The DM connects to the back via a short FireWire cable. It is easy to detach
and simply plugs and plays onto a Mac. This is a great improvement over other
backs which require accessories to fit into pockets or clip onto belts via long
cables.
Both the Aptus 22 and 17 maintain a 4:3 ratio, similar to the one adopted by
Olympus for their pro E-1 camera. The difference is that the Aptus 22 has a
48x36mm sensor, and the 17 has a 43.2x31.7mm sensor, as opposed to the Olympus
18x13.5mm sensor. By comparison, the 17-megapixel Canon EOS-1Ds Mark II uses
a 36x24mm sensor and the 13-megapixel Nikon D2X uses a 23.7x15.7mm sensor. While
having a large number of megapixels will decrease or eliminate any evidence
of moiré patterns, the physical size of the sensor will reduce noise
in low light, long exposure situations, and increase resolution. Also, 17 megapixels
on a 43x31mm sensor means larger individual pixels than 17 megapixels on a 36x24mm
sensor. The larger the pixel the better it is at accurately capturing and recording
color.
The heart of the Leaf system is a high-quality Dalsa chip, rather than the more
commonly used Kodak chip. Leaf claims that this is why their backs are superior
to other backs currently available. The Dalsa chip allows the sensor to record
true 16-bit color, not the 12-bit interpolated up to 16-bit color found on digital
SLRs. Matched to HDR Raw capture, one of several preset options available, this
is as good as digital can get.
Aptus Shooting Screen |
|
 |
|
|
Leaf Capture 10 Software
One of the advantages/disadvantages of reviewing cameras and software is that
they often come without any documentation. The advantage is that the reviewer
can find out just how easy the camera or software is to use. The disadvantage
is it is easy to overlook functions and features that might improve a system's
performance. Undoubtedly, the Capture 10 software has more capabilities than
I was able to access, but here are my impressions:
One of the limitations of the Leaf Capture 10 software is that it only works
on a Mac. PC users need not apply. On the positive side, setting user preferences
was fairly easy. On the negative side, Leaf has included a lot of presets but
does not say what they do, even in the e-manual. What, for example, is an Aptus
17 Product setting as opposed to an Aptus 17 Portrait Soft or an Aptus Portrait
setting?
When an image is recorded in the Shoot mode, it is automatically saved in either
a default "Shots" folder or a user-defined folder. The Capture 10
software allows you to pre-name the images prior to exposure, automatically
updating the count (e.g., Lauren 0001, Lauren 0002, Lauren 0003, etc.). This
system works well. I was able to save all of my images in a folder ready for
processing, instead of batch copying and renaming them later. This saved time--and
for the pro, time is money.
The histogram is large, easy to read, and has over- and underexposure warnings.
These include user-defined flashing colors in areas of over- or underexposure.
Another special feature of the program is the "loupe" which allows
you to magnify an area on the screen to check for focus.
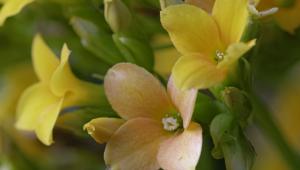
China Doll Macro Shot |
|
 |
|
|
The Process feature of the software converts the native Leaf Mosaic (.mos)
raw files to a TIFF plus low-res JPEG preview and automatically stores them
in a new file, while not altering the original. By converting to a TIFF file
prior to post-processing you now have a disc full of 32MB files without the
advantage of the powerful raw processing features, such as exposure compensation
and white balance. My recommendation is to bypass the Process feature altogether.
Set the capture preferences (ISO, color space, etc.), capture and save the image
in your own file, and do your processing in Adobe's Photoshop.
With that said, the software program is not the reason for using medium format.
You use a tool for what it can do. The Mamiya 645AFDII, with a rollfilm or digital
back, will allow you to produce the highest quality photographs possible today,
short
of using large format. In my opinion, Mamiya has set a high standard for the
rest of the industry.
For more information, contact Mamiya America Corporation, 8 Westchester Plaza,
Elmsford, NY 10523; (914) 347-3300; www.mamiya.com.
|
| |||||||||
- Log in or register to post comments


![]()
Get the Latest Photo Tips, News & Reviews from Shutterbug!
| Camera Reviews Other Reviews | Mobile Reviews Photography Reviews Columns | News | Features | How-To | Resources |
 © 2025 Shutterbug
AVTech Media Americas Inc., USA
All rights reserved