- REVIEWS
Camera Reviews 
More Reviews Mobile Reviews Photography Reviews - GALLERIES
- VIDEOS
- BUYER'S GUIDES
Macro And Detail Imagery: Getting In Close
Nature photography may encompass grand landscapes or large wild animals, but it can also incorporate the smallest of objects. There is an entire delicate world of light, beauty, color and form in macro photography. Wonders that can be documented while on vacation on a tropical island, in a national park or even in your backyard. I have spent mornings lying in a bed of wildflowers, moving no more than a few feet, recording everything from the dew on a spider web to the shape of a purple iris. I am often surprised and rarely disappointed.
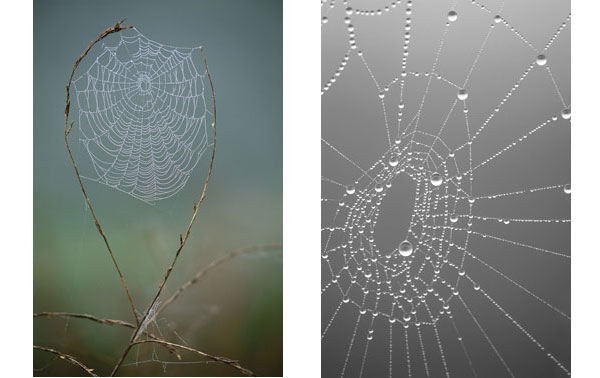
By shedding light on a subject most would pass by or never knew even existed, you discover many more beauties of nature, as well as a certain patience to capture them. Some of your images can be so close as to create abstracts of color and light you never could have imagined. That was the case while photographing morning dew on a spider web near my home in Northern California (#1). I first shot a number of frames directly overhead, but when I lowered my camera to the side and opened the aperture cutting the depth-of-field, it revealed an abstract world of glistening light and water droplets.

All Photos © Sean Arbabi
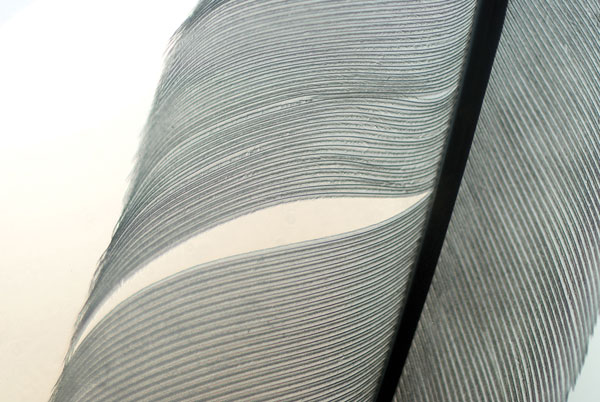
While macro photography has its differences with normal “everyday” outdoor photography, in many ways it’s quite similar, though on a smaller scale. Finding the best angle to show a unique perspective, using proper lighting, sharp focus, appropriate depth-of-field, using the right lens and the best exposure are all common qualities in all photography and macro is no different. For example, when I found a feather with an interesting imperfection balanced on the ground against a twig (#2), I knew that by choosing the right angle, focus, aperture and light I could bring out its beauty and form.
Choosing The Right Lens
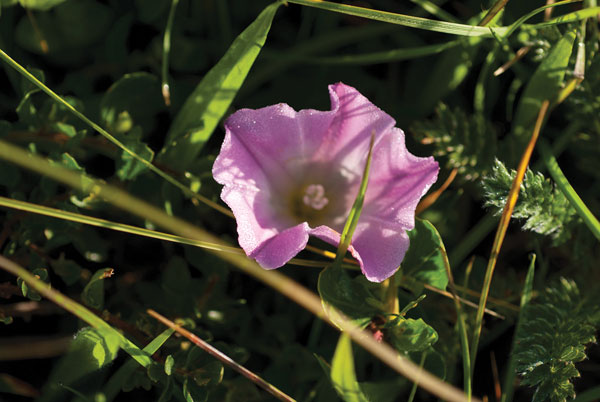
Macro, or close-up photography, relies on optics that allow you to get right up to the subject. “Normal” lenses are only able to focus down to a certain distance, which may inhibit your ability to capture great macro shots. We see this in an image of a wildflower fraught with distractions (#3); it simply wasn’t photographed close enough. However, when I got in tight using the right lens and used my body to shade the sunlight I created a much more pleasing shot (#4).
For really exciting macro work you need a lens with the ability to focus close, 2” instead of 2 feet. And even having the ability to focus close doesn’t always mean great shots—you have to use the lens to get in really close, perhaps closer than your usual comfort zone. I used my macro lens to capture this spider web’s dream-catcher shape (#5), but this composition could have been made with a number of lenses in my bag. Moving in very close (#6) the web was only inches from my camera.
Macro Options
Some compact camera models and cell phone cameras have the capability to switch into a macro setting and that can get you in the game. A dedicated macro lens, however, is built to focus close and if you are serious about macro photography you should consider one to add to your kit. These are specialized lenses that are designed for better detail and sharpness when focusing close.
D-SLR and mirrorless interchangeable macro lenses range from 60mm to 200mm (60mm and 105mm being the most popular focal lengths). If you prefer to work a bit back from your subject (like photographing insects and butterflies that can be skittish) consider a longer focal length macro lens.
You can also get macro style images using a normal telephoto lens, but these are not technically close-up shots. Although they seem to be in the way they fill the frame with details. While canoeing in Montana, I wanted to document a bed of water lilies (#7) and was able to by using my 70-200mm zoom lens from the canoe. I call these “intimate scenes” or “details of nature” since they aren’t technically macro.

Accessories For Macro Work
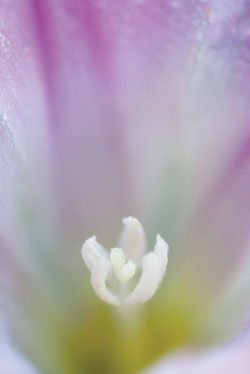
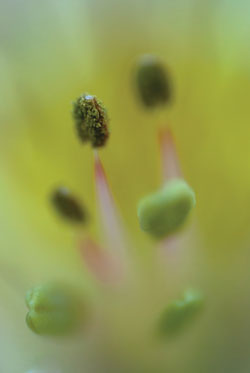
If you don’t want to invest in a macro lens to start, you might want to consider an accessory known as an “extension tube” (#8). These mount between your lens and the camera body and extend the distance between the front lens element and the image sensor, thus allowing the lens to focus closer. Be sure to get a dedicated set of tubes (ones that work with your camera) so you get the benefit of Auto Exposure and other camera automation features. Note: if you mount these on a macro lens you can get incredibly close to your subject, like this abstract study of a rose petal (#9), or the stamen of a lily which takes on an alien appearance (#10).


A less expensive way to go is to get a set of close-up “filters”, which actually act as magnifying lenses on top of your mounted lens. Optical quality is lessened when going this route, but it is a great way to get into the fun of macro photography.
Depth-Of-Field
When shooting macro work the depth-of-field—what is sharp and unsharp in the frame—can get very shallow, often inches or less. The closer you get, the less depth-of-field is available. Even if your aperture is set to f/22 you may still only have inches or a few feet at most in focus.
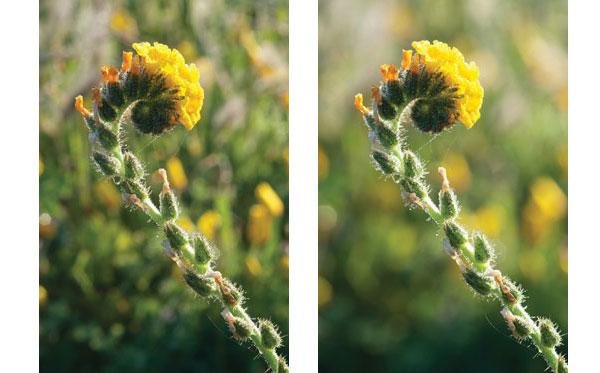
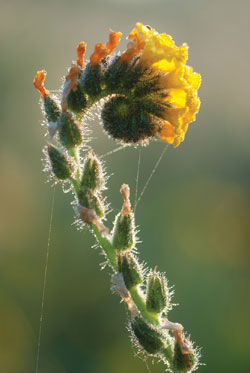
I prefer less depth-of-field with macro for a number of reasons. The first is practical—because a wider aperture means faster shutter speeds and I get less camera shake potential. If you photograph a very small object in light wind, at 6 feet away it barely appears to move but at 6” any subtle movement looks violent and blurry through your viewfinder. Second, minimal depth-of-field provides cleaner, less distracting backgrounds, along with depth and dimension through selective focus. You can see this in the comparison shots of a backlit fiddleneck wildflower (#11, #12 and #13). At f/16 (#11), although the flower is completely sharp, the busy background pulls the eye away from it. As I opened my aperture to f/8 (#12), the flower remained mostly sharp but the background still remains a distracting element. So I adjusted my tripod angle a bit to match the angle of the flower, moved in an inch or so and went wide open with my aperture at f/3.2 to create a soft blurry mosaic of greens, yellows and oranges (#13). Now the viewer would focus solely on this beautiful wildflower.

Your point of view is also critical in successful macro work. If my focus is of a stem, for example, I’ll lower my tripod so that the front of my lens is parallel to the direction the stem is growing—easy to do with a 9 foot sunflower, yet more difficult with a 3 ½” forget-me-not. I did this one morning with a poppy covered in morning dew (#14). By moving parallel to the flower, I was able to get most of the dewdrops in focus while avoiding the pitfalls additional depth-of-field could bring. Because subjects like flowers grow in a number of different directions, or an insect travelling ever so slowly can move out of focus in just a millimeter, finding the best angle becomes a test of patience and persistence.
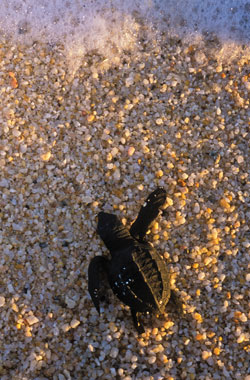
On the other hand, while shooting along the southern Baja coast, I found a baby turtle headed out to sea (#15). With my camera pointed straight down, the flat nature of the sand made a small aperture setting less critical.
Shifting your camera an inch to the left or right can also help you avoid eye sores such as a blade of grass cutting into the frame or a bright or dark spot in the background. While in the mountains outside of San Diego, I spotted a horned lizard and followed it back to its den. The first captures were quick and lacked any semblance of a good photo (#16), but as I took the time to change my angle, lie flat on my stomach and inch slowly closer to its den, all I needed was for the lizard to make an appearance for me to have my shot (#17).

Reproduction Ratio: Defining 1:1
When you purchase a true macro lens, you often see 2 numbers separated by a semicolon, such as 1:2 or 1:1. This denotes the magnification capability of the lens; not necessarily how close you can get, but more the size subjects might appear in frame. This reference goes back to film days but it applies to the “full frame” sensor size of pro digital cameras as well.
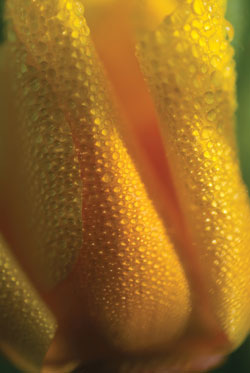
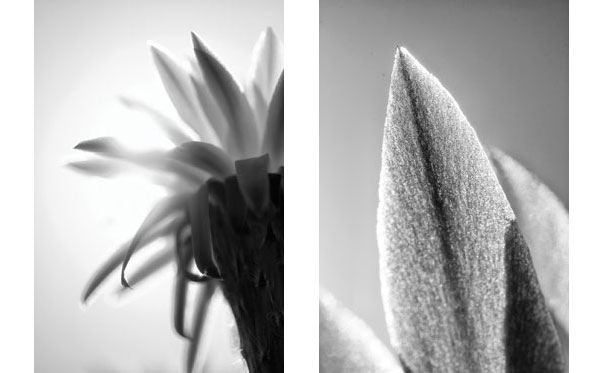
The macro term of 1:1 is what the photo industry refers to as “life-size”, used to describe the relation of an object photographed as compared in size to its image on the piece of film (or full frame sensor). If you focused as close as you could with your 1:1 lens on a 1” fly, then theoretically the fly would measure 1” on the actual film (or full frame image sensor). Thus 1:2 computes to half of life size, 1:4 a quarter life size, and so on. Photographing a barrel cactus flower (#18 and #19) shows the huge differences in detail between 1:8 and 1:1 life-size.
A Fun Macro Project
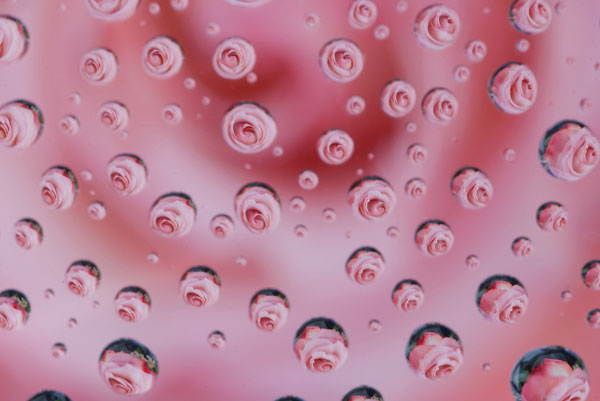
If you’d like to practice your macro techniques while creating eye-catching images, give this easy studio-style setup a try. The tools are 2 bar stools or sturdy boxes, a piece of acrylic glass (preferable over regular glass for safety reasons) and a spray bottle filled with water. Set your camera on a tripod and aim it at some flowers or any grouping of small natural objects. Spray a fine mist of water droplets on to the acrylic glass and point straight down, focusing on the drops just a inch or two away. Position the flowers under the acrylic glass (the closer to the glass, the more they will show up in your final shot). You can take numerous photos and the possibilities are endless. Variations stem from the distance from the camera at which you position your subject, the size of the drops and the subject matter (#20).


![]()
Get the Latest Photo Tips, News & Reviews from Shutterbug!
| Camera Reviews Other Reviews | Mobile Reviews Photography Reviews Columns | News | Features | How-To | Resources |
 © 2026 Shutterbug
AVTech Media Americas Inc., USA
All rights reserved