- REVIEWS
Camera Reviews 
More Reviews Mobile Reviews Photography Reviews - GALLERIES
- VIDEOS
- BUYER'S GUIDES
Lucis Pro 6.0 Software; An Update Offers More Sophistication
I’ve used LucisArt 2 for years to enhance detail and discover information in my image files; indeed, every pro I know has LucisArt and uses it to either sharpen detail or create amazing effects. But the basic LucisArt platform now seems crude compared to the latest, more sophisticated version. The older, basic version had several effects that you could choose from and a small window that wasn’t very good at giving you a good idea of how the final image would look. But now, with Lucis Pro 6.0, it’s a whole new game.
First, the software cannot be downloaded. One of the problems Image Content Technology LLC, the parent company, has had is wholesale pirating of its software. Lucis Pro 6.0 ships as a DVD and requires a Windows or Mac dongle. You may use it on up to three computers and you may buy additional dongles. The software is updated by patches from the company’s website (www.lucispro.com).
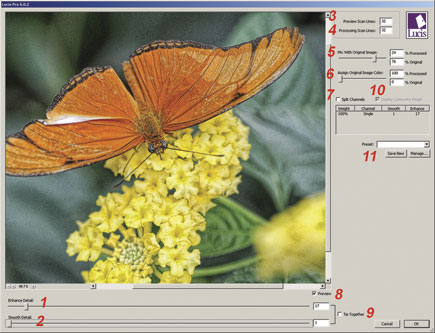
It is not a freestanding software; it acts as a Photoshop plug-in and is accessed in the Filters menu. Once you have an image opened in Photoshop to work on, you simply access the software through the Filters menu and the image appears on the new, and actually usable, preview screen. You can click it on and off so you can see just what’s going on. You can also magnify and reduce the image size so you can see the effect on all or part of the image.
 |
|
|
As in the basic version, which is now also offered as LucisArt 3, things are kept very simple. Slider controls allow you to see changes in real time. LucisArt 3 lacks many of the features of Lucis Pro 6.0 and only works with 8-bit images, where the Pro version works with 16-bit images.
Lucis is the trade name for Differential Hysteresis Processing, a patented image-enhancement process originally developed to enhance detail in scanning electron microscope images. I’m not sure I understand what that means, but I do know you can use it to go from slightly increased detail all the way to an HDR (High Dynamic Range) effect, and you can do it quickly and easily. Let’s take a look at some of the controls at our command that we can use to create the effect we’re looking for.
The most important control is the Enhance Detail slider (1). This is what Lucis is known for and if it just had this control it would still be great. Moving the slider to the left increases detail. The smaller the number, the more pronounced the effect.
 |
|
 |
|
|
After you’ve got that one set, you may or may not want to use the Smooth Detail slider (2) to smooth off some of those rough edges you’ve just created. By using the two sliders in concert, you have a huge amount of control over the final image. The Preview and Processing Scan Lines (3 and 4) are set at 16 by default; I hear they may be going to 32 in future versions. Lucis compares each pixel to every other pixel along scan lines. Increasing the scan lines removes any radial artifacts; setting them very low creates them, which can create interesting effects. Keeping the number lower in the Preview will help speed processing.
Instead of running a dupe layer through Lucis, you can now mix the original image (5) with the altered version in the software and see the effect in the Preview window. When processing the image, Lucis may change or shift color from the original image. A new control (6) allows you to assign the original color back to the image in whatever amount you like. This is very useful in portraits or in any image where accurate color is essential.
|
| |||||||||


![]()
Get the Latest Photo Tips, News & Reviews from Shutterbug!
| Camera Reviews Other Reviews | Mobile Reviews Photography Reviews Columns | News | Features | How-To | Resources |
 © 2026 Shutterbug
AVTech Media Americas Inc., USA
All rights reserved