- REVIEWS
Camera Reviews 
More Reviews Mobile Reviews Photography Reviews - GALLERIES
- VIDEOS
- BUYER'S GUIDES
Lightroom Basics: Proper White Balance Adjustments Really Improve Your Photos (VIDEO)
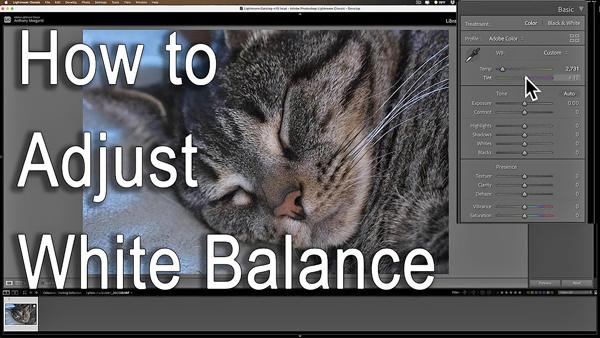
The task of editing photographs can be as simple or as complicated or as you make it, and today’s Lightroom tutorial describes one of the easiest methods for improving your images.
What we’re talking about here is white balance—something you can adjust in the camera or after the fact in post processing. Simply put, this involves removing unsightly color casts so that objects appearing white in a scene are faithfully rendered white in a photo. By doing that, colors tend to easier to adjust as well.
In this six-minute episode, image-editing expert Anthony Morganti explains the concept of white balance and demonstrates three different ways to make the appropriate adjustments in Lightroom. As he explains, white balance should be corrected early in your workflow because, “It’s rather foolish to adjust color and tone on an image if you don’t have a good white balance to build upon.”
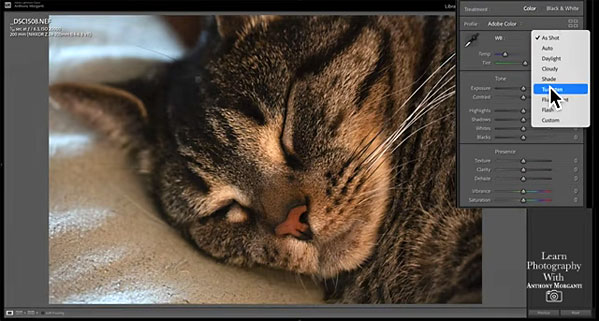
Morganti begins with an unprocessed image shot under incandescent light, and the white balance is considerably off. He immediate gets to work on the white balance using one of the three methods he recommends. And there’s a difference in the approach depending upon whether you captured the shot as a JPEG or Raw file.
As you’ll see, Raw images are easier to adjust because they enable you to use Lightroom’s dropdown menu to select an option that matches your original light source. And it’s pretty much a one-click correction.
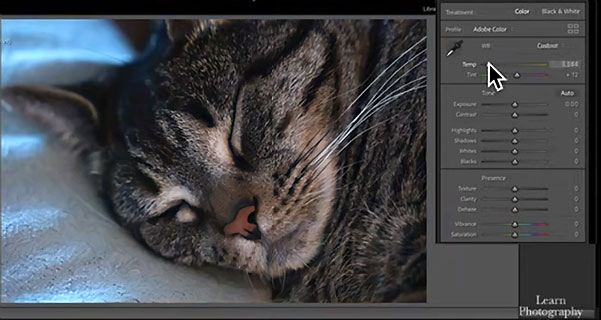
Morganti’s other two methods aren’t much more complicated. They’re handy for different types of images, and they deliver very precise results. So take a look, and remember: When you begin editing an image, white balance is the first thing you should address.
You can find more helpful tips and tricks on Morganti’s YouTube channel, and in another tutorial in which he explains his favorite Lightroom keyboard shortcuts for faster, smarter editing,


![]()
Get the Latest Photo Tips, News & Reviews from Shutterbug!
| Camera Reviews Other Reviews | Mobile Reviews Photography Reviews Columns | News | Features | How-To | Resources |
 © 2026 Shutterbug
AVTech Media Americas Inc., USA
All rights reserved