- REVIEWS
Camera Reviews 
More Reviews Mobile Reviews Photography Reviews - GALLERIES
- VIDEOS
- BUYER'S GUIDES
LaserSoft’s SilverFast PrinTao; Is This “The Path” To Easy, Efficient, And Flexible Photo Printing?
With a digital camera, a computer, and a printer, all that remains to make
photo prints is an application that will access and open your photo files and
send the images to the printer. That's simple enough. But there are obviously
other issues--what about color matching between screen and print? How do
you get to the pictures you want printed? There are also questions about how
you could print two, three, or four photos on a page and how you can add your
name, a copyright notice, or insert text for a caption. It used to be that you
had to purchase a moderate to expensive image-editing application to do all
this, with a steep learning curve thrown into the bargain. Now, LaserSoft has
created a software utility just for printing called SilverFast PrinTao. In my
testing I found that it can help you output professional-looking results with
minimal effort and little learning required. It is what computer geeks refer
to as "intuitive" software.
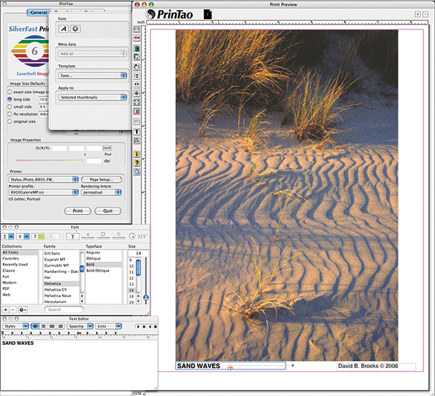
SilverFast PrinTao provides an on-screen user interface with two distinct windows,
a Control Panel on the left and a Preview window on the right. At the top of
the left Control Panel there are three tabs, General, in which most operations
are executed; Templates, from which pre-configured and custom print templates
can be chosen for use in the Preview window; and Options, which includes the
choice of a work space default profile. Immediately below on the left is a logo/thumbnail
window that will display an image thumbnail to provide visual identification
of any file highlighted in the Browser window to the right side of the Control
Panel.
 |
|
|
To begin the printing process you open a file in the Browser window. This
provides easy, direct access to all the files on all drives connected to your
computer. Once a file is located, click on it to highlight the file name in
the Browser window. Then at the top of the column of action icons in the left
vertical frame of the Preview window, click on the green arrow pointing to the
right. This will cause the file to be opened in the Preview window, sized according
to the selected Image Size Defaults in the next window down from the logo/thumbnail
window. You can select any default by highlighting its radio button. The middle
three buttons allow you to define either a specific long or short side in inches,
as well as the print image resolution.
With an image open in the Preview window, and with its frame highlighted, you
can rotate or flip an image vertically or horizontally, as well as center an
image on the page. You can also enlarge or diminish its size to the allowed
printing size, using the fourth through eighth action icons in the Preview frame
next to the Control Panel. In addition, PrinTao's Preview window supports
free-floating objects like images and text blocks. It fully supports drag and
drop positioning of images and blocks of text using the mouse cursor. You can
also add a variety of frame effects to the image by clicking in the ninth action
icon from the top. When you are finished printing or decide you want to print
a different image, click once on the image with the mouse cursor to activate
the frame highlight and then click the second action icon down from the top
with a red arrow pointing to the left, and the file will be removed from the
Preview.
Once your image is sized and placed as you prefer within the Preview window
space--inside the red outline that demarcates the printable region of the
page--you are ready for the final choices, controlling print quality and
color management in the Printer control section at the bottom of the Control
Panel window.
 |
|
|
Quality Control And Color Management
Printer control, particularly color management, is often confusing. PrinTao
makes it all accessible and relatively easy by providing a simple, direct interface
located under Printer at the bottom of the Control Panel window. At the top
left under Printer is a drop-down menu which will show all printers installed,
so just click on the printer name you will be using. The Page Setup button will
then open the Printer's Page Setup dialog that should be set for the page/paper
size to be printed and its orientation, portrait or landscape. Selecting these
Page Setup factors actually controls how the Preview window is configured, and
therefore should be selected before actually opening, sizing, and positioning
images to be printed.
If you want to do application controlled color managed print matching, then
open the Printer Profile drop-down menu and select the profile for the printer/paper
you are using. However, if you want to keep it easy and simple and let the print
driver control and adjust print color, select either sRGB or Adobe RGB (1998)
as the Printer Profile. If you have selected a printer profile to do color managed
printing, use the Rendering Intent drop-down menu and select Perceptual for
most photographic printing, although some prefer the results obtained by selecting
Relative Colorimetric.
|
| |||||||||


![]()
Get the Latest Photo Tips, News & Reviews from Shutterbug!
| Camera Reviews Other Reviews | Mobile Reviews Photography Reviews Columns | News | Features | How-To | Resources |
 © 2026 Shutterbug
AVTech Media Americas Inc., USA
All rights reserved