- REVIEWS
Camera Reviews 
More Reviews Mobile Reviews Photography Reviews - GALLERIES
- VIDEOS
- BUYER'S GUIDES
Intriguing Designs In Smoke: Ethereal Images Made Easy
I have always been fascinated by a photographer’s ability to turn a common subject into a work of art. Being a photographer means seeing the artistic potential in the elements that surround us on a daily basis. I travel all over the world seeking out amazing things to shoot, but I also find them at home—in the kitchen, in my backyard or even in my office. It’s always an exciting discovery to work with a subject to which I never gave a second thought, and then one day it turns into something that is visually arresting.
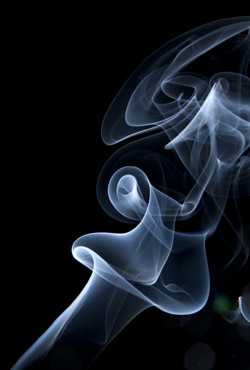
One of the subjects that falls into this category is the smoke from incense. When a stick of incense is burned, the smoke billows upward in a narrow column and then, when it meets an air current, it pulsates and contorts in very interesting ways, as you can see in (#1 and #2). I decided to photograph it one day and was rewarded with some wonderful images.

All Photos © Jim Zuckerman
I wasn’t sure which nearby store might carry incense, and instead of wasting my time looking for it I went online and found multiple outlets. For a few dollars, you can get all the incense you’ll need—and more— for this technique.
At first I tried burning 2-3 sticks at one time (I figured if one was good, more would be better), but I quickly realized this was a mistake. All I had was a smoky mess devoid of a clean, graphic form. In other words, I didn’t get the clearly defined column I wanted. Using only one stick of incense at a time worked much better.
I placed one stick of incense into a slender vase and set that on a plate to catch the ash as the stick burned. For the background, I used a piece of black velvet because this kind of fabric absorbs light very well. I didn’t want a dark gray background that would be typical if you used black foam core or black cotton material. A rich black color provided the kind of contrast I wanted when shooting the white smoke.
For my light source I used a single, off-camera flash. I laid it on my desk about 18” from the incense and triggered it wirelessly with a Pocket Wizard (www.pocketwizard.com). I wanted the flash close enough to the smoke to provide enough light that would allow a small lens aperture. Smoke has depth, as you can see in (#3), and I felt it was important to make all of it sharp.
The form of the smoke changes every second that the incense burns. That’s part of the fascination. Notice how important the black background was in making the form of the smoke so clearly visible. Also note how effective the side lighting was in helping to define the shape and the contours of the smoke.
In this kind of high contrast shot, I don’t trust a meter no matter how sophisticated it is. Even though there are middle gray tones within the smoke, they are so fleeting that it is impossible to use them for an accurate reading. I simply used the LCD monitor on the back of the camera to tell me if the image was too light or too dark. I then altered the light output from the flash using the Flash Exposure Compensation feature. Another option would be to simply move the flash unit closer or farther from the smoke by a few inches to vary the exposure.
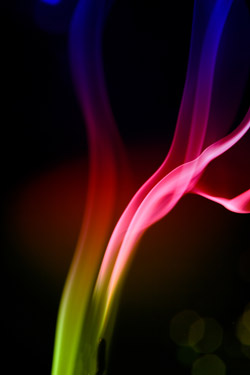
Once I had several intriguing images, I started thinking about what else I might do with the images of smoke. There is indeed a lot of potential in post-processing. The first thing I did was use Photoshop to alter the color. To do this, I made a duplicate layer (Command/Ctrl J) and then applied the Gradient tool to lay down a spectrum of color across the smoke. When the Gradient tool is selected, you can choose several spectra of colors in the tool bar (figure A). By running the cursor down the duplicate layer, the color palette you chose replaces the image. To make the gradient color mesh with the smoke, go to the Overlay Blend mode in the Layers palette (use the submenu that is labeled with the word “Normal”—pull that down and you’ll see Overlay). Instantly the smoke has dazzling color (#4). Other programs allow you to play with color as well.

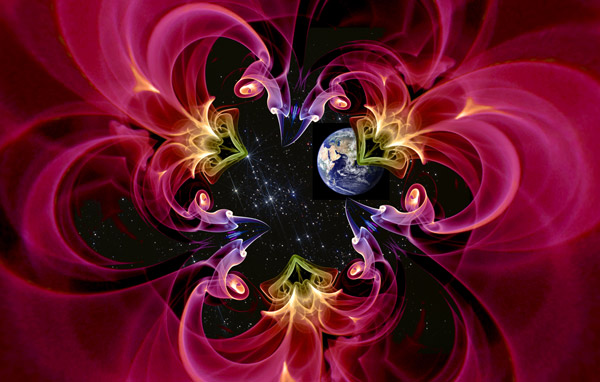
Going beyond that, I experimented with cutting and pasting other elements with the smoke. For example, in (#5) I mirrored the image and then added a costumed model from Venice, Italy. I used the Earth as a component in (#6). To abstract the smoke I used the Photoshop plug-in Flexify 2 made by Flaming Pear Software (http://flamingpear.com). Even without the colors and the composite work, Flexify 2 created amazing abstractions of the smoke, (#7 and #8). Use your own software program to see how you can alter the images and you’ll find that you can create dozens of variations with one image.


![]()
Get the Latest Photo Tips, News & Reviews from Shutterbug!
| Camera Reviews Other Reviews | Mobile Reviews Photography Reviews Columns | News | Features | How-To | Resources |
 © 2026 Shutterbug
AVTech Media Americas Inc., USA
All rights reserved