- REVIEWS
Camera Reviews 
More Reviews Mobile Reviews Photography Reviews - GALLERIES
- VIDEOS
- BUYER'S GUIDES
Image Enhancements: Post Processing For Nature Photography

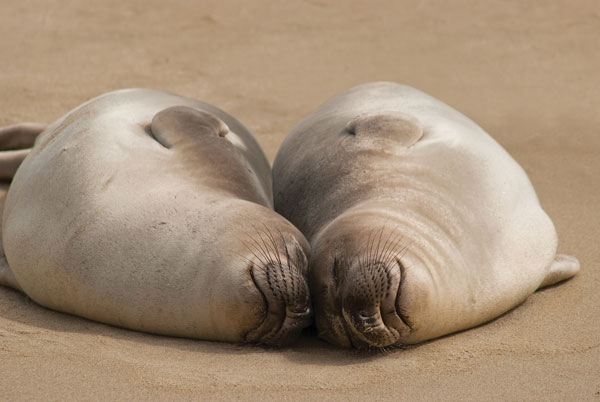
Some photographers feel that the photograph you capture in camera is the final image. Today, with the advent of the Raw digital format, most photographers can’t get away from applying post-capture processing techniques to their images since, by definition, the format is an unprocessed one. Some Raw files need very little work while others require more time and effort. Since my exposure and white balance was set accurately in the field, little was needed in the processing of these 2 elephant seals (#1). However, the ability to edit images, color correct scenes, restore highlights, fix exposure miscalculations, store EXIF metadata (exposure information) and internal GPS (Global Positioning System for location information) data and to take advantage of new features like High Dynamic Range imagery and panorama stitching are the true benefits of digital nature photography.
All Photos © Sean Arbabi
Figuring out a system for everything you do after the capture is now part of the nature photographer’s tool kit—how you transfer files to your computer, erase the memory cards, review, edit and process shots then organize, caption and keyword the group to archive for the next go around. Put a method in place that you can repeat then double-check yourself each time and the operation becomes easier and more efficient.
A Controlled Environment
Setting up your workspace is a good starting point. Facing the monitor away from any windows or lamps so it doesn’t reflect the light helps you see your images better. Having the same type of light in the room no matter what time of day is another good way to control your environment. Then, calibrate the monitor and printer and you are off to the races. This may seem like extra work, but if you are processing and editing an image like this one made in the Sierra foothills (#2) that incorporates subtle tones and narrow contrast, the importance of a controlled environment will become evident.

Editing Software
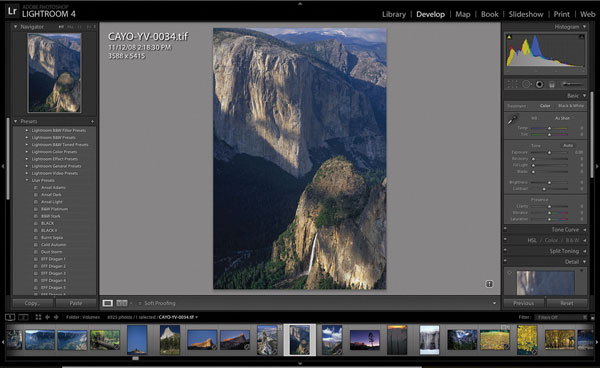
This second step in your digital workflow starts with reviewing your image files and possibly adding a few edits before opening the Raw file. Software programs like Apple’s Aperture (www.apple.com) and Adobe’s Lightroom (www.adobe.com) (#3) are powerful programs that offer great control and editing facility. Their learning curve may be a bit steep, but you’ll find that their workspace becomes fairly intuitive in short order. One of the main benefits of Aperture and Lightroom is that they offer both review and image manipulation features in one package. They allow you to review hundreds or even thousands of Raw image files fast. Both programs offer solid image management, good search controls through folders, keywords or metadata information and both produce a non-destructive workflow (#4). That means no edit in Aperture or Lightroom will permanently modify the original image, regardless of file type.

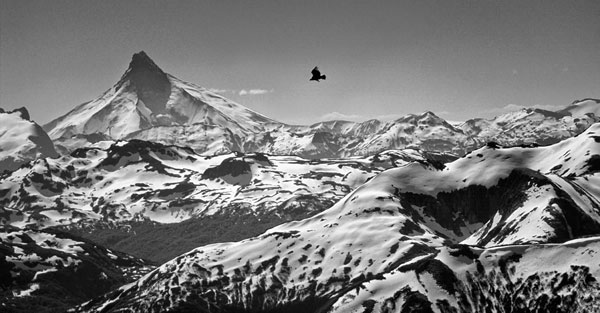
Another benefit of these programs is that they take what are called “plug-ins”, software that works off the processing engine of the main program and that adds extra options to your processing work. For example, to create black and white images from my color digital files I often use Nik Software’s Silver Efex Pro (www.niksoftware.com) (#5 and #6). It’s a great program with easy-to-use preset black and white filters, complete with optional sliders to make any changes in contrast, grain, brightness, structure and more. For the image of Yosemite Falls, the color scene had a monotone feel to it, so I felt it would convert naturally to black and white. In the photo of an Andean Condor soaring over Northern Patagonia (#7), the original image didn’t contain amazing colors, yet the subtle backlight of the summer sun cast wonderful shadows along the snowy border of Chile, making it a more dramatic black and white photo. In fact all the black and white images in this issue were converted using Silver Efex Pro.

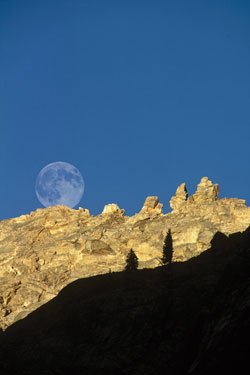
Finally, on rare occasion I may alter the original image and add an element like the moon (#8), marketing the shot as a digitally altered image or a photo illustration.
A Final Word
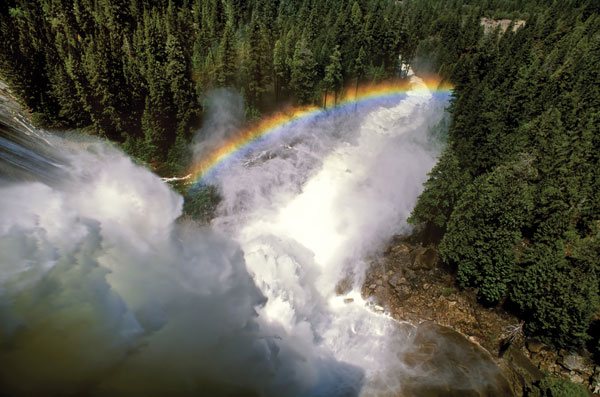
When you step into the wilderness to create art, to document this amazing world or find small miracles of beauty, you are forever changed. There’s an old saying that goes “You can’t step in life’s river and remain in the same place, because we all begin as snow falling on mountains and end as water in the ocean.” I was reminded of this saying when I came across an image of a rainbow floating in the mist above Nevada Fall (#9). You grow and gain knowledge as your blood pressure lowers and your mind expands. This is the creative path I try to follow when photographing the natural world. So enjoy the process, take it all in when you can and recognize that as you learn your photographic journey may ebb and flow, but you will always continue to move forward. Connect with nature, enjoy the process, and work on various techniques one step at a time and you’ll begin to create the images you will hold dear to your heart.
Resources
Here are a group of software companies and products I use for image processing:
Adobe Systems Incorporated (Lightroom, Photoshop): www.adobe.com
Apple Inc. (Aperture, iMac, MacBook Pro): www.apple.com
Extensis (Extensis Portfolio): www.extensis.com
Nik Software Inc. (Silver Efex Pro): www.niksoftware.com
Topaz Labs, LLC (Topaz DeNoise): www.topazlabs.com
X-Rite, Incorporated (ColorMunki): www.xrite.com or www.colormunki.com


![]()
Get the Latest Photo Tips, News & Reviews from Shutterbug!
| Camera Reviews Other Reviews | Mobile Reviews Photography Reviews Columns | News | Features | How-To | Resources |
 © 2026 Shutterbug
AVTech Media Americas Inc., USA
All rights reserved