How To Use Ulead CD & DVD; PictureShow 3 Deluxe

Further Information
Ulead CD & DVD PictureShow 3 Deluxe
http://www.ulead.com

Finding a convenient way to share your photos with others is often a challenge. Printing extra copies of your images gets expensive, and building web pages to share your images can be a time consuming task. Ulead CD & DVD PictureShow 3 Deluxe solves this problem by providing an efficient new way to share your photos: burning them to a CD and then displaying them using a DVD player and TV.

When I tell people about this technology, I'm frequently asked two questions: "Does this require a DVD burner?" and "Do I need an expensive DVD player to view the CD?" The answer to both questions is "No." The CD can be burned using any typical computer CD burner, and the technology to play computer burned CDs is available on just about every DVD player made within the last 5 years, regardless of how much (or how little) it cost.

There are several CD\DVD software packages available in today's market. What I like most about Ulead's package, is that it easily creates professional DVD quality results, complete with music, transitions, and menus, at an affordable price. The MSRP is $49.99, and a free trial is available via download from www.ulead.com/dps/.

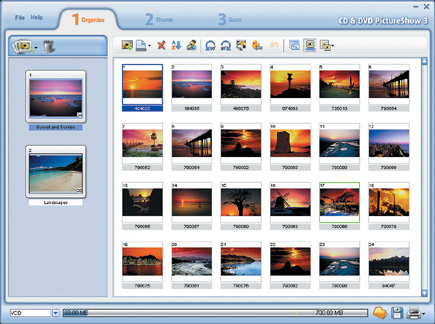
Step 1: Organizing Your Photos
Ulead CD & DVD PictureShow uses a three step interface that walks you through the entire process of creating a slide show (see #1). The first thing you'll need to do is start a new project by clicking the New Slide Show button (located right underneath the File menu) and then clicking "New Photo Slide Show." The "Add Photos" dialog box opens, which is used to select the photos that you'd like to use in your slide show. You can add photos from anywhere on your computer, and/or use the New Slide Show button to access photos directly from your digital camera, by clicking "Get from Digital Camera."

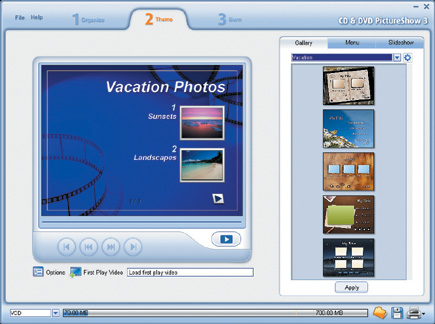
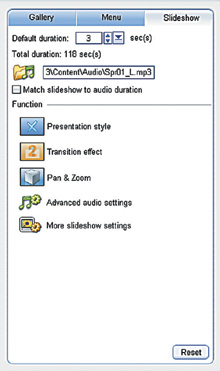
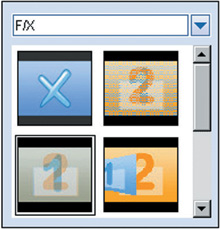
Step 2: Adding Features Using The Theme Tab
The Theme Tab is used to add a background theme to your slide show, and to determine how features such as background music and transitions will operate. When you click on the Theme Tab, a preview of your slide show will appear on the left, and a menu will appear on the right (see #3).

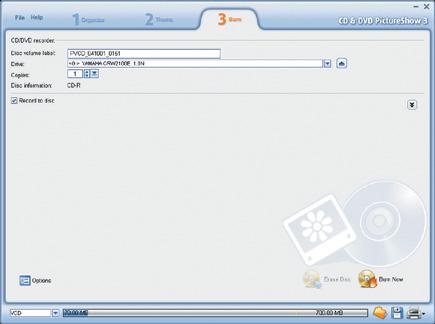
Step 3: Burning Your Slide Show To CD Or DVD
This is the easiest step, since your CD or DVD burner and CPU do all of the work. Click on the Burn Tab to set options for burning your slide show (see #6). If you have more than one CD and/or DVD burner, select which burner you'd like to use from the drop-down box. If your computer has just one burner, it will be selected automatically.

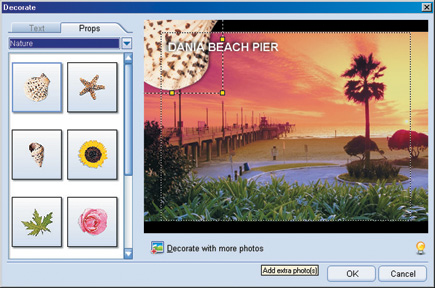
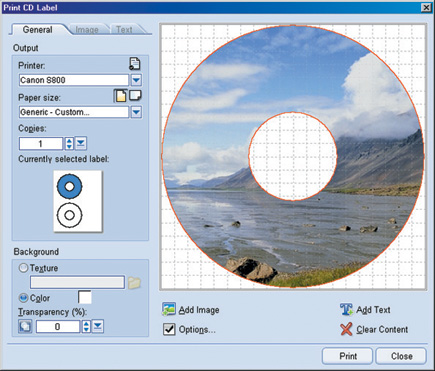
Additional Features: Printing A CD Label And Using Ulead Photo Explorer 8.5
If you'd like to print an attractive label for your CD or DVD, you can do so by clicking the Printer icon on the lower right side of the screen. You can select from a wide variety of name brand CD and DVD labels, or choose the "Generic" option. You can then click on "Image" to add an image to label, and click "Text" to add Text to the label (see #7).

1
The PictureShow Interface with the Organize Tab selected.

Every picture in your slide show can have text and props added to it by double clicking on the photo's thumbnail (see #2). You can rearrange where photos appear in your slide show by dragging and dropping their thumbnails. You can also use the Auto Enhance button, located near the top center of the interface, to automatically balance the brightness and contrast in any selected photo(s).


2
Adding text and props to your photos.

By default, Ulead CD & DVD PictureShow will burn your slide show to the DVD format, since this allows for up to 8.5GB of slide show photos to be stored on a single disk. However, since most computers do not ship with DVD burners, you'll likely want to switch to a CD format, by clicking the Output Format drop-down box in the lower left corner of your screen. There are 2 CD based formats available: VCD and SVCD. VCD enables storing more photos in a slide show, while SVCD enables higher photo quality. You can check the amount of available space on your CD or DVD via the Capacity Bar at the bottom of the interface. In most cases, SVCD is the best option to use, but you can switch to VCD if you need to squeeze more photos onto your CD.
Note that you're not limited to a single slide show per CD or DVD disk. You can add additional slide shows in the same way as you added your original slide show (by clicking the New Slide Show button, and then clicking New Photo Slide Show). Each slide show will be represented by a thumbnail on the CD or DVD's main menu. By default, the first image in the slide show will be used as the thumbnail image. However, you can set any image in the show as the thumbnail image by right clicking on the image and then clicking "Set as Slide Show Thumbnail." When playing back your CD, you can select which slide show to view in the same way that you would select a scene in a professional DVD: by clicking a number on your DVD's remote control.
Before moving on to the next step, it's a good idea to save your current slide show project by clicking the Save button (the second button in the lower right side of the display). Next, click on the Theme Tab at the top of the page, to add features to your slide show.


3
Adding features in the PictureShow Theme Tab.

The first thing you'll want to do is to select a background for your slide show. Backgrounds are selected from a list of categories such as Holidays, Sports, and Vacations. When you've decided on a background, click the Apply button to add the background to the preview on the left of the screen. The background will load with a default title and captions near each slide show thumbnail, you can edit the captions, along with the text font and color, by right clicking on any text object. Default music that fits your theme is added along with the background. You can use the Menu button to access any image on your computer and use it as a background image, and to change the music selection.
The Theme Tab also contains the Slide Show menu, which is used to control various playback aspects of your show (see #4). The first option is to set how long each image will be displayed. You can set the slide show speed to exactly match the length of your audio file by clicking the checkbox labeled "Match Slide Show to Audio Duration."
By default, images are displayed surrounded by a black background. The Presentations Style button is used to replace the default background with an attractive frame. Clicking on the Presentations Style button opens a pop up menu, with presentation frames grouped by category. You can also choose to replace the black background with a different color or texture by clicking "More Slide Show Settings."


4
The slide show Menu is used to control aspects such as transitions and presentation style.

Although you can choose to allow each picture to simply be replaced by the next picture, you can control how this change occurs by using the Transitions button. Clicking the button opens a pop up menu with animated demos showing how each effect works, will appear (see #5). Transitions can be a nice way of adding a professional touch to your slide show presentation. There are dozens of transition styles available, ranging from traditional fades to mosaics and 3D effects.


5
The Transition Pop-Up Menu.

In addition to Transition Effects, you can also add Pan and Zoom effects to each image. While Transition Effects occur as the display moves from one image the next, Pan and Zoom effects occur while each image is being displayed. As with Transition Effects, there's a large sample of Pan and Zoom effects to choose from.
You can also use the Theme Tab to add additional audio data to your show. Click on the Advanced Audio button to access these options. From the Advanced dialog, you can add a series of audio files instead of a single file, or you can record a voice narration to play along with your slide show.
One of the features that I like most about Ulead's CD & DVD PictureShow is that you can preview the entire show exactly as it will appear on a DVD player by clicking the Play button on the preview screen. The Play button will be replaced with a series of buttons that simulate a DVD player's remote control. You can use these buttons to navigate inside your show and confirm that everything works exactly as you planned.


6
The PictureShow Burn Tab.

Make certain that the "Burn to Disc" option is checked, and you're ready to begin the burning process. The Burn button is located near the lower right corner of the screen.


7
Creating a label for your CD or DVD disk.

There are a couple additional options available for creating a more artistic label. The Transparency button is used to make your text semitransparent, allowing the image under the text to be partially visible. The Wrap Text button is used to convert horizontal text into circular text that wraps around your label.
Ulead Photo Explorer 8.5 is included as a free bonus item with Ulead CD & DVD PictureShow 3 Deluxe. Photo Explorer has always been a convenient tool for displaying a thumbnail view of your files and folders, but this newest version of Photo Explorer has some powerful new options.
Photo Explorer can now be used as a basic image editor for performing corrections on and adding effects to your photos (see #8). It's not designed to be a full featured photo editor like Adobe Photoshop or Ulead PhotoImpact, but it can be a very convenient tool to have available for when you need to make routine adjustments to your photos before using them in CD & DVD PictureShow.


8
Performing common image adjustments in Ulead Photo Explorer 8.5.

Tony Celeste appreciates feedback from his readers. You may contact him at aceleste@comcast.net.

X