- REVIEWS
Camera Reviews 
More Reviews Mobile Reviews Photography Reviews - GALLERIES
- VIDEOS
- BUYER'S GUIDES
How to Use High Pass Sharpen & White Balance for Alluring Portrait Photo Edits (VIDEO)
This quick tutorial from the How to Use YouTube channel demonstrates the power of two "crucial" Photoshop tools when editing your portrait photos. The goal is to enhance photos in an alluring, realistic way that that is very flattering to a subject.
This simple technique involves the use of Photoshop's straightforward White Balance and High Pass Sharpen tools and only take four minutes to explain. Best yet, this method will work wonders for improving just about any portrait photos you shoot, whether they're head shots, full body images, or group photos of family or friends.
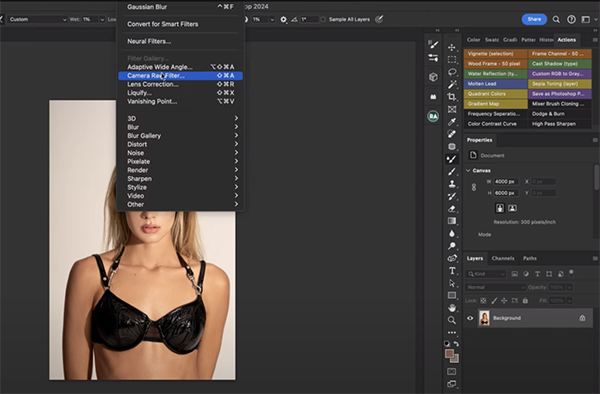
The first step in the process is modifying White Balance by selecting the Filter tab and choosing the Camera Raw filter option from the dropdown menu that appears. The unnamed instructor then uses the Eyedropper to sample the white background to get an initial improvement for what follows.
At this point the color "isn't quite there," so a few simple tweaks are required. All it takes is dropping the Temperature slider and modify Tint. These quick adjustments are accomplished by simply moving a couple sliders, and you'll see how to reset the changes in case you want to start over.
Now that White Balance is properly adjusted the instructor moves on to sharpening. Precise focus on a subject's eyes is always critical and that's where the instructor begins. He clicks on High Pass Sharpen, selects a Brush, and reveals the specific settings to use. You'll also see why it's important to hit "X" on the keyboard "to make sure we're working with the background layer."
It's easy to refine this adjustment if the eye appears sharper than you want, simply by moving Photoshop's Opacity slider to the left. In this instance dropping Opacity to 50% provides a sharp but very natural look. You'll also want to click on Opacity at the top of the screen and change that to 50% as well
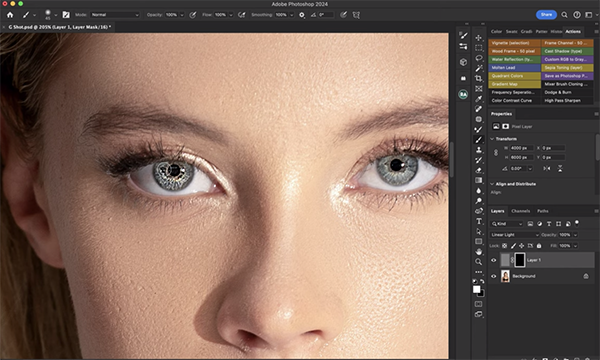
Now when you pull back and observe the eyes, you'll see how much better they look. As the instructor says, "when you sharpen the eyes you'll get more POP in the photo—it's that simple."
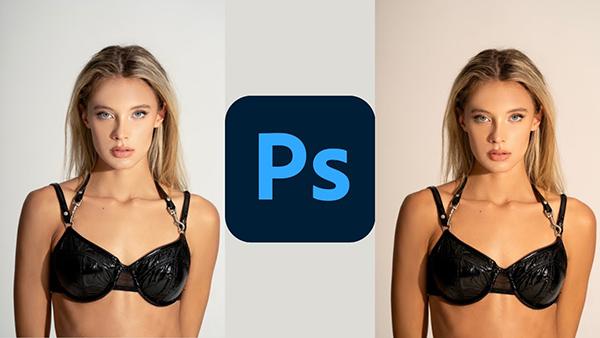
Take a look at the original image and compare it to how the portrait looks after sharpening and white-balancing, and you be impressed by the effectiveness of this quick-and-easy technique. After watching the video head over to the How to Use YouTube channel where there are many more tips and tricks.
And on a related note, don't miss the tutorial we posted earlier this month in which an experienced portrait pro explains how to shoot sensuous outdoor boudoir photos with available light.


![]()
Get the Latest Photo Tips, News & Reviews from Shutterbug!
| Camera Reviews Other Reviews | Mobile Reviews Photography Reviews Columns | News | Features | How-To | Resources |
 © 2026 Shutterbug
AVTech Media Americas Inc., USA
All rights reserved