- REVIEWS
Camera Reviews 
More Reviews Mobile Reviews Photography Reviews - GALLERIES
- VIDEOS
- BUYER'S GUIDES
How to Give FLAT Photos DEPTH & Dimension in Photoshop (VIDEO)
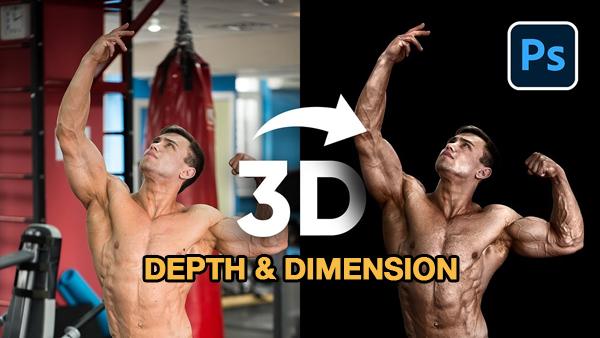
How often have you returned from a shoot thinking you captured some great images, only to discover that they look flat and uninspiring on the computer? If you’re like most photographers, you’ve experienced this disappointment more than once or twice.
Today the PIXimperfect YouTube channel comes to the rescue with a simple Photoshop trick for adding depth, dimension, and drama to boring images. In fact, instructor Unmesh Dinda says this technique is so effective “it creates an illusion of 3D.”
Dinda demonstrates the step-by-step process in a rapid-fire manner, so be sure to have pen and paper ready to take a few notes before launching the video. He uses the power of Curves, Layer Style, and a unique masking technique to automatically add realistic highlights and shadows to the subject.

In essence this is a portrait-editing lesson, but you’re likely to find other uses for this quick-and-easy approach. And while most of our portraiture tutorials involve female models, this one uses a male subject (which is long overdue).
The first step is a crucial one, and that involves going to the Image tab atop the screen, choosing Mode, and then selecting 16 Bits Per Channel from the dropdown menu. Doing this is important because the method involved employs several masks, and working in 8-Bit mode will likely result in unsightly banding.
The next step involves several options for fixing the distracting background. In this case Dinda demonstrates a simple method for turning it black. He then makes the artistic choice to create a dark base for the image at hand. As you’ll see, at this point the photo already appears much better.

Dinda’s final adjustments includ3 strategically adding highlights and shadows, along with a few other quick tips to “make it Pop.” All that’s left is cleaning up a few distracting spots and the remarkable transformation is complete.
Dinda’s wildly popular YouTube channel is full of helpful lessons like this one, so be sure to pay a visit.
And don’t miss another tutorial we posed recently, explaining a Photoshop trick for giving photos precise color and contrast


![]()
Get the Latest Photo Tips, News & Reviews from Shutterbug!
| Camera Reviews Other Reviews | Mobile Reviews Photography Reviews Columns | News | Features | How-To | Resources |
 © 2026 Shutterbug
AVTech Media Americas Inc., USA
All rights reserved