- REVIEWS
Camera Reviews 
More Reviews Mobile Reviews Photography Reviews - GALLERIES
- VIDEOS
- BUYER'S GUIDES
How to Fix Landscape Photos Shot in Harsh Light (VIDEO)

Landscape photography can be difficult depending upon ambient light and the position of the sun. Earlier this week we featured a powerful Lightroom tutorial for "relighting" dull and lifeless images, and today we have another one that addresses a different challenge.
The topic of this episode from the PHLOG Photography YouTube channel is enhancing images shot in harsh light. Under these conditions, with a wide range of tones, your photos may have either blown-out highlights, crushed shadows, or even both. And contrast can be a real problem.
When this occurs Lightroom can even out the tones to create images with balanced exposures, more accurate colors, and other key attributes. Instructor Christian Mohrle is a professional German landscape photographer, and he walks you through a straightforward process that you'll employ time after time.
Mohrle makes everything easy to understand by including a link beneath the video for downloading his sample image so you can follow along and make the changes yourself. As is typical for Mohrle he begins with a few basic adjustments to the overall scene to create the best possible starting point for the selective enhancements that follow.
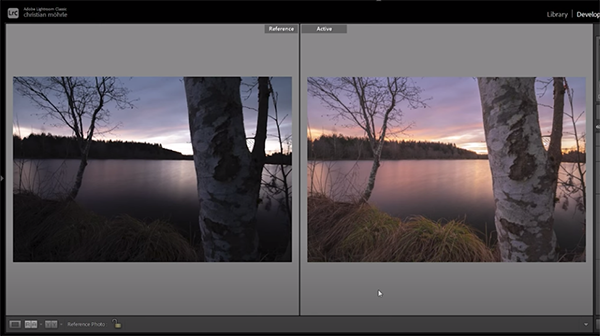
The image is a flat and dark lakeside shot with subdued colors and very poor contrast. After explaining why he didn't use HDR to capture the shot, he changes the profile from Adobe Color to Adobe landscape which immediately opens ups the shadows, cuts the highlights, and slightly enhances saturation.
Other preliminary adjustments include increasing Color Temperature to introduce warmer tones in this sunrise shot. Mohrle then raises exposure to further lighten the shadows and reveal more details, while temporarily ignoring the highlights. He also pumps up the whites, drops Clarity and increases Texture. A couple more quick tweaks and it time for the real meat of the lesson.

Mohrle demonstrates the remaining steps far better than we can explain them. Suffice to say that these are selective adjustments to specific portions of the scene that rely upon simple masks. Careful Color Grading comes next with the intent of improving the image while retaining a realistic look.
The transformation is complete with Focus stacking in Photoshop and a bit of final cleanup that makes the image really sing. You can find an abundance of image-editing lessons, particularly for landscape imagery, by paying a visit to Mohrle internationally popular YouTube channel.
And don't forget to watch the tutorial mwntiioned above so you can make dull and lifeless landscape photographs a thing of the past. Yesterday's guide to focus stacking for beginners will prove helpful as well.


![]()
Get the Latest Photo Tips, News & Reviews from Shutterbug!
| Camera Reviews Other Reviews | Mobile Reviews Photography Reviews Columns | News | Features | How-To | Resources |
 © 2026 Shutterbug
AVTech Media Americas Inc., USA
All rights reserved