- REVIEWS
Camera Reviews 
More Reviews Mobile Reviews Photography Reviews - GALLERIES
- VIDEOS
- BUYER'S GUIDES
Getting The Light Right: Exposure Dilemmas And Solutions
Everyone is insecure about getting the correct exposure. We have good reason to be insecure because too often we’ve experienced over- and underexposures when we didn’t expect it, and that leaves a lasting impression that exposure technique is a mysterious and elusive thing.
Actually, good exposure isn’t mysterious at all. Like anything else, once you understand the principles involved, it becomes a piece of cake and you no longer feel like you are at the mercy of unknown forces.
In order to become comfortable with exposure there are two concepts that are key, and both deal with the difference between how your eyes see and how the metering and exposure system work. There are two key concepts in this: dynamic range and middle gray.
Dynamic Range
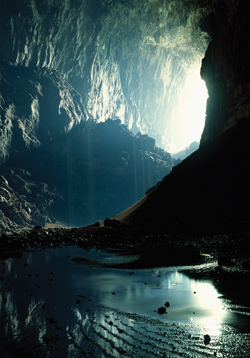
I introduced the concept of dynamic range in Part One, and I want to expand on it here. This is a term that refers to the amount of detail in the shadows and the highlights that a digital sensor (and film as well) can reveal in a photograph. The cave I shot on the island of Borneo (#1), the mouth of the cave became solid white and shows no detail at all and similarly the dark formation on the right side of the frame is mostly devoid of detail. The camera failed to record detail in these areas despite the fact that as I stood there, my eye/brain combination could see this detail clearly.
All Photos © Jim Zuckerman
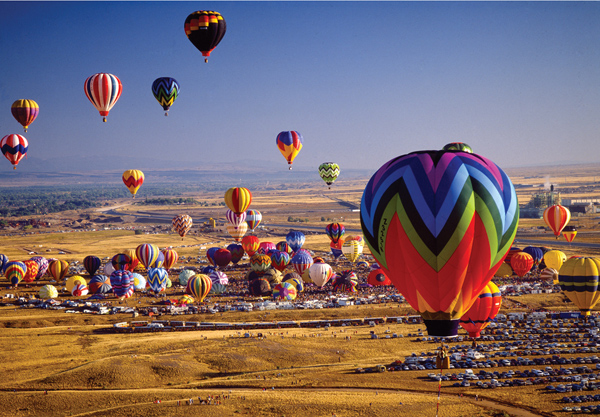
The problem is that a digital sensor is not as sophisticated as our brain, and we expect our camera to capture what we see. When it does not, it is understandable to be puzzled, confused and disappointed. Why can we see complete detail in some pictures, like the aerial shot of the Albuquerque International Balloon Fiesta (#2) (www.balloonfiesta.com) but in the cave photograph a large percentage of the image is obscured in the blown highlights or the blocked-up shadows?
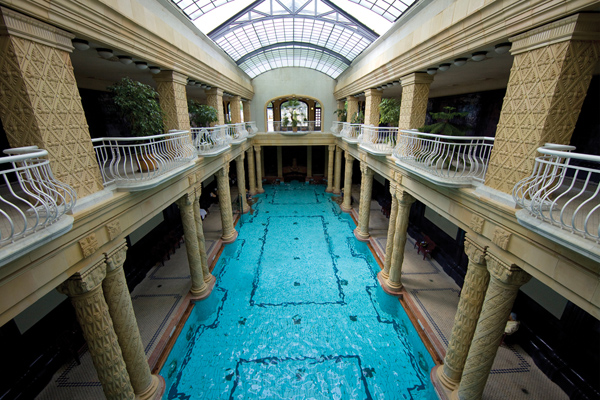
The answer has to do with contrast and dynamic range. In pictures that have extreme contrast, the dynamic range that a sensor can record is just too limited. It can’t reproduce what we see. Another good example is the picture of the famous pool at the St. Gellert Hotel in Budapest, Hungary (#3). I could see detail in clouds through the glass dome on this overcast day, but that detail was lost when I exposed correctly for the pool, which was essentially in deep shade.
One of the biggest hurdles that photographers have when dealing with exposure is having the expectation that the camera and the meter capture what we see with respect to exposure. It doesn’t. It comes very close to capturing the light and tone you see when you photograph a subject low in contrast, like the costumed models during Carnival in Venice, Italy (#4). There are shadows and highlights, but they look very much like what I saw with my eyes. High contrast compositions, like the cave photo, the architecture shot in Kuala Lumpur, Malaysia (#5) or the flute player in Peru (#6) will never be reproduced in a digital image the way you saw it. Once you accept that, then your expectations will be in keeping with what the digital sensor can deliver.


Middle Gray
The concept of middle gray originated with black and white film photography, but it is applicable to color as well. Middle gray is a tone, or brightness that is perceptually halfway between black and white. If you were to look at an image in black and white that had all the shades and tones from deep black to bright white, and abstract those tones to a scale with 10 steps, middle gray would sit right in the middle of that spectrum of gray tones. Why is this concept important in photography? Because it is the underlying principle on which photographic metering systems are based.
Think back to the idea of the difference between the way the eye and the camera sees—one of the reasons for a middle gray anchor in metering is that the eye constantly adapts to changing light where the camera takes an exposure “locked” onto one specific value. The camera only has one shot at getting the light sorted out, while the eye is constantly adapting, so fast that we hardly notice it (except when coming out of a dark theater into daylight). So middle gray is the midway point between the bright and dark areas in the photo, and being the middle point it is like the Continental Divide of light, with bright areas to the right (as in a histogram) and dark areas to the left. But knowing that the camera’s system uses this fulcrum allows the metering system, and you, to sort out the light so bright records as bright and dark as dark, as it should be.
Your camera allows you to choose a metering pattern, which is how the camera gathers light information. There are 3 metering patterns you can use—an algorithm-based system (known as Evaluative, Matrix, etc.) that sends light patterns to an internal computer that then “solves” the exposure problem with pre-programmed responses to specific light combinations; and Spot or Center-Weighted Averaging (CWA) patterns, which either average a range of light patterns from the scene to middle gray (center-weighted) or take one specific area (or spot, which can be as small as 3 percent to as much as about 9 percent of the viewfinder area) as the guide to what you choose as middle gray in the scene.
First let’s look at the non-algorithm based patterns, which some experienced photographers use because they feel they give them the most personal exposure control. Here are 3 shots that show how these patterns behave left on their own. The picture of my dog, Rexie, when he was a puppy (#7) is a white on white composition; the autumn foliage photograph (#8) is mostly middle toned; and the night shot of the Gateway Arch in St. Louis (#9) is almost all black except for the arch and the branches at the top of the frame.


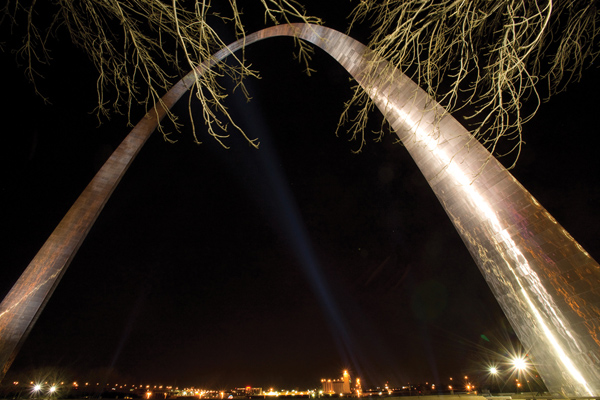
The CWA metering pattern examines each of these pictures and using about 70 percent of the frame of the finder averages the light to produce an overall middle gray reading. As a result, the picture of Rexie will be underexposed (we want the white to be white, not gray) because the meter wants the white tones in the image middle toned, i.e. darker than they should be. The photo of the foliage will be perfectly correct because the meter indicates an exposure to produce a middle gray image. The picture of the arch will be overexposed since the meter wants to make that large expanse of black sky gray, or middle toned and because any point of exposure determines how all the other light will record, brighter areas become brighter still (more bright than they should be), thus overexposed. This should not discourage use of these patterns, since there are ways to adapt the meter to the light at hand that make use of your visual skills and understanding, which is part of the fun of photography.
One way to learn about grayscale and brightness is to try to find the middle gray in everyday shots, then to make the exposure using that value and observe the results. If the picture is too light, that means the tone you used was too dark, and if the picture turns out underexposed, that means the area you used for the reading was too light.
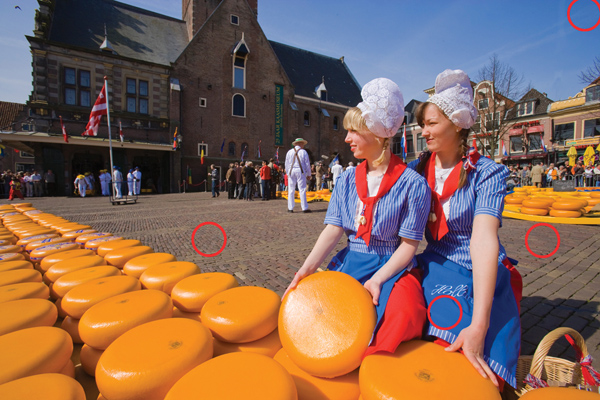
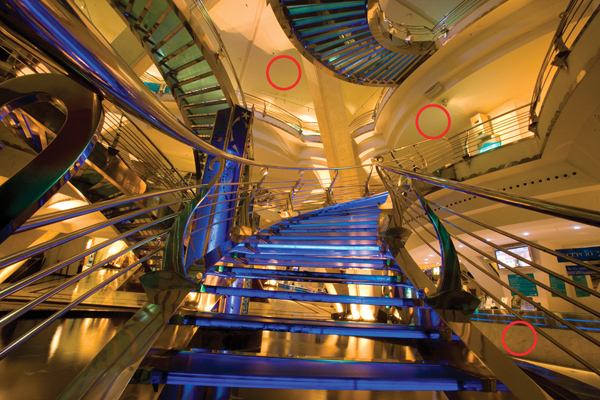
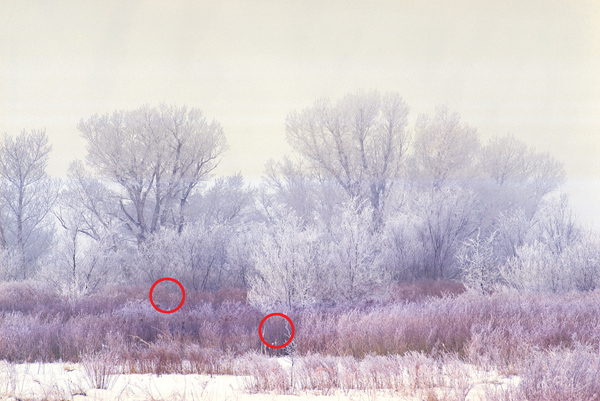
Here are a series of photos in which I have circled in red the areas that I would use as middle gray. This will give you a visual idea of what I’m talking about. Using Spot mode these are the areas that would provide a middle toned density from which the meter would dictate the correct f/stop and shutter speed combination for a correct exposure: (#10, #11, #12, #13, #14 and #15).


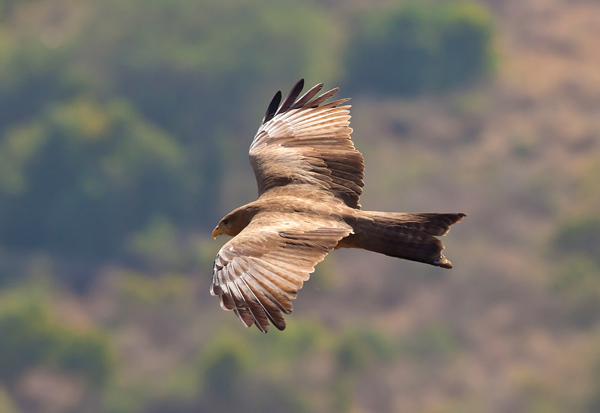
Evaluative (for Canon users), Matrix (for Nikon shooters) and similar exposure patterns can be quite accurate and are especially useful for fleeting moments. Using the spot or CWA metering takes time. When I photographed the black kite (#16) riding the air currents above a cliff face in Ethiopia, it would be literally impossible to take a Spot reading and then take the shot in the brief amount of time—measured in fractions of a second—when the bird was in front of me. As cameras and the computers in them become more sophisticated these “smart” patterns will become even more reliable. But there are still times when they, and Spot and CWA patterns need your “help” to get the exposure right, mainly in high contrast scenes or when you want to set the light mood right out of the camera. We’ll be covering these techniques throughout this issue.
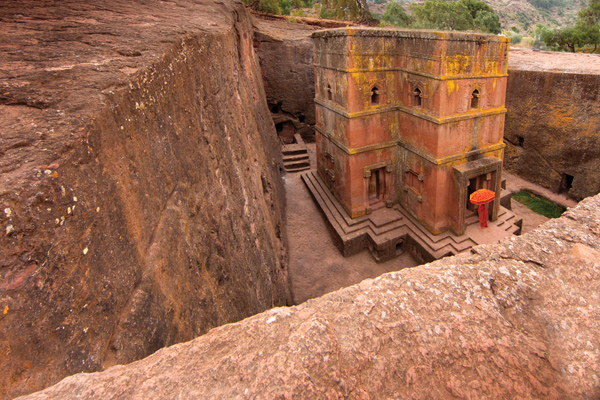
How do you “help” the exposure system get it right? By being mindful of how it behaves and reacts and using the information it puts out as the basis for an exposure decision and not for the final judgment of exposure. For example, in a detail of a Priest’s ceremonial attire at the Timkat Festival in Ethiopia (#17) the dark fabric juxtaposed with the reflective Cross presents significant contrast. I took the shot and then checked the LCD monitor for instant feedback. If the image was too light because the meter “reacted” to the dark fabric and tended toward overexposure, I would set my exposure compensation to minus 2/3 or 1 EV and then I’d reshoot to “help” the meter see as I see. As an example of when evaluative metering nails exposure, here’s one made of a rock-hewn church, also in Ethiopia (#18). The tones are all near middle gray and the exposure is close to perfect.

As you learn about exposure patterns, take the time to use the camera LCD to assess your exposures and learn how to adapt the pattern to the light at hand. If the image is too light or too dark, use the exposure compensation feature on the camera to tweak the image in 1/3 f/stop increments. If you don’t know where this feature is on your camera, check the instruction manual to find out. I feel it is one of the most important functions we have to fine-tune exposure.
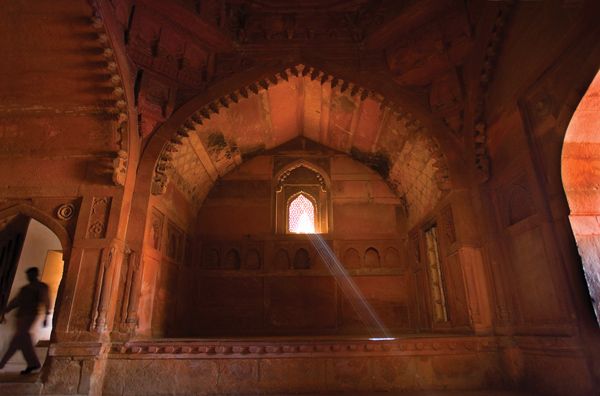
This method will slow you down, but as you gain experience it will become second nature. Most importantly, it allows you to learn how light, the metering pattern and your eye can work together. When shooting static subjects like landscapes and cityscapes, time is usually not of the essence. This technique works especially well in tough lighting conditions like twilight and night photography, high contrast, shooting into the sun and low light situations such as an alcove in the Agra Fort near the Taj Mahal in India (#19).
Exposure Modes
There are 4 basic Exposure modes—Program, Shutter Priority, Aperture Priority and Manual. Manual means you physically set the aperture and shutter speed values. The exposure patterns discussed above determine the kind of light information you get as the basis of those settings.
When many photographers first start taking photography seriously they think that Manual mode is the way to go because it means you are really taking control of the medium. They think that this teaches you fundamental principles in picture taking, and that you are not relying on the camera’s sophisticated electronics to do the thinking for you.
I disagree with this on 2 levels. First, you are still relying on a meter, even in Manual. Either you use the in-camera meter or a hand held meter—how else can you determine the exposure? The built-in meter is still functioning, and you have to physically turn the aperture dial and the shutter speed dial until the indicator on the exposure scale is in the middle. How is this taking control? You are relying on the electronic capability of the camera to dictate the correct exposure. You can dial in a specific f/stop for the desired amount of depth of field, and/or you can select a shutter speed to freeze a fast moving subject or to creatively blur it. But you can do this using the Automatic Exposure modes, too.
Second, you will miss too many shots using Manual Exposure mode. I shot a medium format film camera (the Mamiya RZ 67 which produced 6x7cm transparencies or negatives) for 25 years, and I used Manual Exposure mode all the time. I loved the camera and large slides, but I missed a lot of shots simply because choosing to be so precise in the metering had a price.
Are there times when Manual Exposure mode is needed? Yes, there are. These are special circumstances and I go into those unique and interesting exposure situations later in this section.
Program Mode
When you set the camera to “P”, you’ve chosen Program mode. The camera decides both the shutter speed and the lens aperture for each picture you take, and initially a serious photographer would reject using this because it appears that all or most of your control has been taken away. Not so. Let me make the case for Program mode.
Program mode is designed to assume you are hand holding the camera. Therefore, it is biased to giving you the fastest shutter speed possible given the light you have available and the ISO setting. To take sharp pictures, you would use a fast shutter speed and that’s what Program mode gives you.
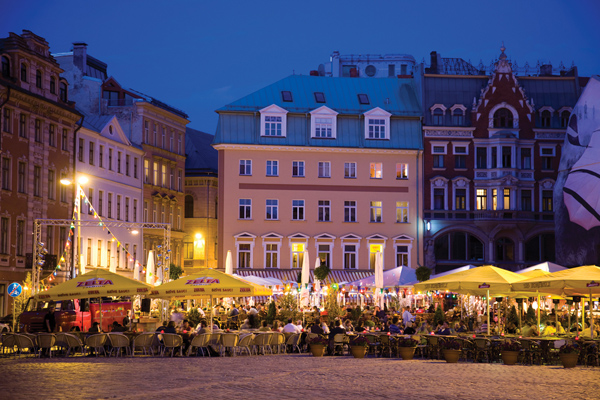
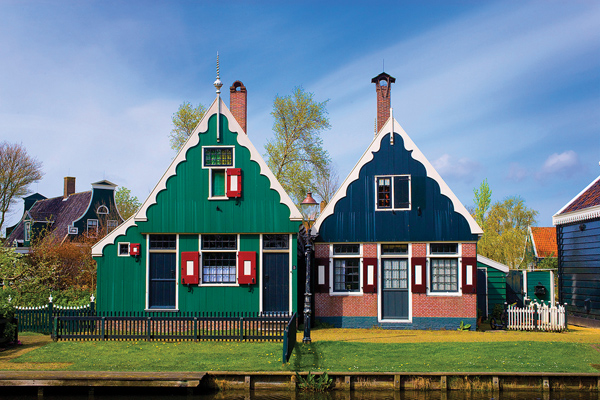
If you are using Program and the shutter speed isn’t high enough to get a sharp picture, then either the ISO is too low or the light is insufficient, or both. In some cameras now you can choose a Program mode that will boost the ISO automatically to get you a faster shutter speed in low light, but many cameras do not have this feature. In my case I would not use Program mode for shooting twilight, such as when I photographed people dining outside in Riga, Latvia (#20) because I don’t use high ISO settings at night and I always use a tripod. This is not what Program was designed for. On the other hand, if I am photographing a parade like the one in Brugge, Belgium (#21) or architecture like traditional houses in Holland (#22) and I’m hand holding the camera, why wouldn’t I use Program mode? I am not concerned about depth of field and this Exposure mode will give me a fast shutter speed. (More on depth of field later.)

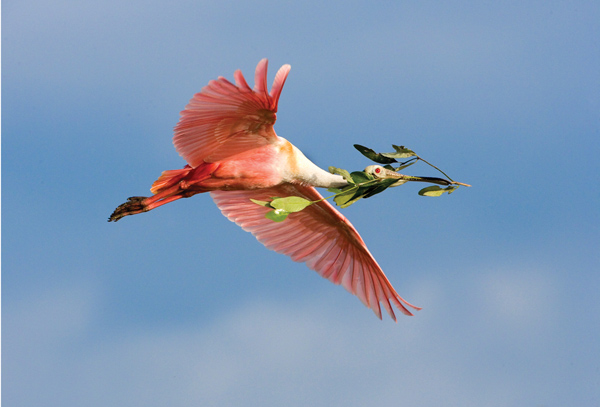
When it comes to shooting wildlife and birds, I use Program all the time. Usually I use a long telephoto lens to capture distant animals, and this means that the shutter speed is much more important than lens aperture. A shutter speed that is too slow will result in soft pictures. Besides, the difference in depth of field between f/4 and f/5.6 when using a 400mm is negligible, but the difference in a 1 shutter speed step increase, from 1/250 to 1/500, is very significant. I was able to freeze the roseate spoonbill (#23) because I used 1/1600 of a second and didn’t concern myself with depth of field.
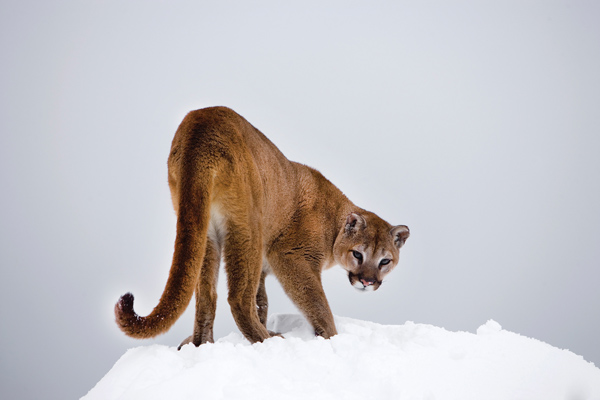
Long telephoto lenses magnify movement to such an extent that a fast shutter speed is very important to get sharp images. Even if subjects are momentarily motionless, like the mountain lion in (#24) I want a fast shutter speed to make sure the long telephoto lens isn’t the cause of soft pictures.
Even though I am a fan of Program Exposure mode, I do not use it if: 1. I am using a tripod. 2. If I specifically want a certain amount of depth of field. 3. If I specifically want to use a particular shutter speed to artistically blur a subject.
Shutter Priority Mode
When you use Shutter Priority (designated as Tv, T or S on the mode selection dial), you choose the shutter speed and the camera chooses the aperture based on the ambient light and the ISO you’ve chosen.
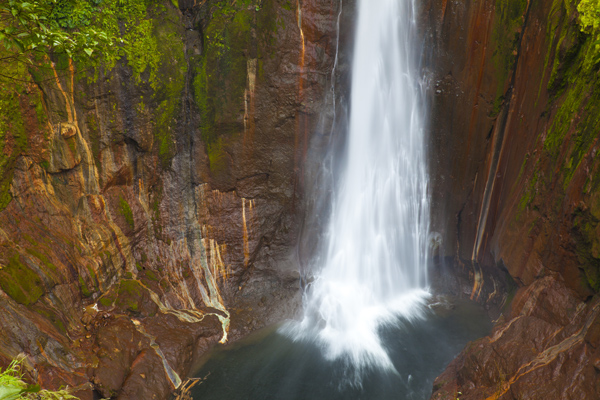
If I want to purposely blur moving water as I did in the shot of a waterfall in Costa Rica (#25) I use Shutter Priority and select a speed such as 1/2 second. I did the same thing with an African white pelican at Lake Nakuru in Kenya (#26) where I used 1/30th of a second (a slower speed would have abstracted the image so much the bird’s form would virtually have disappeared). Slow shutter speeds force the lens aperture to be small, and that’s fine. With these kinds of pictures, depth of field isn’t very relevant anyway.

In low light situations where you are forced to hand hold the camera, shutter speed is critical. The speed you should use is a function of the lens on the camera and the movement of the subject. If the subject is motionless, the general rule for using shutter speeds with lenses (and particularly telephoto lenses) when you are not using a tripod is that the shutter should be the reciprocal of the focal length of the lens, or faster. In other words, if you are using a 300mm lens, your shutter speed should be 1/300th or faster. If you’re using a 400mm lens, the shutter speed should be 1/400th or faster. If your shutter speed is slower than these numbers, the strategy to use is to raise the ISO until the shutter speed is fast enough to take a sharp picture.
The only other mitigating factor is if the lens is “image stabilized.” That will enable you to use a slower shutter speed than the above formula dictates. How slow can you go? It’s hard to say because it depends on how steady you can hold a big lens. I’ve used a 70-200mm f/2.8 IS lens in St. Peters Basilica in the Vatican at an astonishing 1/10th of a second—hand held—and got sharp pictures, but I could never use a 500mm with a shutter speed that slow and expect sharp results. I cringe if I have to use the long lens at 1/125th of a second especially if the subject is moving, but I’ve seen sharp results with that, too. I’m much more comfortable using a faster speed so I know for sure the pictures will be sharp.
Aperture Priority
I think a majority of professional and amateur photographers use Aperture Priority (designated as Av or simply A on the mode dial) as their Automatic Exposure mode of choice. I don’t, and my reasoning is this: It’s very easy to concentrate solely on the depth of field and forget to check what the shutter speed is doing. If the shutter gets to be too slow, the pictures will be blurred. Extensive depth of field is irrelevant if your pictures are not sharp.
When you choose Aperture Priority mode, you select the lens aperture and the camera automatically chooses the shutter speed. Photographers like this mode because the amount of depth of field is clearly defined, and this is a very important aspect of controlling the artistry in your work.
In my own work, there are only 2 instances in which I use Aperture Priority. First, I must be using a tripod. This means that if the shutter speed is long due to a small aperture reducing the amount of light entering the camera, it won’t matter. The pictures will still be sharp (unless the subjects are moving, of course) because the camera is on a firm support.
I always use a tripod for landscape work and therefore I always use Aperture Priority for those kind of shots. Look at the depth of field I got in the Toroweap lookout in Arizona (#27). Good landscape photography requires complete depth of field so the foreground is as sharp as the background. When you place foreground elements close to the camera position, as I did here, depth of field is reduced. To get it back, a small lens aperture like f/22 or 32 must be used. In this way, we can see and appreciate all of the detail that you could see with your eyes at the time of shooting.

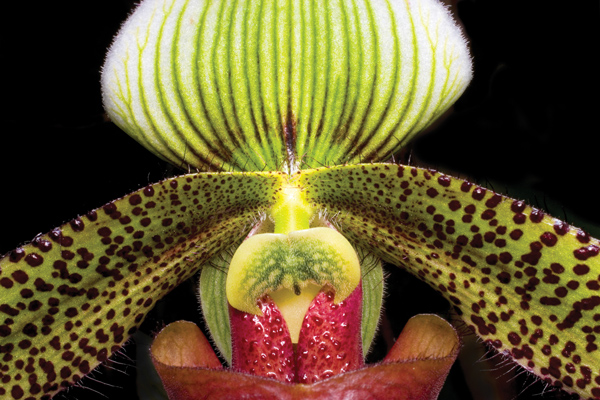
I also consistently use a tripod when doing macro work because complete depth of field is essential in revealing the intricate and compelling detail in small subjects. The close up of the cicada exoskeletons (#28) and the intimate portrait of an orchid (#29) are examples. You would not want shallow depth of field with subjects like this. The whole point of photographing these fascinating subjects is to show their detail, and that’s why I use f/32. Therefore, I select Aperture Priority and use a tripod.

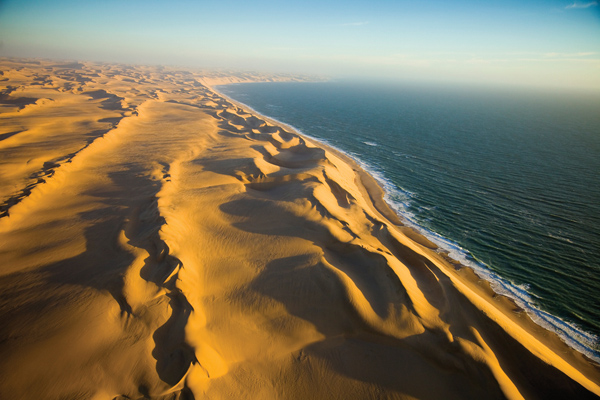
Second, if I want the fastest shutter speed possible given the ambient light and the ISO I’ve chosen, I will switch to Aperture Priority and select the largest aperture on the lens. When I am doing aerial photography from a small fixed wing aircraft or a helicopter, the vibration is an important factor to consider when choosing a shutter speed. I want a speed fast enough to overcome the movement of the plane. When I photographed tulip fields in Holland from the air (#30) I used a shutter speed of 1/1250th of a second, while the pictures of the Skeleton Coast in Namibia (#31) were taken at 1/800th of a second simply because the sunset lighting was weak and I needed a bit more light to make the exposures correct.

The only other option would be to raise the ISO, and if you have a sophisticated camera that can produce good results with ISO settings in the 800 to 1600 range, then that’s a viable choice. Above 1600 most cameras don’t produce high quality images because there is too much digital noise and a degradation of overall sharpness.
Manual Mode
I use Manual mode for certain special exposure situations, such as when I’m shooting lightning, when I’m photographing hummingbirds with a multi-flash set-up, or when I’m using a ring flash for macro photography. For virtually all of my other shooting, I use one of the Automatic Exposure modes.
The only difference between using Manual and using one of the Auto modes is that in Manual mode you must physically turn the shutter speed and the lens aperture dials to get a correct exposure based on what the meter dictates to you.
In Manual you can compensate exposure easily without having to work with the exposure compensation function on your camera (although that’s easy enough).
Mission (Metering) Impossible
There are some lighting situations that are near impossible for a meter to read correctly, especially when contrast is so extreme that middle gray has no meaning. What comes to mind immediately is lightning at night. Not only does the burst of light occur instantaneously, the contrast between the brilliant bolt and the surrounding night sky is so extreme that the meter has no idea how to interpret this.
When faced with a situation like this, you have to expose based on experience or trial and error. For example, you can guesstimate the exposure and then, after the first lightning strike, look at the LCD monitor and tweak the exposure from there. But let me save you the trouble—the exposures that I find to be the best start with ISO 100 at f/8. I open the shutter for a 30 second exposure and wait for the lightning strike, and if it doesn’t happen I simply let the shutter close and then open it again. The speed of the shutter isn’t relevant to the exposure of the sky. If the lightning is coming fast and furious, you may get several strikes in a single exposure as I did in the Arizona desert (#32).

The lens I choose for most lightning storms is my 70-200mm f/2.8 IS Canon medium telephoto. I turn off the IS feature because the camera is mounted on a tripod, and I usually use a focal length in the 140 to 160mm range. If you use a wide angle lens with the idea that if you include a large expanse of the sky you won’t miss the lightning, no matter where it is, the bolts will appear to be too small in the frame. If you use a long lens thinking you’ll fill the frame with impact, you may be ready for the strike in one section of the sky but it occurs just out of the frame. I find that a compromise is necessary, and I’ve had the best success with a mid-range focal length. If the lighting is right above you and it dominates the sky, then you can use a wide angle. A storm passed over me at night while I was driving in Nevada and I used a 24mm wide angle lens (#33). This was an unusual situation. Once the rain starts falling, this kind of shot looking straight up becomes impossible.

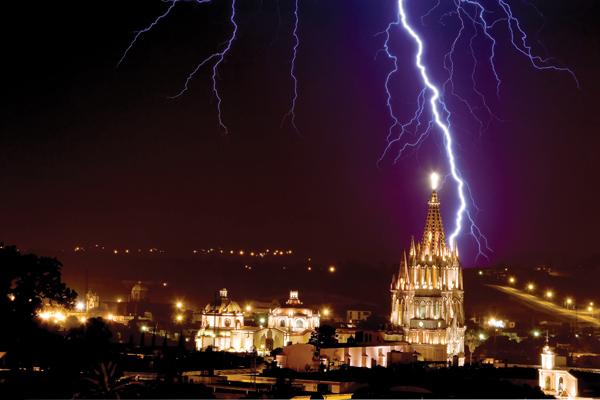
Photographing lightning indoors is a good way to protect the camera from rain and, at the same time, it also protects you from possibly being hit. I photographed a lightning bolt almost striking the cathedral in San Miguel de Allende, Mexico (#34) from the balcony of a bed and breakfast establishment. This image is completely unretouched in Photoshop, and I was able to capture this because the shutter was open for 30 seconds. I used an aperture of f/16 in this situation so I didn’t overexpose the lights of the city.
Fireworks
Another impossible exposure situation is fireworks. The settings I use are ISO 100, f/14 for normal fireworks and f/16 for the finale, and a shutter speed of 1.6 seconds. You can see in (#35 and #36) that the color and the shapes of the bursts are preserved with these settings. The shutter speed can be varied depending on the activity in the sky and how long you want the trails of light. Adjusting the shutter has no effect on the exposure; it only affects the number of bursts you get in one frame and the length of the light trails.


The Moon
The moon also presents a situation that the meter can’t handle. With a typical telephoto lens in the 100 to 500mm range, the moon is relatively small in the frame. Against an expanse of black sky, the contrast is again impossible for a meter to handle. This is why when you photograph the moon, it is usually blown out without texture or detail. In order to capture detail in the lunar surface, the exposure you should use is 1/250 at f/8 with ISO 200. If you use a lens that is 250mm or less, you don’t need a tripod. With longer lenses or when using teleconverters to extend the focal length of shorter lenses, a tripod will ensure that your pictures are sharp. Remember to turn off the image stabilization function on the lens when using it on a tripod. To fill much of the frame with the moon as I did in (#37) I used a 500mm lens with a 2x teleconverter for 1000mm of focal length. To minimize vibration, I used the mirror lockup feature and a cable release.

HDR And Dynamic Range
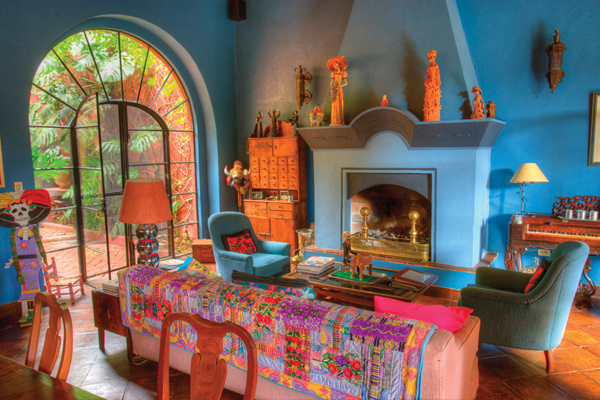
HDR technique is relatively new in photography and it allows us to expand the dynamic range of our images. High Dynamic Range refers to this expansion. HDR is not a special effect; rather it brings back the exposure values in contrasty lighting that would otherwise be lost. For example the picture I took on a balcony of a bed and breakfast in Mexico (#1) illustrates this. The sky was blindingly bright, and under the overhang the shadows were 5-6 f/stops darker. This is an impossible situation to expose for with a single capture, but with HDR—which entails taking several bracketed exposures that are merged together using software programs such as Photomatix (www.hdrsoft.com), Nik HDR Efex Pro (www.niksoftware.com), or Photoshop (www.adobe.com)—the result is very similar to what we could see.

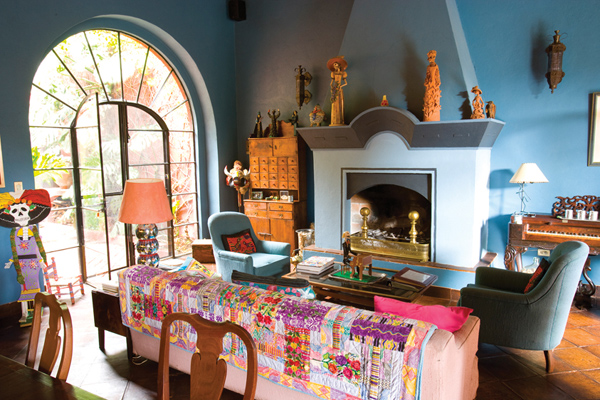
Look at the family room of the same bed and breakfast (#2). This shows a typical high contrast situation where the digital sensor couldn’t capture all the detail you can see with your eye. The courtyard outside is open to the sky, and even though the day was overcast, it was still several f/stops lighter than the interior. By taking 6 separate pictures from a tripod, all with the same lens aperture (I varied the shutter speed), I captured the detail in both the highlights and the dark shadows. These images were assembled in software, and the resulting composite (#3) reveals the room as I saw it. The exposure in the outside courtyard is perfect and even in the darkest corners of the room we can see everything that I could see.
Tech Tip: Spot Pattern
Figure A is a graphic representation of the metering patterns, the blue areas being the portion of the frame from which the meter takes its information to determine a correct exposure. Each photographer has his or her own way of shooting, and for me the 2 most useful Metering modes are Spot and Evaluative/Matrix. Here are some examples when Spot is my pattern of choice.

Spot mode is designed to read the center 3-5 percent of the viewfinder, depending on the manufacturer. One use of Spot is for reading many types of subjects where the background illumination—whether lighter or darker—would adversely affect the light reading on the subject. In (#1) the stage lighting on the Chinese dancer is what I wanted to read, and the Spot function accurately assessed the light on the young woman while disregarding the dark background. In other words, I didn’t want the reading to be influenced by the background. Spot pattern is great for performances and stage lighting.

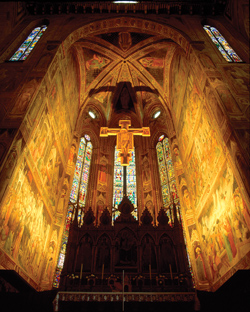
If you wanted to only use Spot metering and you are good at identifying middle gray tones in your compositions, your exposures will always be accurate. It works in every type of lighting situation, and if you can’t find a middle gray portion of the frame, you can take a reading from a gray card or a gray piece of fabric sewn onto your camera bag. In a situation where there is significant contrast, such as the cathedral interior in Florence, Italy (#2) a Spot meter reading on a middle toned area of the image produces a perfect interpretive exposure.
Spot metering pattern can also be used to saturate color (in essence taking bright colors and making them more intense) as can be seen with the Spot reading on the yellow of the rose (#3).

Histograms
A histogram is a guide that shows a graphic representation of the tones in a photograph. Every time you take a picture, you can see this graph on the LCD monitor on the back of the camera and it provides valuable information about exposure and light. The right side of the graph represents the highlights, the left side represents the shadows, and the middle section shows the mid-tones. In figure B, the graph shows there is an even distribution of tonal values, which represents the barn scene in (#1).


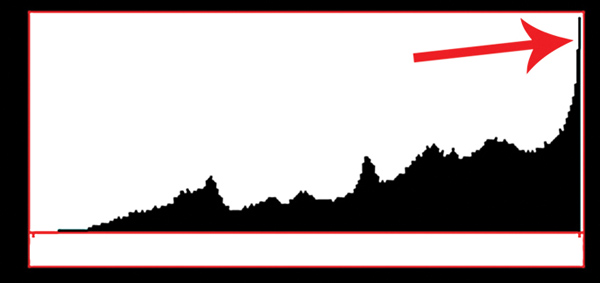

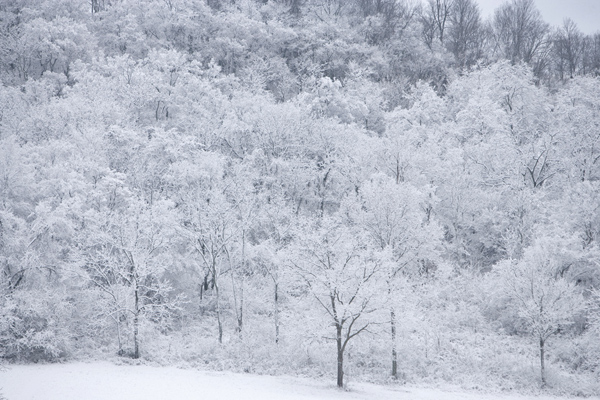
Why do we need to know this information? The reason many photographers constantly consult their histograms is to look for one thing: They want to make sure the picture isn’t overexposed such that the highlights have become blank white. Losing all of the texture and detail in an image is the last thing you want, and this loss—if it occurs—is represented by a spike on the right side of the histogram. Look at figure C. I placed a red arrow to indicate the spike that you don’t want to see. This does not mean there are white areas in a picture. For example, the snow-covered trees in (#2) are all white but there is still texture and detail, albeit subtle, throughout the image. The histogram for this image is figure D. You can see that most of the tonality is on the right of the graphic because of the predominance of highlights, but there isn’t a spike along the right edge. That’s the crucial fact, and that’s why photographers are always looking at the histogram.
The Blinkies
In the middle 50’s there was a song called “Hot Rod Lincoln” and the famous line from the song that stuck with me is a father telling his son “You’re goin’ to drive me to drinkin’ if you don’t stop drivin’ that hot rod Lincoln.” Every time I see the blinkies on someone’s camera, I feel like I’m going to be driven to drinkin’!
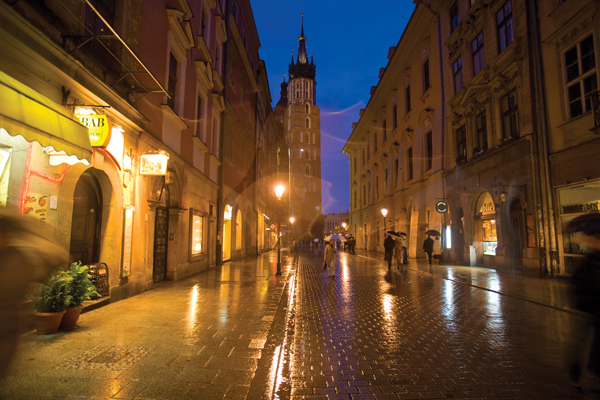
The blinkies refers to a function on a camera where the highlights in a picture, if overexposed, start flashing in the LCD monitor. In my opinion, nothing is more distracting or obnoxious than this. There are times when the highlights are going to be overexposed by definition, such as when you shoot into the sun (#1) or when you photograph a twilight or night scene like the one in Krakow, Poland (#2) and street lamps and windows in storefronts are blown out. In actuality, the sun and street lamps look overexposed to our eyes, too. When you look at the LCD monitor, who wants all of these highlights flashing wildly? I certainly don’t.

The point of offering this function to photographers is to warn us of blown (highly overexposed) highlights, and that’s fine. My solution to preventing overexposed highlights is to underexpose my images by 1/3 or 2/3 f/stops. If this doesn’t protect the highlights, then nothing will. I know many photographers disagree with me on this point, but I’ve now been shooting digital for quite a while and I never get overexposed pictures. This slight amount of underexposure is not enough to cause an excess of digital noise, and I feel it protects the vulnerable highlights from becoming overexposed without suffering the blinkies and without having to consult a histogram every time you take a picture.
If you shoot in Raw mode as you should be doing, there is tremendous exposure latitude that allows us to open up the shadow detail if the small amount of underexposure made it too dark. The upside is that this technique protects the highlights from becoming solid white with a complete loss of detail.


![]()
Get the Latest Photo Tips, News & Reviews from Shutterbug!
| Camera Reviews Other Reviews | Mobile Reviews Photography Reviews Columns | News | Features | How-To | Resources |
 © 2026 Shutterbug
AVTech Media Americas Inc., USA
All rights reserved