- REVIEWS
Camera Reviews 
More Reviews Mobile Reviews Photography Reviews - GALLERIES
- VIDEOS
- BUYER'S GUIDES
Enhance Outdoor Photos with 4 Hidden Lightroom Tools (VIDEO)

If you're a landscape photographer and use Lightroom to process images the tutorial below is likely to improve your workflow by explaining four "hidden" tools you may not know exist. After all, Lightroom is such a robust package that it's almost impossible to keep track of everything it can do.
Instructor Christopher O'Donnell is a very adept landscape photographer who regularly posts Lightroom and Photoshop tutorials designed to help others work faster and more effectively when processing their work. He kicks off today's very helpful episode like this: "These secret features require a few extra clicks to access or set up, but they'll make you far more productive and save time in the long run."
His first tip involves hidden features of the histogram. This trick lets you know exactly what tones you are adjusting with the sliders for Exposure, Highlights, Shadows, Whites, and Blacks in Lightroom's basic panel. It works like this: When you hover the mouse over any particular slider, certain tonal groups will be highlighted in the histogram.
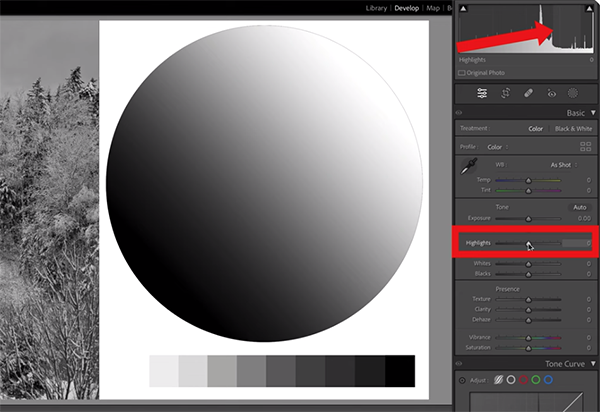
O'Donnell explains that, "these ranges represent the five tonal sliders which gives you an excellent preview of how many pixels you'll be adjusting with each slider." By visualizing which pixels are being adjusted you'll understand how much difference you're making in the lightness of your composition.
Another unfamiliar and very handy feature lets you use the histogram to monitor your color channels. This trick lets you see whether or not you've blown out a specific color. As you'll see, there are several histogram charts overlayed on each other. In other words, each color has its own peaks and valleys, and O'Donnell explains how to put this valuable information to work.
Tip number three explains how to employ the histogram so you can see LAB color values for lightness. This one is unique because most of us only pay attention to RGB values. O'Donnell recommends this approach because it enables you to monitor your "L", (i.e. lightness) value. This works on a scale from 0 to 100, with 100% being pure white and 0% representing pure black.
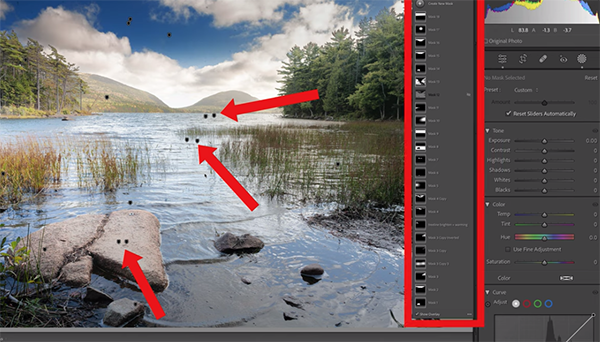
The video concludes with Lightroom's fourth hidden tool, which involves using Pins to preview Masks. We'll let O'Donnell explain the details of how this works, but here's a quick summary: With the Masking panel active you'll see small pins on your image, each of which represents a Mask in the panel. By hovering over a pin you'll see an overlay preview of the area of the image affected by that mask.
O'Donnell provides far more detail about how to make the most of these hidden tools. So pay close attention and maybe jot down a few notes. Then head over to his popular YouTube channel for more editing tips and tricks.
We also suggest checking out a tutorial we posted recently from another post-processing expert who explains how to control highlights in Lightroom for more impressive landscape photographs.


![]()
Get the Latest Photo Tips, News & Reviews from Shutterbug!
| Camera Reviews Other Reviews | Mobile Reviews Photography Reviews Columns | News | Features | How-To | Resources |
 © 2026 Shutterbug
AVTech Media Americas Inc., USA
All rights reserved