- REVIEWS
Camera Reviews 
More Reviews Mobile Reviews Photography Reviews - GALLERIES
- VIDEOS
- BUYER'S GUIDES
The Digital Road To Infrared; Software, Cameras, And Filters For A Trip To An Often Surreal World
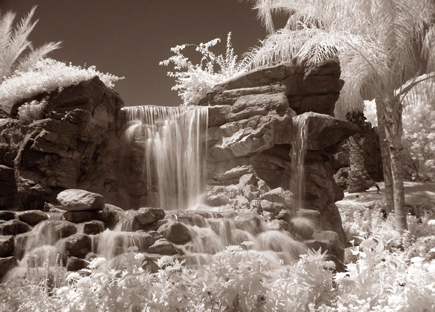
Mysterious, evocative, otherworldly--these are all terms that describe the powerful emotional and visual responses to black and white infrared (IR) photography. For landscapes, this approach yields striking, contrasty images where healthy green foliage, which strongly reflects IR radiation, appears to glow in snowy white tones, while blue skies and water darken dramatically. With portraits and some objects, the infrared technique results in pale, luminous skin tones and eerie, glowing edges.
 |
|
|
Before the arrival of digital cameras, the only way to achieve these stunning effects was to shoot a film such as Kodak High Speed Infrared in a compatible camera. This film has to be loaded in total darkness--you can't even take it out of its plastic canister in daylight or you will fog it. Furthermore, outdoors where the best effects are found, you must carry and use a light-tight changing bag to load and to change film. Exposure is unpredictable at best, so you've got to bracket exposures widely to get one good one for each scene or subject. Only a few labs process the IR film, and it's hard to handle and difficult to print. Thankfully, with the advent of the digital age, there are now far easier roads to infrared. In this article, we'll look at both software and hardware solutions.
Soft Infrared
The easiest way to achieve an infrared look is to start with a conventional
color photo and manipulate it with software. Adobe's Photoshop CS, Elements
3.0 (and later and some earlier versions of both), incorporate all the tools
you need to transform a color original--whether shot with a digital camera
or scanned from a print, negative, or slide. It's not as easy as selecting
a filter and clicking, but it is fairly straightforward and can be accomplished
in a few minutes.
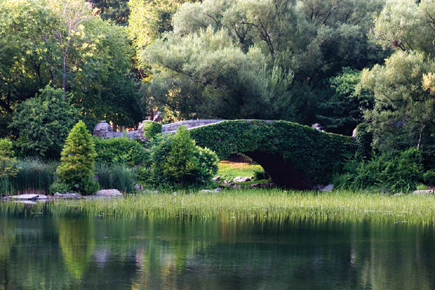
For dramatic mood and contrast, choose a landscape with lots of greenery, such
as the bridge scene I shot in Central Park, #1. For portraits or objects, look
for contrasting dark or light backgrounds. For both, consider including skies
with clouds. Once you've chosen your photo, keep it in RGB Color mode
(not gray scale). Always work on a copy to preserve your original. Open a copy
of your picture in Photoshop. In the Layers palette, duplicate the background
layer and name it "IR layer."
 |
|
|
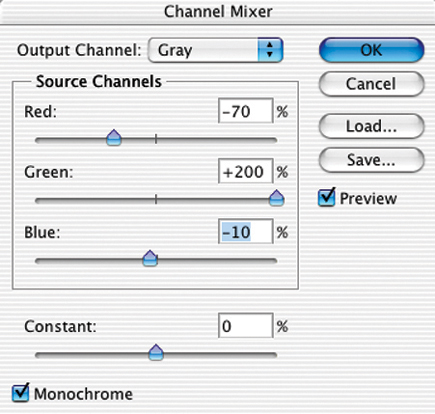
Convert With Channel Mixer
With the IR layer active, choose Layer>New Adjustment Layer>Channel Mixer.
A dialog box appears naming the new layer Channel Mixer 1. Click OK and you'll
see it added to the Layers palette, #2. Also, you'll bring up the Channel
Mixer dialog box, #3, a powerful tool to make black and white conversions. Next,
check the Monochrome box at the lower left of the dialog. The Channel Mixer
allows you to adjust which amounts of the red, green, and blue channels will
be used to create a black and white image.
 |
|
|
For landscapes, drag the green slider all the way up to +200 percent, then set the red and blue channels to -50 percent each, then vary the mix to suit each photo. For this image, -70 percent red and -10 percent blue worked best. Don't worry if your screen goes totally white or black during these operations--as you move the other sliders, you'll regain normal tonalities.
 |
|
|
For portraits, start with the red all the way to +200, then take the blue
down to -60 or -75. The green middle slider might go from -40 to +30, all depending
on the image. Experiment with many different mixes, and try the sliders throughout
their full range. However, you'll probably want to keep the red at least
+100 to +120. For one portrait, I set the red to +200, the green to -38, and
the blue to -60 while for another, +120 red, +32 green, and -75 blue worked
best. As you make the adjustments, you'll begin to see the IR effect.
In theory, you should adjust the percentages so that their total equals 100
percent. However, I often find settings outside this range work well. The Constant
slider near the bottom of the Channel Mixer dialog box changes brightness. While
I usually prefer to leave it at 0, you may find it useful when the final mix
of percentages is more or less than 100 percent. Once you've adjusted
the sliders for a look you like, but the image is a bit dull or low in contrast,
add a Levels and/or Curves adjustment layer, to pump up the image contrast and
fine-tune the tonalities.
Next Add Some Glow
Photographs made with IR film display an eerie glow, partially caused by film
halation. To add a glow effect to your picture, flatten the file by choosing
Layer>Flatten Image. Next, blur the image with Filter>Blur>Gaussian
Blur, #4. The Radius amount will vary with the size of your file, so experiment.
As a starting point, try 5-20 pixels for a 25MB size image and 2-10 pixels for
a 5MB image.
 |
|
|
Choose Edit>Fade Gaussian Blur, #5. Click the Preview box and change the Mode of the blurred channel to Overlay or Screen. The Blend mode controls how each layer will interact or blend with the layers below it. Click on the double arrows and then select "Screen" or another mode from the Mode pop-up menu. Try Screen first, then Overlay. Sometimes, Overlay provides better contrast and richer blacks, but may make the image too dark--you have to experiment. Try other mode settings, too, like Hard Light or Soft Light.
 |
|
|
In the Fade dialog box, drag the Opacity slider to the left to reduce the effect of the blur. The amount varies with each image--here I used 30 percent. The final IR effect is dramatically shown in #6. In some images, a fade of 5-25 percent works well, in others, 80 percent.
 |
|
|
...And A Touch Of Grain
Kodak IR film exhibits pronounced, gritty grain while Konica IR film does not.
If you want to add a grain effect to your digital IR image, make a duplicate
of your background layer. Then, with the duplicate layer active, choose Filter>Noise>Add
Noise. The Distribution-Gaussian setting usually works best while the Amount
varies according to the size of your image. Play with the slider until you see
the look you like. Be sure to check the Monochromatic box at the bottom. When
this is on, noise is applied the same to all color channels. Experiment with
different Blend modes for this grain layer. Try Edit>Fade Noise and try different
Blend modes such as Multiply and Darken.
|
| |||||||||


![]()
Get the Latest Photo Tips, News & Reviews from Shutterbug!
| Camera Reviews Other Reviews | Mobile Reviews Photography Reviews Columns | News | Features | How-To | Resources |
 © 2026 Shutterbug
AVTech Media Americas Inc., USA
All rights reserved