- REVIEWS
Camera Reviews 
More Reviews Mobile Reviews Photography Reviews - GALLERIES
- VIDEOS
- BUYER'S GUIDES
Digital Oil Painting In Corel’s Painter X; A Step-By-Step Guide To One Of Its Many Tools
Corel's Painter (now in Version X) started years ago as a black and white
program called Sketcher, which came in a cigar box package. Over the years it
was owned by a variety of companies and was even sold in a paint can. The program
has matured and is unrivaled in its ability to mimic natural artistic mediums
like pastel, oil paint, charcoal, watercolor, and more.
A movement is developing among photographers, lead by portrait and wedding photographers,
to offer art to their clients. These photographers distinguish themselves from
their competitors by making unique portraits that have the expressionistic quality
of a painting. To do so, many of these photographers have adopted the tools
available in Painter.
Painter can be used on any subject matter. It is always wise to start with a
strong image that has good compositional and color elements. If there are small
areas that need to be fine-tuned, you should correct the image in Photoshop
before opening it in Painter.
Although Painter can be used to make marvelous art without the use of a photo
at all, we will dwell on the possibilities available to alter a photograph.
The type of art material, in this exercise, will be oil paint. Oils characterize
themselves with a thick, fluid application of opaque paint on canvas.
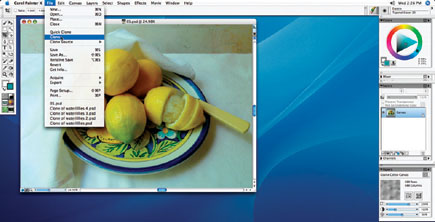
1. Open a photo in Painter and use File>Clone. This duplicates
the image and you will be working on the duplicate, not the original. This is
a nondestructive method of working, something that you should always strive
for.
 |
|
|
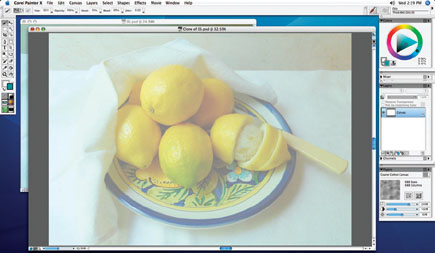
2. The next step seems counterintuitive, but just trust me on this one. Choose Select>All, and then hit the delete button. The image disappears and a white canvas remains. But wait, there is more.
 |
|
|
In the upper right-hand corner of the picture frame you will see an icon that
looks like a semitransparent white sheet of paper on top of a darker sheet.
This button will allow you to toggle back and forth with tracing paper. With
the tracing paper view turned on, you can see your original photo beneath. You
don't have to be a Monet to use this program.
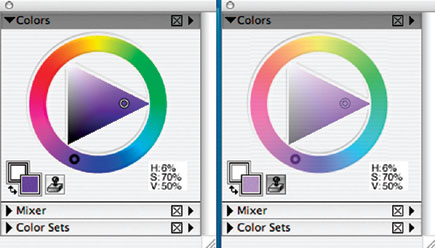
3. The next menu to check is the color palette. If the colors
are vivid, you will be painting with whatever color is currently selected. If
you click on the clone stamp icon, the colors will grow pale and you are now
in the Cloning mode. The Cloning Color mode tells the software to pull the color
information from the original photograph, not the selected color.
 |
|
|
4. Although Painter has many types of Cloning Brushes, most of the brushes can be used in the Cloning Color mode. For our brush, I selected the Oils, and the variant selected was the Thick Wet Camel 30. There are so many brushes available in Painter and each comes with a myriad of variants.
 |
|
|
The titles of the brushes are a good indication of how they will work. I wanted
a thick, wet oil paint that revealed the texture of the brush stroke on this
piece. If the title of the brush includes the word grainy, it will be affected
by the grain of whatever paper is currently selected. Take lots of brushes for
a test drive to see what you like.
|
| |||||||||


![]()
Get the Latest Photo Tips, News & Reviews from Shutterbug!
| Camera Reviews Other Reviews | Mobile Reviews Photography Reviews Columns | News | Features | How-To | Resources |
 © 2026 Shutterbug
AVTech Media Americas Inc., USA
All rights reserved