- REVIEWS
Camera Reviews 
More Reviews Mobile Reviews Photography Reviews - GALLERIES
- VIDEOS
- BUYER'S GUIDES
The Darkroom
Dealing With Dynamic Range
I love digital cameras. However, they all have one serious problem. They tend to block up the shadow tones. That is, they have a short dynamic density range, compared to film. If you use very flat lighting you get simply great pictures. But, if you shoot outdoors on a sunny day or if you use the built-in flash, you will tend to wash out delicate highlights and block up the shadow tones in one big black glob. It's a shame that digital camera manufacturers do not publish a dynamic density specification for their cameras like the scanner manufacturers do. But, the truth is, the camera manufacturers do not have any specification that they are proud of. |
||||||
And, if you try to scan transparencies or negatives on low cost flat-bed scanners, you'll have the same problem. Many folks intentionally overexpose their color negatives to improve shadow tone definition. The technique works great when printing the negatives in a wet darkroom. But, when you try to scan those negatives on low cost (short dynamic density range) scanners, then you will lose delicate highlights and the deep shadows will go solid black. You need a dynamic density range of 4.0 or more to handle overexposed color negatives correctly. By the way, some scanners, such as Nikon's 8000ED/4000ED, do a great job on color negatives because they have that greater dynamic range--the Nikon's mentioned deliver a 4.2 dynamic density range. Solving The Problem |
||||||
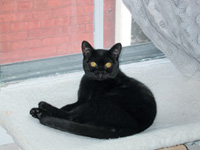
Notice that the black cat went
to a black glob and the bright daylight that is outside the window washed
out the brick wall. |
||||||
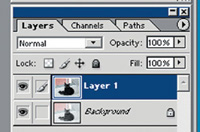
Next, do a "Select All"
on the original image (the solid black cat) and copy it to the clipboard.
Highlight the image that you lightened (#2) and paste the copy of #1 onto
#2. |
||||||
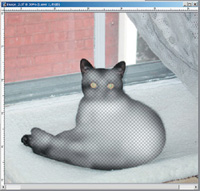
Once I had lightened the fur
in the cat (#6), I flattened the image, and then I did a selection on
the red brick wall and darkened it. Then, I did a second selection (#7)
on the lace curtain in the upper right corner and lightened it. I thought
it looked a little dirty in the original picture. |
||||||
If you'd like help with calibrating your Epson printer and your PC computer, write to me care of the magazine (editorial@ shutterbug.net). For only $3, you can get my CD-ROM that will walk you through the process using only the tools in Photoshop (the full version) and your Epson printer driver. |


![]()
Get the Latest Photo Tips, News & Reviews from Shutterbug!
| Camera Reviews Other Reviews | Mobile Reviews Photography Reviews Columns | News | Features | How-To | Resources |
 © 2026 Shutterbug
AVTech Media Americas Inc., USA
All rights reserved