Corel's KPT Collection A Powerful Plug-In With Many Options

1: The KPT Interface, with the RadWarp filter selected.
Photos © 2003, Anthony L. Celeste, All Rights Reserved

Corel's KPT Collection Quick Look
· MAC and Windows compatible
· $99.99 -- US

Further Information
COREL'S KPT COLLECTION
http://www.corel.com

Plug-in sets often seem to fade in popularity over the years, but KPT is a collection that has endured the test of time. Kai's Power Tools had a humble beginning as an Internet graphics forum called "Kai's Power Tips and Tricks." In the forum, graphics guru Kai Krause presented a series of technical articles describing how to perform various forms of image enhancement. The forum eventually led to the release of "Kai's Power Tools 1.0", a set of graphic plug-ins that provide a powerful yet easy to use interface for reproducing many of the effects that were originally explained in Kai's forum.

2: The Preview Panel's Options Menu.

Many of the older KPT plug-ins, including all of KPT 1 and 2, are no longer compatible with today's 32-bit graphic programs and operating systems (hardcore KPT fanatics, myself included, keep copies of the older plug-ins installed on older computers). You may be wondering, "Why keep an old version around when a new version is available?" The answer is that that KPT version upgrades aren't simply updated ones of old plug-ins. Most of the plug-ins in KPT version upgrades are actually completely new plug-ins. The "Corel KPT Collection" that I'll discuss in this article contains the plug-ins from KPT 5, KPT 6, and KPT 7.

3: The KPT Equalizer panel.

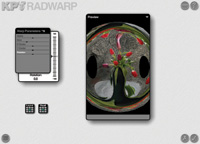
The KPT Collection Interface

Although each plug-in in the KPT Collection contains at least one unique control, all of the plug-ins share some common interface elements (#1). The question mark icon in the upper right corner of the screen is used to open the filter's online user's manual. The check mark and "X" icons in the lower right corner are, respectively, the OK and Cancel buttons. The grid icon in the lower left is used to access presets.

4: The Gentle gradients of the tree bark and sharp edges of the leaf and water droplets provide for a good test image.

5: Over applying the low frequency ranges affects most of the image: The tree bark had colors rearranged, and the leaf's detail has turned into a yellow glow. Still, the sharp edges of the water droplets remain almost untouched.

6: The original photograph, with no sharpening or blurring.

7: Setting the 32 and 64 sliders to +25 percent provided the slight touch of midrange sharpening that this image needed. .

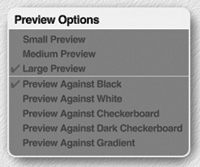
The Preview Panel, located near the middle of the screen, gives a live preview of how your photo will look using the plug-in's current settings. By clicking on the 
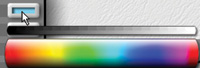
white arrow near the upper right corner of the Preview Panel, you can set preview options such as preview size and background color (#2).

The Preview Panel, along with all of the other panels on the screen (such as the Warp Parameters Panel in #1) can be moved to any area you like. To move a panel, hover your mouse over the panel's name, press down on the left mouse button, drag the panel to its new location, and release the left mouse button.

The Layout dots (located near the lower left in #1) can be used to save your current panels layout for use another time. The Recall dots, (located next to the Layout dots), can be used to save your current control settings for use another time. Click a gray dot to store your layout or panel settings, click a green dot to apply the settings previously stored in the dot, and press ALT while clicking any green dot to delete the dot's settings.

Blurring And Sharpening Images With KPT Equalizer

The KPT Equalizer filter offers a truly unique approach to blurring and sharpening images. Most photo editors provide several blur and sharpen filters (the most recent version of Photoshop contains 8 blur and 4 sharpen filters).

One of the reasons that so many filters are needed to perform similar tasks is that each filter works on a different visual frequency. Visual frequency refers to the contrast differences that we see as we view an image. Areas in which there are mild changes in contrast across a large portion of an image, such as a smooth skyline, have the lowest visual frequency. Areas in which there are pronounced changes in contrast, such as the edge of a face against a smooth skyline, have the highest visual frequency. Certain filters, such as the Photoshop "Sharpen More" filter, are designed to affect areas of lower visual frequency, while others, such as the Photoshop "Unsharp Mask" filter, are designed to affect areas of higher visual frequency.

Finding which filter or combination of filters is right for your photo can be a tedious and time consuming process. KPT Equalizer addresses this problem by combining 9 different visual frequency adjustment tools into a single interface, and then allowing each of these tools to apply a blur effect or a sharpen effect (#3-#7).
The "256" slider adjusts the lowest visual frequency areas, the "1" slider adjusts the highest visual frequency areas, and the remaining 7 sliders adjust the midrange visual frequency areas. Moving a slider in the positive range (moving it up) sharpens the image, moving a slider in the negative range (moving it down) blurs the image, and leaving a slider set to zero applies no changes to that slider's visual frequency range. Since you can set one or more sliders in the positive range while setting another slider or sliders in the negative range, KPT Equalizer has the unique ability to apply both sharpening and blurring effects from within the same filter interface.

8: The KPT Lens Flare's preset collection.

Adding Color And Flare With KPT Lens Flare

Lens Flares are one of the most popular effects in photography and videography. If you watch closely the next time you see a few television commercials, it's likely you'll see a lens flare in action.

Lens flares are used to simulate the effect of bright light reflecting off a camera lens. Since lens flare effects often occur naturally in photography, lens flares can give photos a more eye-catching look, without making them appear synthetic or unnatural (since lens flares are a natural visual phenomena).

9: The KPT Lens Flare's color picker.

Adobe Photoshop, Corel Photo-Paint, and just about every other major photo editor ships with a lens flare effect. In addition, there are several third-party lens flare plug-ins available. But, in my opinion, the KPT Lens Flare is the most powerful and easiest to use lens flare that you'll find.

The best way to start out using KPT Lens Flare is to select a preset that resembles the type of lens flare that you'd like to apply to your photo (#8-#11).

10: A photo enhanced with the KPT Lens Flare. The streaks are set to Anamorphic I (which provides a streak with considerable width and moderate height), and the reflection (seen in the blue and green dots of light extending diagonally from the flare) is set to Searchlight.

Once you've selected a preset, KPT Lens Flare makes a wide variety of tools available for customizing the effect. There are 5 KPT Lens Flare tool panels available:
· General: This tool panel is used to position the lens flare. You can also position the lens flare by clicking and dragging on it in the Preview window. You'll probably find the click and drag method to be more comfortable and intuitive than setting coordinates in the panel. You can also use the General Panel to adjust overall flare brightness, and to set its aspect ratio. An aspect ratio of 1.0 creates a perfect circle, but you may find that an aspect ratio in the area of 1.8 creates a more natural looking flare.

· Glow: The Glow Panel determines the color of the body of the lens flare and the surrounding areas. The Intensity slider is used to set the intensity of the body of the lens flare; the Scale slider is used to set the size of the lens flare and its glow areas. To change the color of any item in the Glow panel, click on the color block next to the item, and select a new color from the Color Picker.

11: This photo uses the Star Beams streak to create a star like flare, and the Anamorphic II reflection (seen in the yellow and orange reflections near the bottom right of the image).

· Halo: This panel is used to add a thin circle surrounding the lens flare. Two types of halos are available: Filled and Lenticular. Since Filled halos use a solid color and Lenticular halos use gradients, Lenticular halos generally produce a more convincing halo effect. As with all KPT Lens Flare panels, you can also control intensity and scale.

· Streaks: The Streaks panel controls the beams of light that originate from the center of the flare. Flares with streaks tend to be significantly more realistic looking than flares that do not use streaks. You can select from 14 different streak types, or create your own custom streaks. You can also rotate the streaks in any direction using the rotation slider.

12: The KPT Projector Tool panel.

· Reflection: The Reflection panel controls reflections that begin near the center of the flare and extend both above and below (or to the sides) of the flare. Reflections are another key item in creating a robust Lens Flare with a natural appearance. You can select from 8 different reflection types, and customize the reflection using the Intensity and Scale sliders. Unlike most KPT Lens Flare options, a color option is not provided for the Reflection Panel, since the reflected colors are based on the color of the Lens Flare and the naturally occurring colors in your photo.

13: A Simple 3D rotation created in KPT projector.

Creating Distortions Using The KPT Projector

KPT Projector is used to create translate, scale, and rotate effects, such as those available using the Photoshop Edit/Transform and Edit/Free Transform menu commands. Even when using Photoshop's most advanced transform, the Free transform option, you must still hold down various keys with one hand while performing transforms with your mouse using the other hand. KPT Projector makes the process much easier, by enabling all transforms from within a single tool panel (#12-#13).

As helpful as this is, convenience is not the true power of KPT Projector. The true power lies within Projector's 3D Rotate tool (the round button with cross arrows, on the far right of #12). The 3D Rotate tool is inspired by the 3D Camera tools in Corel Bryce. Bryce was the first 3D landscape tool ever created, and its interface was created by the same programmer/designer responsible for the KPT Collection, Kai Krause.

14: The KPT Collection Frax Flame Interface.

The beauty of using the 3D Rotate tool is that you can move your image in 3D without entering complex coordinates or having to learn complex tools. All you have to do is click and drag your mouse over the 3D Rotate tool, or click the 3D Rotate tool once and then click and drag in the Preview window, and your photo is rotated and the display immediately updated with the result.

The tool is so intuitive that there's really very little explanation required here. Simply click and drag upward, downward, left, right, or diagonally. My favorite effect is to click and drag to the right, and then click the tilting option on the Parameters panel. This instantly creates a 3D effect with a level of ease that I have not seen in any other similar program.

On the Parameters panel, there is a single slider; it's used to adjust "Focal Length." Focal Length sets the overall depth of the 3D effect. A setting of 1 produces the most pronounced effect; a setting of 5 produces the mildest effect. I've found that for most images, settings in the range of 1.6 to 2.0 create the most impressive effect.

Also note that on the Parameters panel, there are Standard and High Quality output options. If you're using a slower computer, you may prefer to use Standard while you're making adjustments. However, to produce the best quality end result, I recommend always using High Quality when you're done experimenting and ready to apply the adjustments you've made to your image.

There are a total of 24 filters in the KPT Collection. Time and space obviously inhibit a look at all of them. However, I feel this overview of the Equalizer, Lens Flare, and Projector filters will have given you an idea of the power of this software package, and provided the fundamentals needed to use it efficiently.

In this article I've focused on some of KPT Collection's photo editing filters, but no look at any KPT product would be complete without a quick glance at a KPT fractal filter. Fractal plug-ins have been present in KPT ever since Version 1. Fractals are images based solely on mathematical formulas, the beauty of working with fractals in KPT is that the interface hides the math from you, and replaces it with tools that enable those of us without doctorates in mathematics to work with these incredible images (#14).

KPT Collection is available from Corel Corporation via www.corel.com/kpt. Price: $99.99.

Tony Celeste appreciates feedback from his readers. You may contact him at aceleste@comcast.net.

X