- REVIEWS
Camera Reviews 
More Reviews Mobile Reviews Photography Reviews - GALLERIES
- VIDEOS
- BUYER'S GUIDES
Color Mismatches For Creative Effect White Balance Tips
There are many kinds of white light. At first this statement seems like it doesn’t make sense, but if you look closely at a typical light bulb in your living room (the old kind, not the new florescent type of bulbs) and compare it with, say, a daylight florescent fixture, the light bulb is much more yellow than the florescent light. Similarly, if you compare sunrise and sunset lighting to the light from an overcast sky at noon, the lighting from low angled sunlight is very yellow—it looks golden, in fact—and the cloudy sky produces a white light that is more bluish.
Photographic technology addresses these discrepancies in white light with the White Balance feature in our cameras. Our brain automatically makes the conversion, so to speak, but a mechanical tool isn’t as sophisticated and it can’t correct these color biases well. The Auto White Balance option attempts to do this, but it isn’t the panacea most people think it is.
To produce the colors that we see in a digital image, I recommend the following:
1. For most outdoor shooting, use Daylight White Balance. This includes sunrise and sunset.
2. When shooting in deep shade and on days when the sky has a deep overcast, use the Cloudy White Balance setting.
3. When shooting with tungsten lights, use the Tungsten White Balance option.
4. When shooting under florescent illumination, use Auto White Balance.
Not all cameras use the same terminology for these settings. For example, instead of Daylight White Balance your camera may use Sunny. Instead of Tungsten, the indication for you might be Indoors.
Why Mismatch?
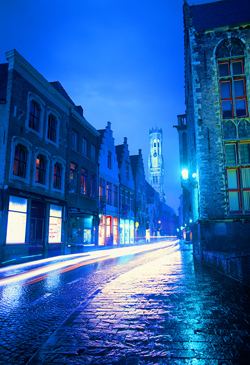
No one ever said that the color you capture in a scene has to match what you see. You are the artist and you can express yourself in any way you want. For example, the reason why photographers use the Cloudy White Balance setting in deep overcast is to mitigate the blue tone associated with this kind of light. However, blue tones can be beautiful, and there are many times when I purposely use the type of white balance in my camera that will bring out this kind of color. I photographed the Rogue River in Oregon at twilight just 10 minutes before dark (#1), and I used Daylight White Balance, not Cloudy WB, purposely to bring out the saturated cobalt blue you see here. Blue connotes cold, and that is certainly appropriate for this landscape.

All Photos © Jim Zuckerman
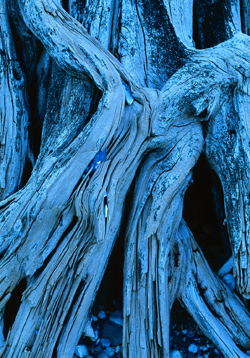
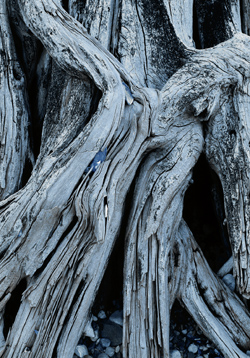
When I shot a decaying tree in Alaska (#2), the same thing happened. This wasn’t twilight, but it was deep shade. The cyan/blue color could be corrected using a Cloudy White Balance as shown in (#3). I happen to like both versions, but you can see how mismatching the White Balance setting with the ambient light gives you some creative possibilities.
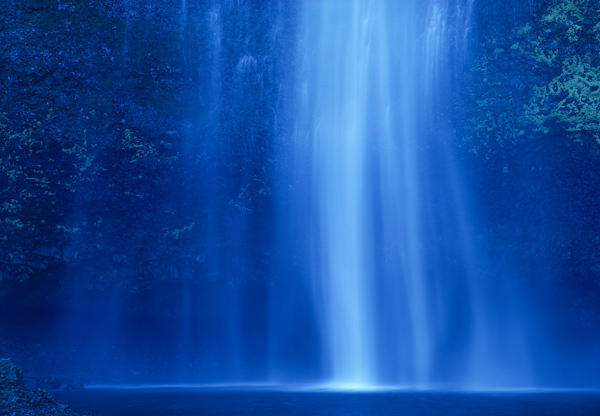
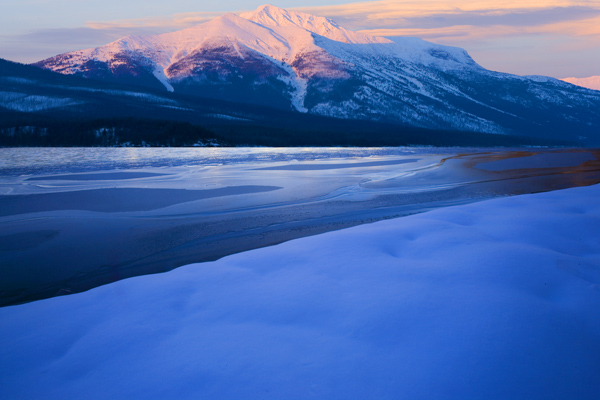
Many digital cameras give you the ability to vary the White Balance setting in very small increments. This is defined in degrees Kelvin. This is a temperature scale used in many scientific applications. 5500˚ on this scale is equal to the white light of a noon sun, while 3200˚ is the light seen in a living room light bulb. Deep shade and twilight are around 7000-8000˚ Kelvin. By scrolling up or down this scale, you can tweak the color bias of your pictures. When shooting in daylight, if you want the images to be warmer, or more yellowish, choose a higher Kelvin temperature such as 6500 or 7000 like I did in the portrait of a young girl (#4). If you want to make a picture bluer, such as the waterfall in (#5), lower the Kelvin temperature. The lower the number, the bluer the picture will be.

Mixed Lighting
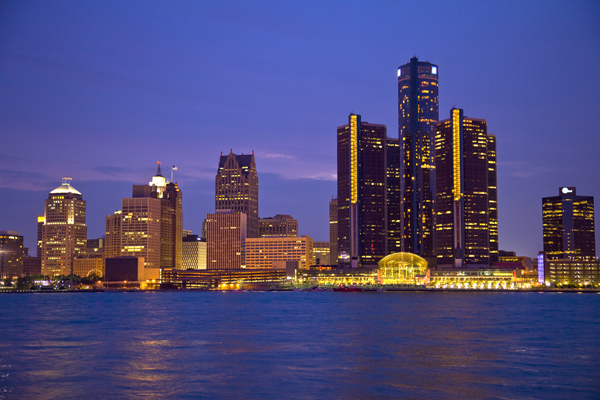
When shooting cityscapes at twilight or night, such as the Detroit skyline (#6), you are dealing with mixed lighting. The diminished light in the sky behaves like deep shade and becomes cobalt blue on Daylight White Balance, but at the same time the tungsten and florescent lights seen inside the windows of the buildings photograph more yellowish than if you had used a Tungsten White Balance. I prefer using Daylight WB for cityscapes at this time of evening, but sometimes to vary the colors in my images I will use a Tungsten White Balance. Note the colors in (#7). The lights in the storefronts as well as the traffic have lost their yellowish tone, and the image is primarily blue.
In landscape work there are also issues with mixed lighting. When the sun is on or close to the horizon, the lighting is red/yellow. After sunset or before sunrise the sky is more magenta. If you include deep shade in the frame, such as (#8), and Daylight White Balance is selected, the shaded portions of the composition will be quite blue while the sunlit areas will be somewhere in the vicinity of reddish, yellow to magenta—depending on the atmospheric conditions and how low the sun is in the sky. I think these colors enhance outdoor work and make images a lot more interesting and a lot more artistic even though they don’t duplicate what we see with our eyes.
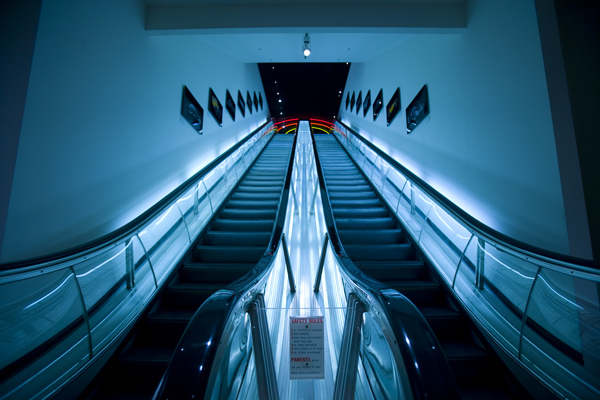
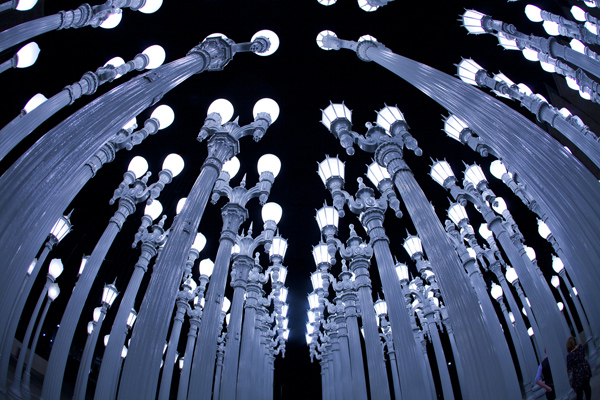
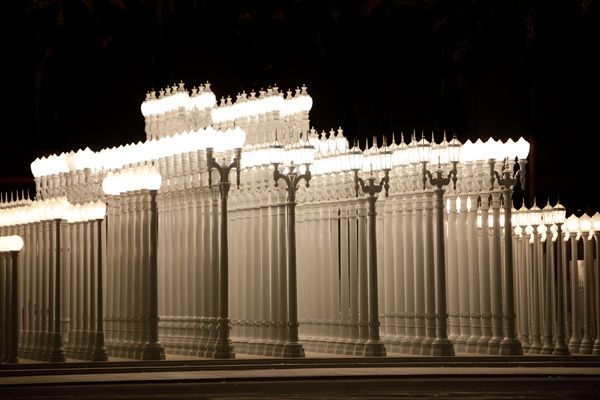
In the past, when we all shot film, florescent illumination had a blue/green colorcast unless a special filter was used (a magenta FLD filter). Today, Auto White Balance does a sensational job at giving us true colors under this type of light. However, sometimes the harsh, even garish light of florescent fixtures isn’t attractive at all, and a more “artistic” interpretation is called for. This is what I did when I photographed an escalator in the Petersen Automotive Museum in Los Angeles (#9). I used a Tungsten White Balance (or 3200 K) to achieve this effect. I used the same technique in shooting 1920’s era streetlights in front of the Los Angeles County Art Museum (#10). The blue tones appeal to me, but for a different look I photographed them from across the street using Daylight White Balance (#11), and the effect created another type of mood altogether.
Raw Converter
If it didn’t occur to you to experiment with the White Balance setting during a photo shoot, you can tweak the color bias of your images in post-processing if you shoot in Raw mode. If you shoot in JPEG mode, you can use Photoshop or Elements to do some manipulation of color, but you have limited control over the color temperature. For example, if you shoot a daylight scene on tungsten to purposely make it blue, with a JPEG file you can’t tweak the color as if you had originally shot it with Daylight White Balance. However, if the file were captured as Raw, then using the temperature slider in either Adobe Camera Raw or Lightroom affords you the opportunity to work with the color temperature as if you were in the field.


![]()
Get the Latest Photo Tips, News & Reviews from Shutterbug!
| Camera Reviews Other Reviews | Mobile Reviews Photography Reviews Columns | News | Features | How-To | Resources |
 © 2026 Shutterbug
AVTech Media Americas Inc., USA
All rights reserved